Creating a virtual machine
A virtual machine (VM) is a software system that emulates the operation of a physical server. VMs are created and run on VMmanager cluster nodes. Each VM runs in an isolated environment and does not affect the other VMs on the node.
The platform supports two ways to create VMs:
- based on the recommended configuration — uses a ready-made set of resources and settings that can be changed if necessary;
- from an image — a VM disk image is used.
When creating a VM, consider the free resources on the cluster nodes. A VM will be created even if it uses all node resources.
Creating a VM based on the recommended configuration
To create a VM:
- Enter Virtual machines → Create a VM → Recommended configurations tab.
- Select the Cluster in which the VM will be created.
- Select the Operating system to be installed on the VM. To create a virtual machine without an operating system, click Without OS.
- Select a method for uploading the image:
- From repository;
- Local file — select the image file in iso format on your local computer;
- Image URL — enter the URL where the ISO image is available. The image can be available via HTTP(S) or FTP.
- To upload from a local file or URL:
- Select the OS type:
- Linux;
- Windows;
- FreeBSD;
- Other OS.
- Specify the Image tags for the connected OS if this VM needs to run scripts. The script will run on the VM if at least one of its tags matches the OS tag.
- Select the OS type:
- To avoid booting the VM from the image after connecting, disable the option Boot virtual machine from the ISO.
Click Upload image. If this is the first ISO image to be attached to this VM, it will be rebooted.
- To create a VM with the ISO image attached:
- Click Select an ISO image.
- Select a method for uploading the image:
- From repository — select the image from the connected repository;
- Local file — select the image file in iso format on your local computer;
- Image URL — enter the URL where the ISO image is available. The image can be available via HTTP(S) or FTP.
- To upload from a local file or URL:
- Select the OS type:
- Linux;
- Windows;
- FreeBSD;
- Other OS.
- Specify the Image tags for the connected OS if this VM needs to run scripts. The script will run on the VM if at least one of its tags matches the OS tag.
- Select the OS type:
- To avoid booting the VM from the image after connecting, disable the option Boot virtual machine from the ISO.
Click Upload image. The VM will be created from NoOS template with the ISO image attached.
- Select the VM Resources from the list. To create your own configuration, click Custom configuration and specify its parameters. For the description of the parameters, see VM configurations.
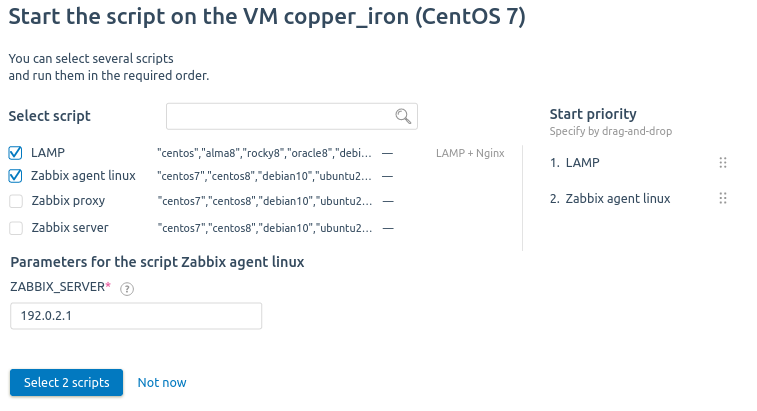
- Select the Applications and scripts that will run on the VM after the operating system is installed. Read more in Creating a script for the VM.
If an email template has been created for the selected script, you can enable the Send the email associated with the script option, select the language of the email and specify the recipient. Read more in Email templates in scripts.
To select multiple scripts:- Click Select another or several.
- Select the required scripts.
- Specify the script parameters.
- Select the order in which you want the scripts to run in the Start priority column. To change the priority, drag the script name to the required position.
- Click Select .. scripts.
- Select the cluster Node to host the VM. If you select the Automatically option, the platform will detect the node taking into account the VM distribution settings in the cluster and the distribution filters. Read more in Selecting a cluster node for the virtual machine and Managing servers in the cluster. If the VM configuration does not match the distribution filters for the cluster nodes, the creation of the VM will end with the error "Cannot find node with matching host filter program". In this case, select the node for the VM manually.
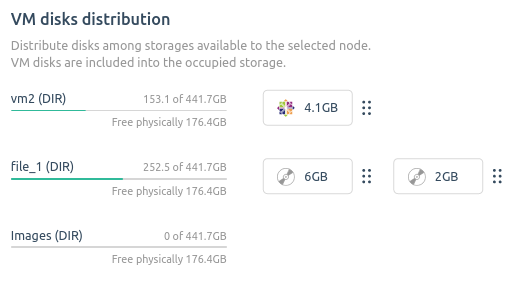
- If the cluster node was manually selected, configure VM disks distribution in storages of the cluster node. To change the location of the disk, drag it to the required storage location.
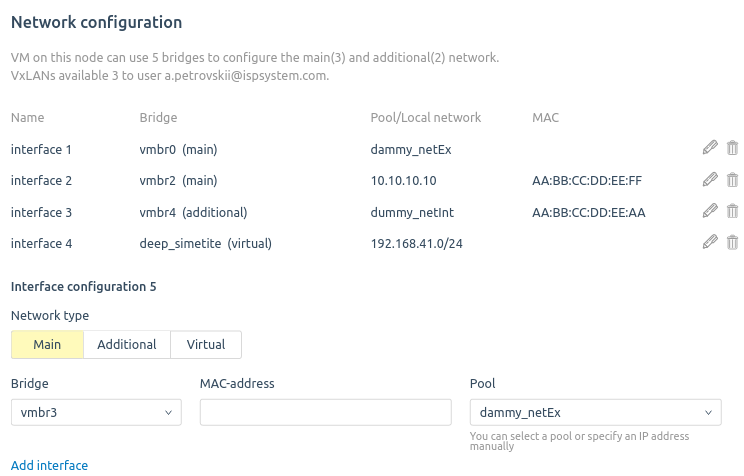
- Set the Network configuration for each VM interface. To change the settings for the main interface, click
 . To configure an additional interface, select its settings and click Add interface. To delete an interface, click
  .
.
Network interface settings:- Network type:
- main;
- additional — available for clusters with two network interfaces. Read more in Main and additional network;
- virtual — if a virtual network is available in the cluster. Read more in Virtual networks (VxLAN).
- Bridge — the network bridge used on a cluster node. Each bridge can only be used in one virtual interface. Read more in Network setting on the cluster node;
- MAC-address;
- Pool — the pool of IP addresses from which the address will be assigned to the virtual machine. To set a specific IP address, select the Allocate IP option and enter the address;
- Local network — a local network in a virtual network.
- Network type:
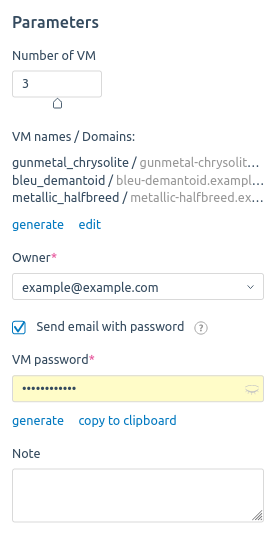
- Set the VM Parameters:
Select the Number of VM — from 1 to 5:

You cannot create more than one VM at a time with an ISO image attached.
- when creating a single VM:
- Specify a VM name or click generate to automatically create a new one.
- Specify the Domain for the VM. A domain must have at least two parts separated by a dot. For example, example.com.
- If two to five VMs are created, their names and domain names will be generated automatically. Click generate to automatically generate new names, or click еdit to enter names and domains manually.
- when creating a single VM:
- Select the VM Owner.
- To have the platform send an email with access details to the VM owner, enable the Send email with password option.
- Enter the VM password or click generate to automatically create a new password. You can copy it to clipboard.
- Add a discretionary Note.
- Click Create a VM.
Creating from an image
Before creating a VM, prepare the required image. Read more in Creating a disk image.
If the source image was created with an OS installed from an ISO image, then specifying network settings during VM creation will not be available.
To create a VM:
- Enter Virtual machines → Create a VM → VM images tab → select an image from the list.
- To create a linked clone, enable the create as linked clone option.
- If you need to change the configuration, specify:
- vCPU — number of vCPUs, pcs;
- RAM — RAM size, MB;
- Storage — disk storage size, GB.
- Select the VM Owner.
Enter the VM password or click generate to automatically create a new password. You can copy it to clipboard.

If a custom answer file was used when creating the Windows OS image, the VM password field will not be displayed. The VM will be created with the password from the answer file. Read more in the article Answer files for OS Windows images.
- To have the platform send an email with access details to the VM owner, enable the Send email with password option.
- Select the cluster Node to host the VM. With the Select automatically option, the platform will determine the node taking into account the VM distribution settings in the cluster and the distribution filters. Read more in Selecting a cluster node for the virtual machine and Managing servers in the cluster. If the VM configuration does not match the distribution filters for the cluster nodes, the creation of the VM will end with the error "Cannot find node with matching host filter program". In this case, select the node for the VM manually.
- If the cluster node was manually selected, select Storages for VM disks.
- Specify the settings of the main and additional networks for the VM. To disable the network interface, click Do not use.
Network interface parameters:- Bridge for interface — the network bridge used on the cluster node. Each bridge can only be used in one virtual interface. Read more in Network setting on the cluster node;
- Pool — the pool of IP addresses from which the address will be assigned to the virtual machine. To set a specific IP address, select the Assign IP option and enter the address.
- To add an interface, click Configure network → Add interface and specify its parameters:
- Bridge for interface.
- MAC-address.
- Pool or a specific IP address.
- If a virtual network is available in the cluster, you can select its parameters. To do this, click Use network and specify:
- Virtual network name.
- Local network name.
- To add a virtual interface, click Configure network → Add interface and specify its parameters:
- Virtual network name.
- Local network name.
- Specify the Number of VM — from 1 to 5:
- when creating a single VM:
- Specify a VM name or click generate to automatically create a new one.
- Specify the Domain for the VM. A domain must have at least two parts separated by a dot. For example, example.com.
- If two to five VMs are created, their names and domain names will be generated automatically. click generate to automatically generate new names, or click edit to enter names and domains manually.
- when creating a single VM:
- Click Create.
Access to a virtual machine
If the Send email with password option was enabled during VM creation, the platform will send an email with credentials to the VM owner.
The user name for connecting to the VM is taken from the OS template. Default values:
- for Unix family OS — root;
- for Windows family OS — admin or administrator.
Parallel VM creation
The platform can create multiple VMs simultaneously. There is a restriction on parallel creation of VMs with the same OS group on one cluster node. By default, no more than five such VMs can be created simultaneously. To change this value:
- Get the authorization token:
curl -k -X POST -H "accept: application/json" -H "Content-Type: application/json" 'https://domain.com/auth/v4/public/token' -d '{"email": "admin_email", "password": "admin_pass"}'CODEComments to the commanddomain.com — domain name or IP address of the server with the platform
admin_email — platform administrator's email
admin_pass — platform administrator's password
In response, you will get the message in the form:
Example of response in JSON
{ "confirmed": true, "expires_at": null, "id": "6", "token": "4-e9726dd9-61d9-2940-add3-914851d2cb8a" }CODESave the received token value.
Perform the API request:
curl -k -H "x-xsrf-token: <token>" -X POST "https://domain.com/vm/v3/setting/max_concurrent_host_create_tasks_per_node" -d '{"value":"<max_number>"}'BASHComments to the command<token> — authorization token
domain.com — domain name or IP address of the server with the platform
<max_number> — maximum number of VMs
Increasing this parameter will increase the load on the platform and cluster nodes.