Managing servers in the cluster
A cluster is a group of servers in a single location. The key feature of such servers (cluster nodes) is their location and high data transfer speed between them.
You can set up your own scripts to run automatically when the server is connected to the cluster. Read more in Creating a script for the node.
Server connection
Before connecting, make sure that the server meets the requirements for the cluster.
When the server connects to the LXD cluster, all information in the node's ZFS pool will be deleted.
Perform the following steps to connect a server to the cluster:
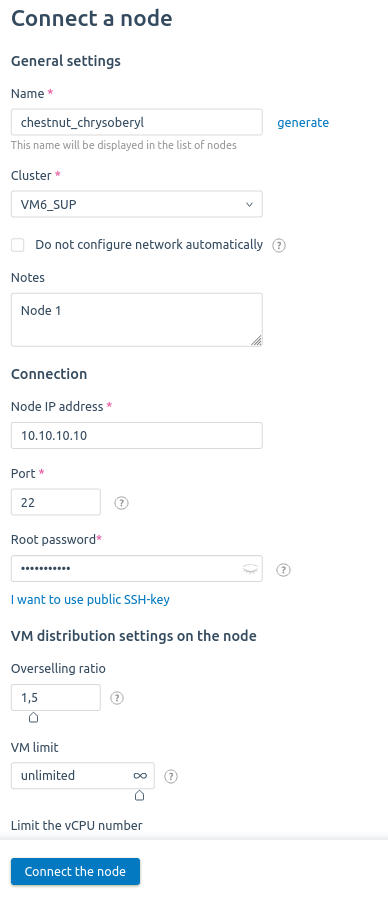
- Go to Cluster nodes → Connect a node.
- Enter a cluster node Name.
- Select a Cluster that the server will be connected to.
To prevent VMmanager from creating a default bridge on the node, enable the Do not configure network automatically option. Learn more in Network setting on the cluster node.

Enable this option if:
- you plan to use the VLAN interface for the server IP;
- the server has a non-standard network configuration — there is no single interface for all traffic to pass through.
After connecting the node, you will be able to manually configure the necessary network settings.
- Enter additional information into the Notes field.
- Enter a server IP address and Port to connect via SSH. The default port is 22.
- Enter the User. It is recommended to use root for correct operation of the node.
Enter the server User password or add a public SSH-key of the server with VMmanager. To do so, click on I want to use a public ssh-key, copy the key, and add it into the file /root/.ssh/authorized_keys on the server.

If you specify a SSH root password, VMmanager connects to the server with this password and add the platform's public SSH key to the list of authorized keys. Next time to connect to the storage, VMmanager will use only the SSH key.
- Enter the RAM Overselling ratio. Learn more in Overselling.
- Select VM limit. When the limit is reached, the creation and migration of virtual machines on the node will be forbidden. If the limits are not set, the virtual machines can be created unless there are sufficient resources on the node.
- Select vCPU limit — the maximum number of vCPUs that can be allocated to VMs on this node. The default value of the parameter is the number of CPUs on the server multiplied by the overselling ratio.
- Specify the VM parameters that will be created on the cluster node. For details, see the VM distribution settings section.
- If you are connecting the server to a cluster with IP-fabric type, specify an IPv6 address for configuring networks.
- If you connect the server to the cluster with the "Routing" network configuration type, enter the IP for new VM. You can enter single IP addresses, or a mask. Enter every IP address from a new line.
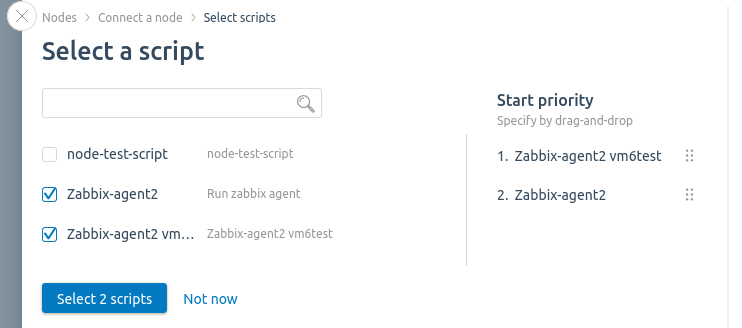
- Select the scripts to be executed when the node is connected:
- Press Select scripts.
- Mark the desired scripts in the list.
- Select the order in which the scripts will be executed in the Start Priority column.
Press Select ... scripts.

If the Autorun on clusters option is enabled in the script settings, you cannot disable the script and change the priority. Read more in Creating a script for the node.
- Click on Connect the node.
- If you have selected a cluster with two network interfaces, specify the Interface for the main network and/or the Interface for the additional network. Read more in Main and additional network. Press Continue.
Example of server connection
The system will install the required software and configure the server.
To increase the number of possible network connections, VMmanager changes the values of net.nf_conntrack_max and net.netfilter.nf_conntrack_max parameters to 1048576 on the cluster node. Read more in How to change netfilter parameters?
Cluster node dashboard
To view information about a cluster node, open its card: go to Nodes section → select the node. The cluster node card displays:
- node status;
- virtualization type — KVM or LXD;
- CPU — CPU load;
- RAM — RAM used;
- Storage — disk space used;
- overselling ratios;
- information about connected storages;
- Total VMs — total number of VMs on the node;
- number of VMs with a certain status;
- Estimated number — maximum possible number of VMs. The value is calculated dynamically and depends on available node resources;
- cluster name;
- operating system;
- IP-address of the node;
- Uptime — time of continuous node operation;
- Services — services running;
- note.
Possible node statuses:
| Status | Description |
|---|---|
| Connected | The node is in working order |
| Preparing the node | The platform prepares the node for connection |
| Virtualization settings | Virtualization software is installed on the node |
| Monitoring settings | A monitoring system is installed on the node |
| In maintenance mode | The node is in maintenance mode |
| Corrupted | The software on the node is not working correctly |
| Inaccessible | The platform cannot connect to the node |
| Deleted | Node deleted |
In a high availability cluster, nodes can assume the following statuses:
- serviceable:
- Master node — the node is serviceable and has been selected as the master;
- Active — the node is serviceable and is a participant or in an intermediate running state (master selection or waiting for an update);
- non-serviceable:
- Network isolation — the node is not accessible via the network, but the node has access to the storage. The status is set if the node is unavailable to ha-agent services on other nodes in the cluster;
- No connection with storage — the node has no access to the storage, but remains accessible via the network;
- Unavailable — the node is unavailable via the network and has no access to the storage. The status is set if the platform does not have access to the node;
- Excluded from HA cluster — the node is unavailable via the network, but has access to the storage. The node's VMs are temporarily excluded from the cluster and are not migrated;
- special:
- Unknown status — the exact status of the node is unknown. For example, high availability is in the process of being enabled;
- Error enabling HA — the task of enabling HA on the node failed.

Cluster node dashboard interface
To view detailed information about a node, click the Parameters button in the node card.
Reconnecting a node
If the software on a node does not work correctly, the platform sets the status "Corrupted" for it. You can reconnect the problem node. To do this:
- On the server with the platform, examine the connection error log file /var/log/node_create/{node_id}.log. Fix the problems that prevent you from adding a node.
- In the Nodes section, in the row with the problem node, click the message in the Status column → Reconnect node button.
Change connection settings
If the IP address and/or SSH port on the cluster node has changed, VMmanager will lose connection with the node. To reconnect:
- Go to Nodes → select a node →
 menu → Change connection settings.
 - Specify the Node IP address.
- Specify the SSH port.
- Click Connect to node.
VM distribution settings
When creating a VM, the platform selects the cluster node with the most suitable distribution settings. For example, you can configure the settings so that only VMs with a certain amount of RAM or Storage are created on the node.
To configure distribution settings:
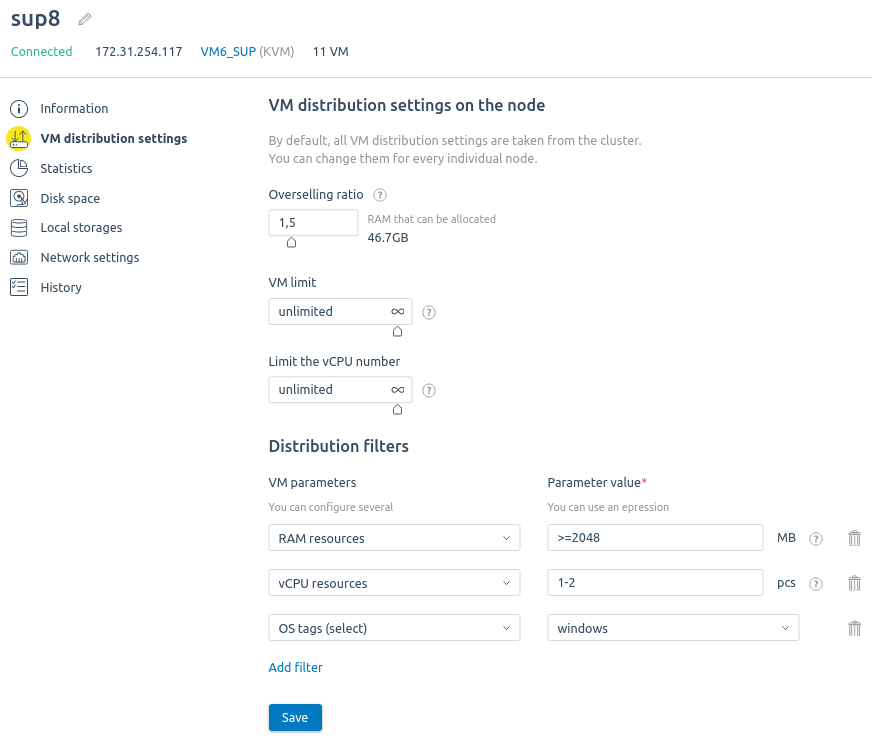
- Enter Nodes → select the node → VM distribution settings.
- Enter the RAM оverselling ratio. Read more in Overselling.
- Specify the VM limit — the maximum number of VMs on the node.
- Specify the Limit the vCPU number — the maximum number of vCPUs that can be allocated to VMs on this node.
- Select VM parameters for distribution filters:
OS tags — operating system template tags;
Some VMs may not have OS tags. For example, if the VM is created without an OS or from an ISO image. For such VMs, filters work as follows:
- if the filter checks for a match with a tag, the VM cannot be placed on this node;
- if the filter checks for a mismatch with a tag (the filter value is set in "!some_tag" format), the VM can be placed on this node.
- Configurations — the names of configurations;
- RAM resources — the amount of RAM;
- Storage resources — the volume of the disk;
- vCPU resources — the number of virtual CPUs;
- Complex filter — a condition with several parameters.
When entering conditions, use the filter syntax. If you want to set an additional condition, press Add filter. To delete a condition, press .
.
- Press Save.
Example of setting distribution filters
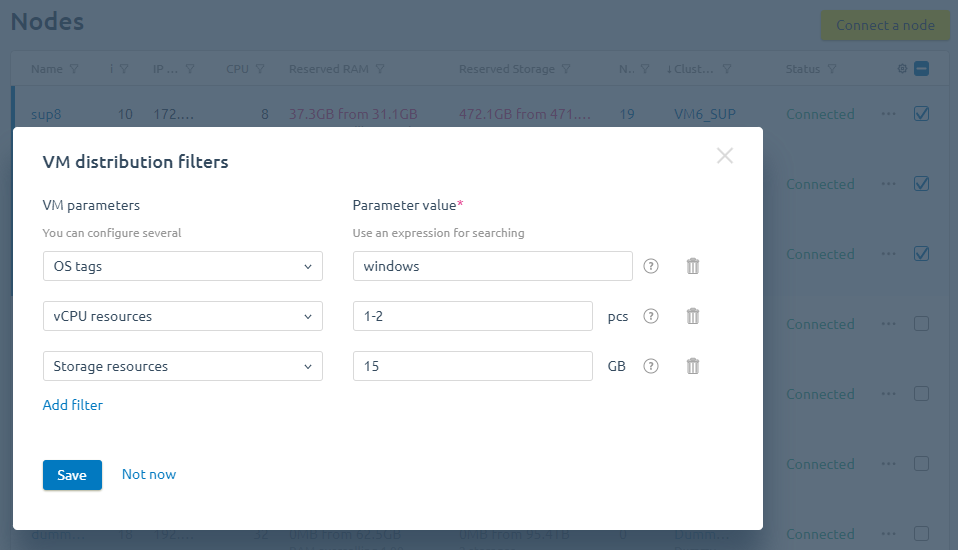
To configure VM distribution on multiple nodes of a cluster:
- Enter Nodes → select the nodes.
- On the bottom menu, press VM distribution settings.
- In the window that opens, configure the VM distribution filters.
- Press Save.
Example of setting distribution filters
Forbid users to create VMs on a cluster node
To prevent users from creating virtual machines on a cluster node:
- Go to Cluster nodes → menu → Prohibit VM creation.
- Click on Confirm.
To cancel the settings:
- Go to Cluster nodes → menu → Allow VM creation.
- Click on Allow.
Useful tips
Related topics:- Creating a script for the node
- Server requirements for the cluster
- Main and additional network
- Network setting on the cluster node
Knowledge base articles: