Configurations of virtual machines
VM configuration is a set of resources for creating a virtual machine. Learn more in the article Creating a virtual machine.
The available configuration options depend on the virtualization technology: KVM or LXD.
You can only restrict connections for VMs on cluster nodes running AlmaLinux 8 and Ubuntu 20.04.
Add configuration interface
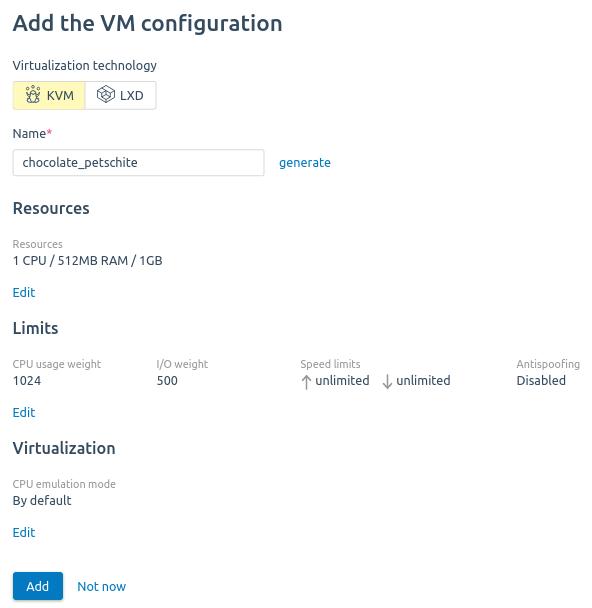
Configuration for KVM cluster
To create a configuration:
- Go to Templates → VM configurations → Add configuration.
- Select the Virtualization technology — KVM.
- Enter a configuration Name.
- To allow SPICE connections to the VM, activate the Enable SPICE connections option.
- To specify VM resources:
- Click Edit in Resources section.
- Select values:
- vCPU — the number of CPU.
- RAM — RAM in MB.
- The size and tags of the main disk storage. The platform will display a list of available storage in the line below. Read more about tags in Selecting storage for VM disks.
- If the VM should have more disks, click Add disk and specify the parameters of additional disks. To delete the disk settings, click
 .
.
- Click Save.
- To specify VM limits:
- Click Edit in Limits section.
If the VM requires adding vCPU and RAM without rebooting, enable the Increase CPU and RAM values without rebooting option.
- If the VM requires increasing disk size without rebooting, enable the Increase disk size without rebooting the VM option.
Select values:
- Inbound traffic speed, Mbps.
- Outgoing traffic speed, Mbps.
- CPU weight — CPU usage priority. Values range from 128 to 10000. For example, a VM weighing 2048 will access the CPU twice as often as a VM weighing 1024.
- I/O usage weight — input/output operations priority. Values range from 100 to 1000. For example, a VM with the I/O weight of 200 will perform read and write operations to disk twice as often as a VM with the weight of 100.
- Read speed, IOPS.
- Write speed, IOPS.
- Read speed, Mbps.
- Write speed, Mbps.
- Incoming TCP-connections.
- Outgoing TCP-connections.
- Antispoofing settings:
- Antispoofing enable/Antispoofing disable switch — enable or disable protection against network attacks using the IP-spoofing method;
- Tagged traffic is permitted/Tagged traffic is not permitted switch — allow or deny traffic with the VLAN tags.
To restrict access to certain VM ports:
Click Add.
Specify the restriction settings:
Traffic direction — the type of connection: incoming or outgoing.
Port numbers.
To add a setting, click Add more. To delete settings, click
.
Click Add.
- To choose virtualization parameters:
- Click Edit in Virtualization section.
Choose CPU emulation mode — VM CPU specification defining method:
- By default — QEMU virtual CPU is emulated;
- Host-model — the emulated CPU will have the same function flags as the cluster node CPU;
Host-passthrough — the emulated CPU will exactly match the CPU on the host machine cluster node and have the same function flags. This emulation mode provides better performance and may also be mandatory for some applications. Migration of such virtual machine is possible only to the fully matching CPU.

If the OS template contains the cpu_mode parameter, the VM will be created with the emulation mode specified in this parameter. For more information about template parameters, see the OS templates repositories article.
- To change snapshot settings:
- Click Edit in Snapshot settings section.
- If you need to save the RAM state for snapshots, enable the Allow saving RAM status option.
- Set the VM snapshot limit.
- Click Save.
- Click Add.
Configuration for LXD cluster
To create a configuration:
- Go to Templates → VM configurations → Add configuration.
- Select the Virtualization technology — LXD.
- Enter a configuration Name.
- To specify VM resources:
- Click Edit in Resources section.
- Select values:
- vCPU — the number of CPU.
- RAM — RAM in MB.
- Storage — disk space in GB.
- Click Save.
- To specify VM limits:
- Click Edit in Limits section.
Select values:
- Inbound traffic speed, Mbps.
- Outgoing traffic speed, Mbps.
- Network weight — The more the weight is the more time is allocated for processing requests. Values range from 1 to 10.
- CPU weight — CPU usage priority. Values range from 0 to 10. For example, a VM weighing 10 will access the CPU twice as often as a VM weighing 5.
- I/O usage weight — input/output operations priority. Values range from 0 to 10. For example, a VM with the I/O weight of 10 will perform read and write operations to disk twice as often as a VM with the weight of 5.
- Read speed, IOPS or Mbps.
- Write speed, IOPS or Mbps.
- Incoming TCP-connections.
- Outgoing TCP-connections.
- Antispoofing settings:
- Antispoofing enable/Antispoofing disable switch — enable or disable protection against network attacks using the IP-spoofing method;
- Tagged traffic is permitted/Tagged traffic is not permitted switch — allow or deny traffic with the VLAN tags.
To restrict access to certain VM ports:
Click Add.
Specify the restriction settings:
Traffic direction — the type of connection: incoming or outgoing.
Port numbers.
To add a setting, click Add more. To delete settings, click
.
Click Add.
- To choose сontainerization parameters:
- Click Edit in Containerization parameters section.
- If needed, enable the Nested Containerization option. The option allows you to create containers within a container using Docker, Podman, LXC and other tools.
- Click Add.
Useful tips
Related topics: