Virtual networks (VxLAN)
IaaS (Infrastructure-as-a-Service) is a computing infrastructure that is provided to customers to deploy and run their own software solutions. As an IaaS solution, VMmanager allows you to provide users with virtual machines combined into overlay networks. The platform uses VxLAN, EVPN and Route Reflector technologies to set up networks.
VxLAN (Virtual Extensible LAN) is a network virtualization technology used in large cloud computing systems. Compared to VLAN, this technology allows you to create a larger number of networks and has more flexible settings.
VMmanager uses virtual distributed network switching technology to support VxLANs on all nodes of the cluster. This allows VxLANs to be created on the nodes in the cluster where they are needed.
For VxLAN operation on the cluster nodes, open the ports 179/tcp, 4789/udp.
In the current version, a virtual full mesh network is available.
Full mesh is a network topology in which network nodes are connected to each other and can act as a switch for the other members. The network will only be available to VMs that have been added to it.

Full mesh network has high fault tolerance. A large number of links provides a wide choice of traffic routes within the network. When added, each node in the network automatically receives information about all other nodes and defines its role. If one node in the network fails, network routes are automatically redefined and the other nodes do not lose communication with each other.
- Route Reflector – with the help of equipment that transmits iBGP routes information.
A VxLAN in VMmanager is created for a specific platform user. Other users will not be able to access this network.
Cluster configuration
Virtual networks can be used in clusters with KVM virtualization and the network configurations of Switching and IP fabric.
No more than 10 nodes can be added to a cluster with virtual networks and the Switching network configuration type. Virtual networks will only be available within that cluster.
To enable the use of virtual networks in a cluster:
- Activate the Enable virtual networks option when creating the cluster.
- Select one of the configuration types:
- Full Mesh. No more than 10 nodes can be added to the cluster. Virtual networks will only be available within that cluster.
Route Reflector:
If the IP-fabric network configuration type is selectedAll virtual network settings are copied from the IP-fabric network settings.
If the Switching network configuration type is selectedSpecify settings for virtual networks:
- To configure the IPv4 network, activate the Enable BGP sessions for IPv4 option and specify session settings:
- The BGP Autonomous system number.
- BGP community for IPv4.
- Neighbor IPv4 and the number of the Autonomous system for the Route Reflector.
- Add a discretionary Comment.
- To specify settings for more equipment, press Add more sessions for IPv4.
- To configure the IPv6 network, activate the Enable BGP sessions for IPv6 option and specify session settings:
- The BGP Autonomous system number.
- BGP community for IPv6.
- Neighbor IPv6 and the number of the Autonomous system for the Route Reflector.
- Add a discretionary Comment.
- To specify settings for more equipment, press Add more sessions for IPv6.
- To configure the IPv4 network, activate the Enable BGP sessions for IPv4 option and specify session settings:
To enable virtual networks in the created cluster, enter Clusters → select the cluster → Virtual networks → select the Full mesh configuration network type → Enable.
To disable the use of virtual networks in a cluster:
- Release all IP addresses used by the virtual networks in this cluster.
- Enter Clusters → select the cluster → Virtual networks → Settings → select Disable → Save.
Managing virtual networks
Under an administrator account
The administrator can manage all created virtual networks. Enter Networks → Virtual networks → All networks.
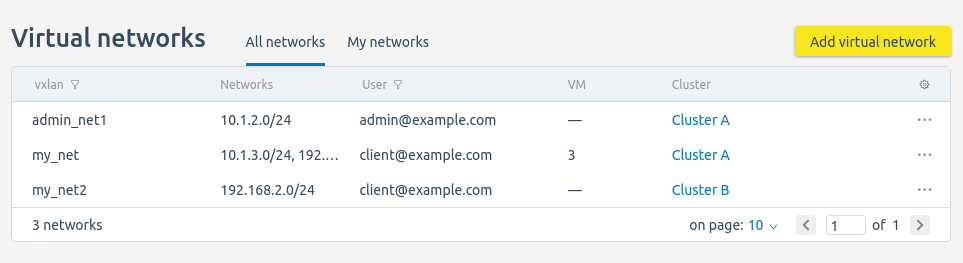
Section interface
To create a network for another account:
- Press Add virtual network.
- Specify the network parameters:
- Select the network Owner.
Select or create a VxLAN.
To select an existing VxLANpress Select → select VxLAN Name.
To create a new VxLANpress new → enter VxLAN Name → select a cluster for network.
- Select one or more clusters to connect to the virtual network.
- Specify the Network in the format <network address>/<network mask prefix>. For example, "10.10.10.0/24".
- Specify the Gateway address for the network.
- Press Add.
You can create an additional local network for the virtual network. To do this:
- Select the virtual network →
 menu → Add local network.
 - Enter the network parameters:
- Specify the Network in the format <network address>/<network mask prefix>. For example, "10.10.11.0/24".
- Specify the Gateway address for the network.
- Press Add.
To change the virtual network settings, select the network → ![]() menu → Edit.
menu → Edit.
To delete a virtual network:
- Release all IP addresses on this network that are in use.
- Select the network → menu → Delete.
In Networks → Virtual networks → My networks you can create a virtual network for your own account. To do this:
- Press Add virtual network.
- Specify the network parameters:
- Name.
- Select the Cluster in which the network will operate.
- Specify the Network in the format <network address>/<network mask prefix>. For example, "10.10.10.0/24".
- Specify the Gateway address for the network.
- Press Add.
You can also manage virtual networks in the cluster card. Enter Clusters → select the cluster → Virtual networks.
Under a user account
The platform user can manage his virtual networks in the Virtual networks section.
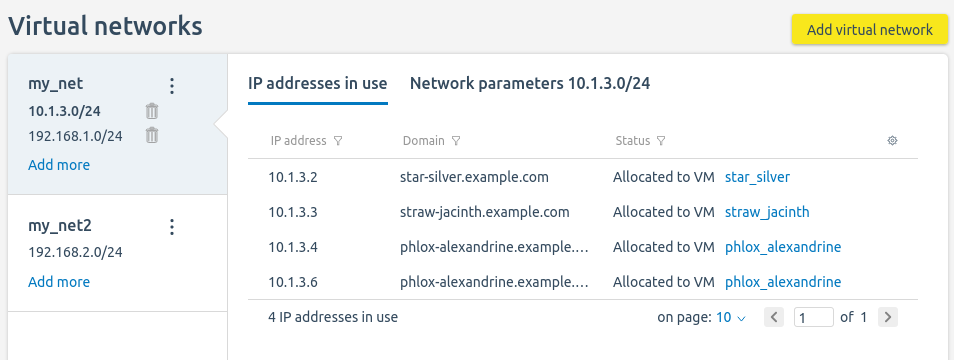
Section interface
On the left side of the window, you can select the network to view and edit the settings. The Add more link allows you to create an additional local network for the virtual network.
The IP addresses in use tab displays the network addresses assigned to VMs.
The Network parameters tab displays information about the network and gateway. The user can edit these parameters if all network addresses are free.
When adding a virtual network, the user specifies its parameters:
- Name.
- VM group — all VMs from the cluster in which the network will operate.
- Network in the format <network address>/<network mask prefix>.
- Network Gateway address.
Configuring the network on the VM
For the platform to assign a new VM an address from a virtual network, when creating a VM, press Use network in the Virtual network section and select the network.
To add IP addresses from the virtual network to the created VM, enter Virtual machines → select the VM → IP addresses → Add an IP address → select the virtual network and number of IP addresses → Add.
If there is no communication between VMs
If cluster nodes are in different L2 networks and VMs on these nodes cannot connect to each other, configure the frr service:
- Connect to the cluster nodes via SSH.
Run the command:
vtysh -E << EOF conf ip nht resolve-via-default end copy running-config startup-config EOFBASHRestart the frr service:
systemctl restart frrBASH
Configuring the sale of virtual networks
You can configure the sale of virtual networks with BILLmanager:
- Go to BILLmanager and create a processing module for the Virtual networks product type.
- Create a tariff and enable the created processing module for it.
- Configure the add-on for the created tariff.
For more information about configuration, see the Virtual networks section of the BILLmanager documentation.