Migration of virtual machines
Migration is the transfer of a virtual machine (VM) to another node. VMmanager allows you to migrate VMs both within one cluster and to another cluster.
There are two types of migration:
- without VM stopping (live migration) — VM remains available during migration;
- with VM stopping — VM is unavailable for the time of migration.
Migration restrictions
For all types of migration
Migration cannot be performed if:
- the source node and the destination node use different types of virtualization. For example, the source node is in a KVM cluster and the destination node is in an LXD cluster;
- the source cluster has the Routing network configuration type;
- for a VM with Windows IP address adding model, QEMU Guest Agent is not installed;
- the VM uses a Route Reflector VLAN, which is not present in the destination cluster;
- high availability is configured in the source cluster or the destination cluster.
For migration to a different cluster
Migration cannot be performed if:
- a Full Mesh VLAN has been created on the VM;
- clusters have different types of network configurations;
- source node and destination node have operating systems from different Linux families. For example, the source node has Red Hat and the destination node has Debian;
- VM disk is in NAS storage and migrates to storage other than file storage.
If you migrate a VM with the Enable SPICE connections option to a cluster where SPICE connections are not allowed, the option will remain enabled, but SPICE connections will be unavailable.
For live migration
Migration cannot be performed if:
- the source or destination node has a QEMU version lower than 2.0.0;
- the version of QEMU on the destination node is lower than on the source node.
In some cases, migration cannot be performed if:
- different OS versions are used on the source and destination nodes;
- a cluster node has nested virtualization enabled. Read more in the article How to disable nested virtualization?
- if the version of QEMU that was last used to run the VM is incompatible with the QEMU version on the destination node. In such cases, it may help to synchronize the QEMU versions on the nodes and restart the VM before re-migrating.
After live migration VM may freeze for the following reasons:
- CPU mismatch in Host-passthrough emulation mode;
- QEMU or libvirt error;
- OS kernel error.
For migration from VMmanager 5
The restrictions are listed in the article Migration from VMmanager 5 to VMmanager 6.
Migration algorithm
- The XML description of the virtual machine is copied to the destination server.
- If the Shrink the VM disk prior to migration option is enabled, the VM disk file is optimized. The optimization allows to get the minimum possible file size.
- The disk of the virtual machine is transferred:
- if the disk is in a local storage, it is copied to the destination server;
if the disk is in a network storage, it is connected to the destination server.

During live migration, QEMU periodically checks the state of the virtual machine during the migration. If the original VM data has changed, the copied data is overwritten by the changed data. If the virtual machine is in active use and data is constantly changing, migration will fail.
- The virtual machine is deleted on the source server.
- The virtual machine is started on the destination server.
Starting the migration
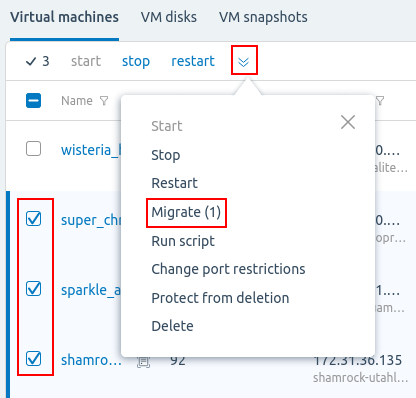
- Enter the Virtual machines section.
Select the VM →
 menu → Migrate or select the required VMs →
  → Migrate.
If migration is not available for all selected VMs, the menu item will contain the number of VMs available for migration. For example, Migrate (5).
Group migration via the platform interface is available only for VMs located on a single cluster node. If you select VMs from different nodes, the group migration will be performed for the VM from the node that is higher in the list.
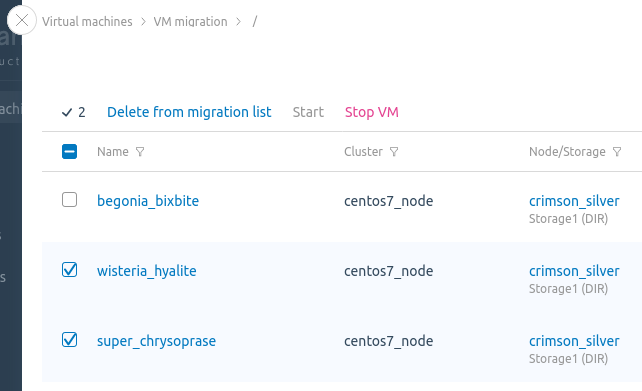
- To manage the list of VMs for migration:
- Click the VM list button.
- Select the VMs in the list.
- Click on the button with the required action:
- Delete from migration list;
- Start;
- Stop VM.
- Select the Migration type:
- Within cluster — VMs remain in the same cluster, but will be moved to a different node;
- Between clusters — VMs will be moved to another cluster;
- Disk only — VM disks will be moved to another storage.
- Specify the migration parameters:
- Disable the Shrink the VM disk prior to migration option if disk optimization is not required. The option is only available for disabled VMs.
- Disable the Use the distribution filters option if you do not need to use filters. Read more about distribution filters in Managing servers in the cluster.
- Disable the Cold migration of linked clones option if live migration of linked clones is required.
- To migrate Between clusters, in the Target cluster section, click Select the cluster and select the desired cluster from the list.
- To migrate Within cluster or Between clusters, in the Target node section, click Select the node and select the desired node from the list. If the node is unavailable, the Status column displays the reason why it is unavailable.
- In the Network interfaces settings section, select which interfaces on the destination node will match the interfaces on the source node.
- In the VM disks distribution section, select in which storage the VM disks will be placed. Disks of the same VM can be placed in different storages.
- Explore the information in the VM resume section. This section contains the information about whether all disks are distributed and whether a reboot is required for the VM.
- Click the Migrate button.

Useful tips
Related topics: