Migration from VMmanager 5 to VMmanager 6
Migration allows you to move management of virtual machines (VMs) from VMmanager 5 KVM to VMmanager 6. Migration includes transfer of the following:
- address space — IP addresses, pools and networks used;
- user accounts;
- VM access restrictions;
- BILLmanager users, if the integration has been configured.
For migrated VMs, the platform will create a temporary cluster with limited functionality. After migration, you can migrate VMs from this cluster to other clusters in the platform.
Note
This article describes the migration from the VMmanager 5 KVM control panel. If you are using VMmanager 5 OVZ, migrate the VMs manually according to the instructions in Moving an OVZ container to LXD cluster
Migration restrictions
You can transfer any cluster from VMmanager 5 to VMmanager 6. Further migration of VMs to VMmanager 6 clusters has limitations in the current version of the platform:
| Restriction | Possible solution |
|---|---|
| for cluster nodes with QEMU version lower than 2.0.0, "live" migration of VMs is not available | power off the VM before migration |
| changing the storage type can cause temporary inaccessibility of VMs | do not change storage type during migration |
| VM may not have any network interfaces connected to NAT | edit the network configuration of the VM |
| no more than one VM interface should be connected to each network bridge of the cluster node | remove the VM interface or connect it to a free network bridge |
| VM may not have snapshots created | delete the snapshots before migration |
| VM may not have mounted ISO images | unmount ISO images before migration |
| the VM disk must be in a local storage — a file or LVM storage | migration option will appear in the next versions of the platform |
VM migration is possible to clusters with Switching or IP-fabric network settings.
For migration, the license for the VMmanager 5 control panel must be active.
Requirements for network settings
Each server must have a unique hostname.
Allow connections to the ports:
- between the server with the VMmanager 5 control panel and the VMmanager 6 platform:
- 22/tcp — SSH;
- 5900-6900/tcp — QEMU VNC, SPICE;
- 6514/tcp — libvirt virtual machine management service;
- 49152-49261/tcp — libvirt migration services;
- 443/tcp — HTTPS;
- between the VMmanager 5 cluster nodes and the VMmanager 6 cluster nodes:
- 22/tcp — SSH;
- 49152-49261/tcp — libvirt migration services;
- 443/tcp — HTTPS;
- between the VMmanager 5 cluster nodes and the VMmanager 6 platform:
- 22/tcp — SSH;
- 5900-6900/tcp — QEMU VNC, SPICE;
- 6514/tcp — libvirt virtual machine management service;
- 49152-49261/tcp — libvirt migration services;
- 443/tcp — HTTPS.
If integration of VMmanager 5 with IPmanager 5 or BILLmanager is configured, VMmanager 6 should have access to IPmanager5 or BILLmanager ports:
- 22/tcp — SSH;
- 443/tcp — HTTPS;
- 3306/tcp, 3306/udp - MySQL IPmanager or BILLmanager server;
If BILLmanager is located behind a DDoS protection service, specify the IP address of the BILLmanager server with ports 22/tcp and 443/tcp open in the migration settings. When migrating to BILLmanager, service and user IDs change, so VMmanager 6 can create many requests to BILLmanager, which may result in them being blocked by the DDoS protection.
Port 22/tcp must be available to all nodes in the cluster and, if necessary, to the public network.
If QEMU VNC, SPICE access is only provided through a server with VMmanager, the port range 5900-6900/tcp must be open to the network connecting the cluster nodes.
Migration procedure
Address space import
VMmanager 5 and VMmanager 6 use different software to manage the address space:
- VMmanager 5 uses the IPmanager 5 control panel;
- VMmanager 6 uses the built-in IPmanager 6 module.
IPmanager 6 supports IPmanager 5 API emulation mode. If you are using other software products that require integration with IPmanager 5 (for example, BILLmanager, DCImanager 5, ISPmanager), you can configure them to work with IPmanager 6.
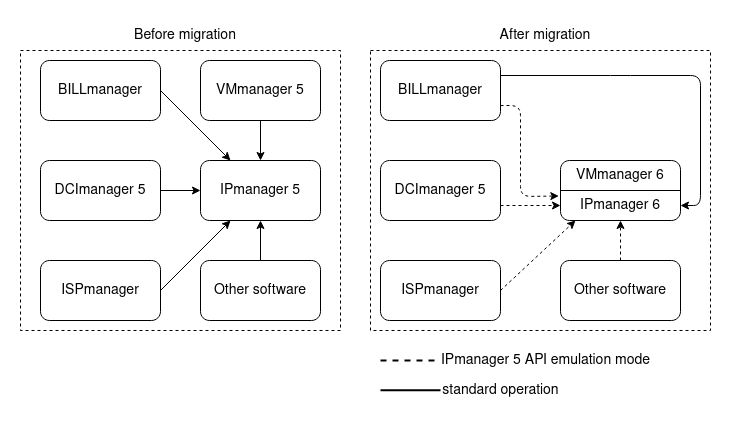
Example of address space management
VMmanager 5 cluster import
To import a VMmanager 5 cluster, the migration service:
- Connects to VMmanager 5 and gets information about the entities created in the control panel — VMs, users, cluster settings.
- Blocks VMmanager 5.
- Creates a backup of the VMmanager 6 platform.
- Imports information about VMmanager 5 settings into VMmanager 6.
- If integration with BILLmanager has been configured in VMmanager 5:
- Connects to BILLmanager.
- Changes the processing module type for VMmanager 6.
- Adds BILLmanager users with VMmanager 5 services to VMmanager 6.
Migrating users from VMmanager 5
If an e-mail is specified in the VMmanager 5 user settings, an account with that e-mail will be created in VMmanager 6.
If no e-mail is specified in the VMmanager 5 user settings, an account of the username@vm5.imported form will be created in VMmanager 6 where username is the VMmanager 5 user name.
Preparing for migration
VMmanager 5
- Create a backup of VMs and control panel. Read more in Backup plans in the VMmanager 5 documentation.
Enable public key authentication:
In the /etc/ssh/sshd_config file, specify the parameter
PubkeyAuthentication yesCODERestart the sshd service:
systemctl restart sshdCODE
Determine the number of CPU cores used on the cluster nodes:
dmidecode --type processor | grep -i "core enabled"CODE
VMmanager 6
- Make sure that the VMmanager 6 license contains enough CPU cores to connect all cluster nodes from VMmanager 5. If necessary, purchase a license that supports more cores.
- If the platform is not installed:
- Make sure that the server for VMmanager 6 meets the system requirements.
- Install VMmanager 6 according to the manual.
- Perform initial setup of the platform.
BILLmanager
- Create a staff member to configure the integration. When creating, enable the Full access privileges option. Read more in the BILLmanager documentation article Departments and staff.
- Create the VMmanager 6 processing module and tariff plans for virtual server services.
- Create a backup of BILLmanager. Read more in Backup configuration in the BILLmanager documentation.
- Generate an authorization key:
- Connect to the server with BILLmanager via SSH with superuser permissions.
Execute the command:
/usr/local/mgr5/sbin/mgrctl -m billmgr session.newkey user='<integration_user>' key='<secret_key>'CODEComments to the command<integration_user> — username for configuring integration
<secret_key> — authorization key — a random combination of at least 16 symbols
- Save the key value.
IPmanager 5
Make sure that IPmanager 5 is using the MySQL or MariaDB DBMS. If IPmanager 5 is using SQLite DBMS, switch to the use of MySQL DBMS. Read more in Usage of MySQL as a DBMS (database management system).

Note
The recommended MySQL/MariaDB version is at least 5.5.x. For earlier versions, successful VM import is not guaranteed.
- Make sure that the MySQL server is accessible from VMmanager 6 — check if ports 3306/TCP, 3306/UDP are open in the firewall settings and if remote connection to the database is possible:
- Connect to the IPmanager 5 server via SSH.
Check the current firewall settings:
firewall-cmd --list-allCODEOpen ports 3306/TCP, 3306/UDP:
firewall-cmd --permanent --add-port=3306/tcp firewall-cmd --permanent --add-port=3306/udpCODERestart the firewall service:
service firewalld restartCODEOpen the MySQL configuration file /etc/my.cnf. Add the bind-address=xxx.xxx.xx.xx paramter to the [mysqld] section and mark as comment the line with the skip-networking parameter.
Commentsxxx.xxx.xx.xx — IP address of the server with IPmanager 5
Connect to mysql service:
mysql -u rootCODEuse mysql;CODEAllow the user to connect to MySQL remotely:
GRANT ALL PRIVILEGES ON <DB_NAME> . * TO '<DB_USER>'@'<REMOTE_IP>' IDENTIFIED BY '<DB_PASSWORD>';CODEComments<DB_NAME> — database name
<DB_USER> — the name of the user who is allowed to connect remotely
<REMOTE_IP> — IP address of the server from which the remote connection will be made
<DB_PASSWORD> — password of the user who is allowed to connect remotely
FLUSH PRIVILEGES;CODE
Migration
IP address migration
- Enter
 → Migration → Migrate IP addresses from IPmanager 5.
 Specify the connection settings for IPmanager 5:
Note
The connection settings are specified in the IPmanager configuration file /usr/local/mgr5/etc/ipmgr.conf :
- Address of server with IPmanager — DBHost parameter;
- Database name — DBName parameter;
- Integration user login — DBUser parameter;
- Password — DBPassword parameter.
- Address of server withi IPmanager — IP address of the IPmanager 5 database;
- Database name — IPmanager 5 database name;
- Integration user login — IPmanager 5 database username;
- Password — IPmanager 5 database user password.
- Press Migrate IP.
- Create a user on the server with IPmanager 5 for integration. All types of addresses to be migrated must be available to the user. Read more about address types in Manage the groups of IP addresses .
Connect to the server with VMmanager 6 via SSH.
Enter the vm_ipmgr_1 container:
docker exec -it vm_ipmgr_1 bashBASHGo to the /opt/ispsystem/ipmgr/ directory:
cd /opt/ispsystem/ipmgr/BASHStart the import:
docker exec -it vm_ipmgr_1 /opt/ispsystem/ipmgr/bin/mgr5import --dbhost <db_ip> --dbname <db_name> --dbuser <db_user> --dbpassword <db_pass> --user <ipmgr_user>CODEComments to the command<db_ip> — IP address of the IPmanager 5 database
<db_name> — IPmanager 5 database name. The default value is ipmgr
<db_user> — user name of the IPmanager 5 database user. The default value is root
<db_pass> — IPmanager 5 database user password
<ipmgr_user> — name of the IPmanager 5 user created for integration.
Note:
You do not have to use the --user parameter. In this case, VMmanager 6 will import the entire database of IPmanager 5 and create pools of IP addresses like USERNAME_GROUPNAME, where USERNAME is the name of the IPmanager user, GROUPNAME is the name of the group of IPmanager addresses.
Optional command parameters--noip — do not convert IP addresses.
--nohistory — do not convert the history of IP addresses.
--debug — command log output to stdout.
You can check execution of the command in the log file /var/log/ipmgr5_import.log in the vm_ipmgr_1 container on the server with VMmanager.
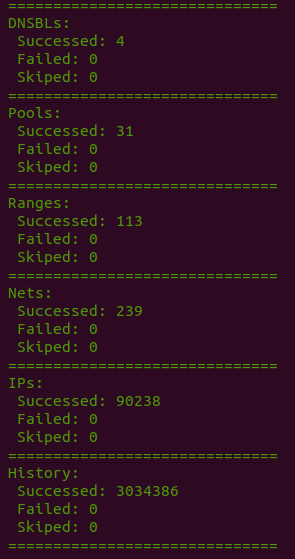
Example of command output
Exit the container:
exitBASH
To enable VMmanager 5 and BILLmanager to work with IPmanager 6:
- To allow VMmanager 5 to access only a certain pool of IP addresses, create a pool in VMmanager 6 with the suffix public. For example, VM5_public.
Create an administrator account named ipmgr5@example.com in VMmanager 6.
Note
ipmgr5@example.com is not an example, but the exact name that you need to specify when creating an account.
- In VMmanager 5 and BILLmanager:
- Enter Integration → IPmanager .
- Specify the settings for integration:
URL — https://domain.com/api/ipmgr5/v3/ipmgr
Comments to the URLdomain.com — domain name or IP address of the server with VMmanager
Username:
to allow the control panel to access only a certain pool of IP addresses, specify pool_XXX;
CommentsXXX — pool prefix in VMmanager. For example, for the VM5_public pool, specify the username pool_VM5.
- to allow the control panel to access the entire address space, specify an arbitrary user name.
- Password — password of the ipmgr5@example.com user.
- In the Synchronization of IP-addresses section leave the Administrator login and Administrator password fields blank.
- Press Ok.
If VMmanager 6 has integration with DNSmanager 6, you need to synchronize PTR records with the DNS-server after the address space is created. To do this:
- Delete the DNSmanager 6 integration module: Settings → Modules → Integration with DNSmanager 6 → Delete the module → Delete the module.
- Reinstall and configure the integration module. Read more in Integration with DNSmanager 6 module.
You can check the success of synchronization in the /var/log/dns_proxy_integration.log file in the vm_dns_proxy_1 container on the server with VMmanager.
Virtual machines migration
Note
You can migrate virtual machines from multiple VMmanager 5 instances to a single VMmanager 6 instance. A separate temporary cluster will be created for VMs from each VMmanager 5 instance.
- Enter → Migration → Migrate VMmanager 5.
- Specify the migration settings:
- Temporary cluster name , which will be created in VMmanager 6.
- VMmanager 5 server SSH-address.
- SSH username to connect to the server with VMmanager 5.
- SSH port .
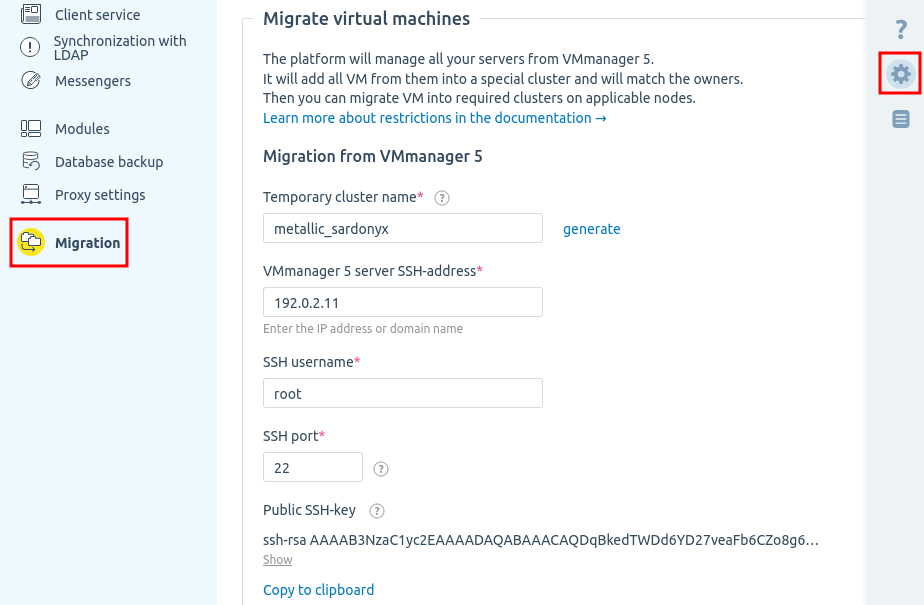
Copy the Public ssh-key and add it to the ~/.ssh/authorized_keys file on the server with VMmanager 5.
Note
To enable public key authentication, in the /etc/ssh/sshd_config file on the server with VMmanager 5, specify the parameter
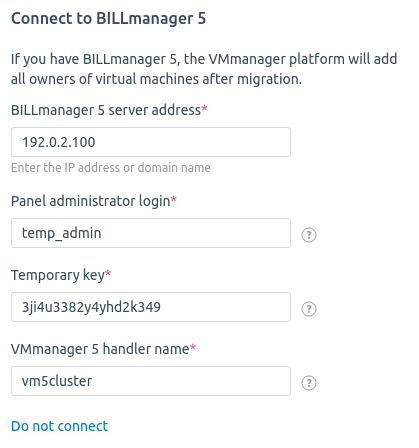
PubkeyAuthentication yesCODE- Specify the settings of connection to BILLmanager if integration has been set up in VMmanager 5:
- BILLmanager 5 server address — server IP address or domain name.
- Panel administrator login — name of the staff member created when preparing BILLmanager.
- Temporary key created during BILLmanager preparation.
- VMmanager 5 handler name.
- Press Migrate VMmanager 5.
If the migration failed with an error of the following form
{
  "error": {
    "code": 1111,
    "msg": "Handler throw uncaught exception",
    "value": "vm/import/cluster Can not load a vm5_data file"
  }
}check whether an SSH connection is available from the vm_box containter in the VMmanager 6 server to the main VMmanager 5 node.
The IP address of the main VMmanager 5 node is specified in the MainIp parameter of the /usr/local/mgr5/etc/vmmgr.conf configuration file on the server with VMmanager 5.
Transferring a VM from a temporary cluster
A temporary cluster is created for VMs from VMmanager 5 with the VM5 KVM type and "Switching" network configuration. Available operations with VMs in a temporary cluster:
- power on;
- power off;
- reboot;
- connection via VNC or SPICE;
- delete;
- migrate to another cluster node;
- migrate to another cluster, if the VM configuration meets the requirements.
To ensure that all functions are available on migrated VMs, migrate them to other platform clusters.
If a VM does not meet the requirements for migration to the VMmanager 6 cluster, the Migration to the VM6 cluster is unavailable link is displayed next to its name. Click on the link for more information.
If the VM has network interfaces connected to NAT, change the network configuration of the VM:
Connect to the temporary cluster node via SSH.
Get a list of virtual networks on the node:
virsh net-listBASHExample answer
Name State Autostart Persistent ---------------------------------------------------------- default active yes yes DefaultBridge active yes yes NAT_192.168.168.1 active yes yesCODEDetermine which network belongs to the NAT. To do this, run the command for each network:
virsh net-dumpxml <network> | grep 'forward mode'BASHComments to the command<network> — name of the network
Example answers:
NAT network
<forward mode='nat'>CODEbridge network
<forward mode='open'/>CODEExamine the VM configuration:
virsh dumpxml <VM_domain>BASHComments to the command<VM_domain> — domain name of the VM
Edit the libvirt configuration:
virsh edit <VM_domain>BASHComments to the command<VM_domain> — domain name of the VM
In the file you need to replace the line like
<source network='<nat_network>' bridge='<virt_interface>'/>CODEComments<nat_network> — NAT network name
<virt_interface> — virtual interface name
with a line like
<source network='<bridge_network>'/>CODEComments<bridge_network> — bridge network name
Connect to the server with the platform via SSH.
Remove the interface entries from the database:
docker exec -it mysql bash -c "mysql isp -p\$MYSQL_ROOT_PASSWORD"BASHDELETE FROM vm_host_interfaces WHERE host = <VM_id> AND node_bridge IS NULL ;SQLComments to the command<VM_id> — id of the VM

Tampering with the database involves a potential risk. We do not recommend making manual edits to the database, as this may disrupt the correct operation of the platform.
Instructions to make changes to the database should only be performed after backing up the platform.
exitSQL- Restart the VM.
If the VM has snapshots, delete them:
Connect to the temporary cluster node via SSH.
Check that the snapshot are connected:
virsh snapshot-list <VM_domain>BASHComments to the command<VM_domain> — domain name of the VM
Connect to the server with the platform via SSH.
Delete the snapshots entries from the database:
docker exec -it mysql bash -c "mysql isp -p\$MYSQL_ROOT_PASSWORD"BASHDELETE FROM vm_snapshot WHERE host = <VM_id> ;SQLUPDATE vm_host SET vm5_data=json_replace(vm5_data,'$.snapshot',json_array()) WHERE id= <VM_id> ;SQLComments to the commands<VM_id> — id of the VM
Tampering with the database involves a potential risk. We do not recommend making manual edits to the database, as this may disrupt the correct operation of the platform.
Instructions to make changes to the database should only be performed after backing up the platform.
exitSQL
If ISO images are connected to the VM, disconnect them:
- Connect to the temporary cluster node via SSH.
Examine the VM configuration:
virsh dumpxml <VM_domain>BASHComments to the command<VM_domain> — domain name of the VM
The section describing the ISO image looks like this:
Example description
<disk type='file' device='cdrom'> <driver name='qemu' type='raw'/> <source file='/nfsshare/iso/tQVJGvq2bYQNWdvD2xB14xB1J111v11'/> <backingStore/> <target dev='hda' bus='ide'/> <readonly/> <boot order='2'/> <alias name='ide0-0-0'/> <address type='drive' controller='0' bus='0' target='0' unit='0'/> </disk>CODESave the device name from the target dev parameter. In the example above it is hda.
Edit the libvirt configuration:
virsh edit <VM_domain>BASHComments to the command<VM_domain> — domain name of the VM
You need to remove the sections with the ISO image descriptions from the file.
Connect to the server with the platform via SSH.
Delete the ISO image entries from the database:
There are potential risks involved in altering a database. We do not recommend making manual edits to the database, as it can disrupt the correct operation of the platform.
Create a backup of the platform before performing any actions with the database.
docker exec -it mysql bash -c "mysql isp -p\$MYSQL_ROOT_PASSWORD"BASHDELETE FROM vm_disk WHERE host = <VM_id> AND target_dev = <device_name> ;SQLComments to the command<VM_id> — id of the VM
<device_name> — name of the device
Check if the VM has a primary disk:
SELECT id,is_main FROM vm_disk WHERE host = <VM_id>;SQLIf the reply for all disks contains NULL, specify one of the disks as the primary disk:
UPDATE vm_disk SET is_main = 1 WHERE host = <VM_id> AND id = <disk_id>;SQLComments to the commands<VM_id> — id of the VM
<disk_id> — id of the disk
Exit the DBMS console:
exitSQL- Restart the VM.
If the VMmanager 5 node is running CentOS 6, after migration the node will have the status "Unavailable" and the VM statuses will not be displayed. VMs in this state cannot be migrated through the platform interface.
This issue is due to the fact that the gomon monitoring service used in the platform does not support installation on CentOS 6. To migrate a VM from such a host:
- In the platform interface, stop all VMs on this node.
- Connect to the node via SSH.
Check the VM status:
virsh list --allBASHExample output
Id Name State ----------------------------------------------- 606 2689_halloween_rubellite running 609 2690_shadow_almandite running 657 1776_olive_wascoite running - 2112_minikube shut off - 2115_alabaster_siberite shut offCODEIf the command output contains VMs with a status other than shut off, stop those VMs:
virsh shutdown <VM_domain>BASHComments to the command<VM_domain> — VM domain in the format <VM id>_<VM name>. For example, 1776_olive_wascoite
- Connect to the server with the platform via SSH.
- Change the status of all VMs to "Stopped":
Open the DBMS console:
MySQL
docker exec -it mysql bash -c "mysql isp -p\$MYSQL_ROOT_PASSWORD"BASHExecute the command:
UPDATE vm_host SET state='stopped' WHERE node=<node_id>;SQLComments to the command<node_id> — id of the node
Exit the DBMS console:
\qCODE
- Perform VM migration through the platform interface. In the migration settings, disable the Shrink the VM disk prior to migration option.
If you migrate to a cluster with "IP fabric" network configuration type, and the VM has "No automation" IP address addition model selected, the VM will be unavailable over the network after migration. To avoid this, perform network configuration on the VM before migration:
- for Red Hat-based operating systems:
Change the network settings in the /etc/sysconfig/network-scripts/ifcfg-<interface name> file:
NETMASK="255.255.255.255" GATEWAY="<gateway for IPv4 sessions>"CODERestart the network service:
systemctl restart networkBASH
- for Debian-based operating systems:
Change the network settings in the /etc/network/interfaces file:
NETMASK="255.255.255.255"
GATEWAY="<gateway for IPv4 sessions>"
CODE
To find out the IP address of the gateway, go to Clusters → select a cluster → Parameters button → Network settings → IP-fabric settings.
To properly migrate VMs with Windows operating systems, install the libguestfs-winsupport utility on the temporary cluster node.
The platform interacts with the VM through the QEMU Guest Agent program. For example, QEMU Guest Agent is needed so that VMmanager can change the password or run the script on the VM. If QEMU Guest Agent is not installed on the VM or is not responding, the Status column displays the message Problem with Guest Agent. To install QEMU Guest Agent on a VM, click on Problem with Guest Agent → Install GA and restart VM. You can install QEMU Guest Agent manually. For more information, see the article How to check and restore QEMU Guest Agent?
VM migration without powering it off ("live" migration) is possible if:
- QEMU version 2.0.0 or higher is installed on the VMmanager 5 cluster node;
- the version of libvirt on the VMmanager 6 cluster node is not lower than the version of libvirt on the VMmanager 5 cluster node.
In other cases, the VMs must be powered off before migration.
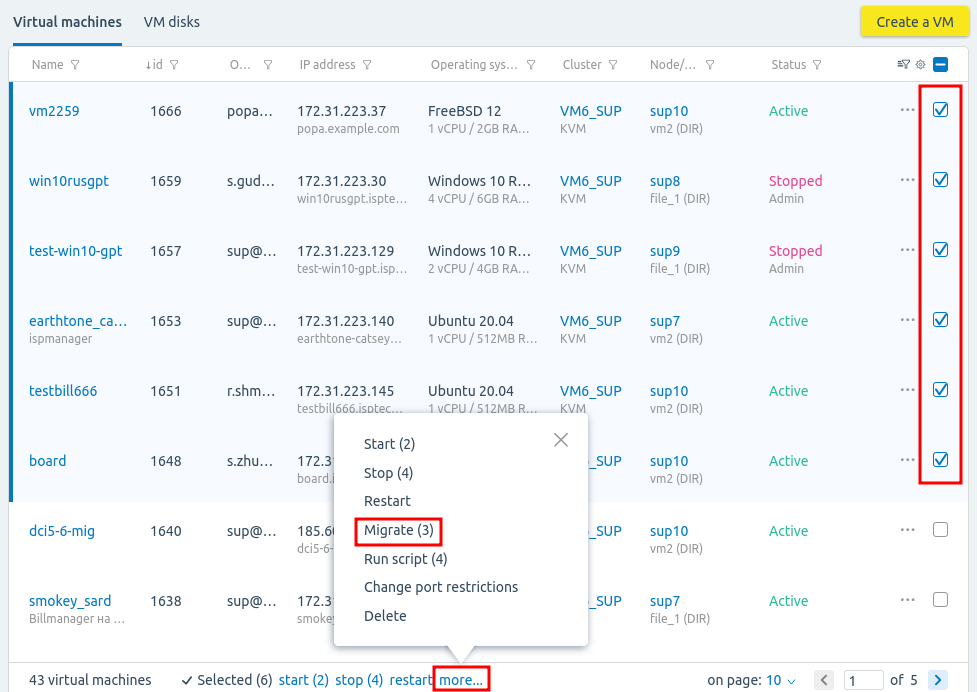
To move a VM from a temporary cluster:
- Select the necessary VMs → more... → Migrate.
- Specify the migration settings:
- Disable the Shrink the VM disk prior to migration option if disk compression is not required. The option is only available for disabled VMs.
- Disable the Use the distribution filters option if you do not need to use filters. Read more about distribution filters in Managing servers in the cluster.
- Select the cluster to migrate to.
- Select the node to migrate to.
- Select the available storages on the node that will host the disks of the VMs. Disks of the same VM can be placed in different storages.
- Review the information in the VM Summary section. The section contains information about whether all disks are allocated and whether the VM needs to be rebooted.
- Press Migrate (Migrate and reboot).
What to do after migration
After VMs migration, a temporary cluster can be deleted. Free nodes from the temporary cluster can be connected to other clusters in the platform. We recommend that you reinstall the OS on these nodes before connecting.
Transferring services in BILLmanager
If integration with BILLmanager has been configured in VMmanager 5, then the migration service will:
- Change the processing module type from VMmanager 5 to VMmanager 6.
- Add the prefix _imported to its name.
A new processing module is created to manage the VMs in the temporary cluster. Ordering new services through this processing module is not available. After migrating the VMs to other platform clusters, switch the services to tariff plans with a different VMmanager 6 processing module.
To manually migrate services to a new processing module:
- Connect the VMmanager 6 service processing module for VMmanager 5 tariff plans:
- Enter Products → Tariff plans → select the tariff plan from which the virtual server service for VMmanager 5 was sold → Modules button.
- Enable the VMmanager 6 processing module.
- Power the virtual machines off from BILLmanager:
- Enter Products/Services → Virtual private servers → select all VMmanager 5 virtual server services (press CTRL) → Edit button.
- Press the Disable button.
- Confirm powering off with the Ok button.
- Migrate virtual server services to tariff plans with the VMmanager 6 processing module:
- Enter Products/Services → Virtual private servers → select all VMmanager 5 virtual server services (press CTRL) → Edit button.
- Specify the VMmanager 6 service processing module in the Processing module field.
- Press Ok .
- Enable the services in BILLmanager.
- Delete the staff member created for integration.
Possible issues
Possible migration issues are described in the Knowledge Base article Possible issues with migration from VMmanager 5.
Re-migration
If the first migration failed, you can perform the migration again. If an address space was imported during the first migration, you do not need to delete it to migrate again.
To migrate services from BILLmanager, re-generate the authorization key.
Canceling migration
You can return VM management to VMmanager 5 after migration. Migration can be cancelled only if the VMs were not deleted or moved to other clusters after migration.
To cancel migration:
- Restore the status of VMmanager 6 from a backup. Read more in Creating platform backups.
- If you changed BILLmanager settings, restore the control panel from a backup. Read more in Backup configuration in the BILLmanager documentation.
- Unlock VMmanager 5:
- Connect to the server with VMmanager 5 via SSH:
Execute the command:
/usr/local/mgr5/sbin/mgrctl -m vmmgr -uBASH