Migration from DCImanager 5 to DCImanager 6
Migration allows you to transfer settings and equipment from the DCImanager 5 control panel to the DCImanager 6 platform. Migration is performed semi-automatically from the console of the server with DCImanager 6. Migration from one or more DCImanager 5 control panels is possible.
If DCImanager 5 has integration with BILLmanager configured, the tariffs and services of dedicated servers will be automatically transferred to the DCImanager 6 processing module.
Migration stages:
- Software preparation — DCImanager 5, DCImanager 6, IPmanager 5, BILLmanager.
- Migration of address space — IP addresses, pools and networks used.
- Migration of DCImanager 5 objects — users, equipment, connection settings, VLANs, warehouses.
- Editing BILLmanager settings.
Note
During migration the following will not be moved:
- test switches and Dummy-type PDUs;
- switches and PDUs with user processing modules;
- users with the Operator role.
Software preparation
DCImanager 5
- In the settings of all servers, switches, and PDUs specify the racks and units in which these devices are located.
- In the settings of all blade servers, specify the chassis units in which these servers are located.
- Create a temporary user for the integration. When creating, specify:
- Administrator access level.
- Number of records — not less than the number of equipment of each type in the warehouse. For example, if there are 5600 disks in the warehouse, the value must be at least 5600.
- Generate a one-time authorization key:
- Connect to the server with DCImanager 5 via SSH with superuser permissions.
Run the command:
/usr/local/mgr5/sbin/mgrctl -m dcimgr session.newkey username=<integration_user> key=<secret_key>CODEComments to the command<integration_user> — user for integration
<secret_key> — authorization key — a random combination of at least 16 symbols
Save the key value.

Note
You can only log in with this key once. To migrate again, the key must be generated anew.
- Create a temporary database user and allow it access to the user table:
Open access to MySQL.
Commands for CentOS 7:firewall-cmd --new-zone=migration-mysql --permanentCODEfirewall-cmd --reloadCODEfirewall-cmd --zone=migration-mysql --add-source=<IP address> --permanentCODEfirewall-cmd --zone=migration-mysql --add-port=3306/tcp --permanentCODEfirewall-cmd --reloadCODEComments to the commands<IP address> — IP address from which access is allowed
Create a temporary user with read-only access:
Go to the database console:
mysqlCODERun the commands:
CREATE USER '<user>'@'localhost' IDENTIFIED BY '<password>';CODECREATE USER '<user>'@'%' IDENTIFIED BY '<password>';CODEGRANT SELECT, SHOW VIEW ON dcimgr.users TO '<user>'@'localhost';CODEGRANT SELECT, SHOW VIEW ON dcimgr.users TO '<user>'@'%';CODEFLUSH PRIVILEGES;CODEComments to the commands<user> — temporary username
<password> — temporary user password
DCImanager 6
- Create a platform backup.
- Create and configure the location.
- Load the necessary OS templates.
- Install and configure the necessary modules.
- If the Integration with IPmanager 6 module is installed but not configured in the platform, delete it.
IPmanager 5
Make sure that IPmanager 5 uses a MySQL or MariaDB DBMS. If IPmanager 5 is using SQLite DBMS, switch to the use of MySQL DBMS. Read more in Usage of MySQL as a DBMS (database management system) in the IPmanager documentation.
Note
Recommended MySQL/MariaDB version is at least 5.5.x. For earlier versions, the successful import of VMs is not guaranteed.
- Open access to the MySQL server from the DCImanager 6 side. To do this, allow connections on ports 3306/TCP, 3306/UDP and remote connections to the database:
- Connect to the server with IPmanager 5 via SSH with superuser permissions.
Check the current firewall settings:
firewall-cmd --list-allCODEOpen ports 3306/TCP, 3306/UDP:
firewall-cmd --permanent --add-port=3306/tcpCODEfirewall-cmd --permanent --add-port=3306/udpCODERestart the firewall service:
service firewalld restartCODEOpen the MySQL configuration file /etc/my.cnf. Under [mysqld], add the parameter bind-address=<IP address of the server with IPmanager 5> and comment the line with the parameter skip-networking.
Connect to mysql service:
mysql -u rootCODEuse mysql;CODEAllow the user to connect to MySQL remotely:
GRANT ALL PRIVILEGES ON <db_name> . * TO '<db_user>'@'<remote_ip>' IDENTIFIED BY '<db_password>';CODEComments<db_name> — database name
<db_user> — the name of the user who is allowed to connect remotely
<remote_ip> — IP address of the server from which the remote connection will be made
<db_password> — password of the user who is allowed to connect remotely
FLUSH PRIVILEGES;CODE
BILLmanager
- Create the DCImanager 6 processing module.
Create a temporary user to configure the integration. When creating, enable the Full access privileges option.
Note
Do not use the root account to set up the integration.
- Generate a one-time authorization key:
- Connect to the server with BILLmanager via SSH with superuser permissions.
Run the command:
/usr/local/mgr5/sbin/mgrctl -m billmgr session.newkey user=<integration_user> key=<secret_key>CODEComments to the command<integration_user> — user for integration
<secret_key> — authorization key — a random combination of at least 16 symbols
Save the key value.
Note
You can only log in with this key once. To migrate again, the key must be generated anew.
Create a backup of BILLmanager.
- If BILLmanager has services with the Server type option, they should be disabled. To do this:
- Connect to the server with BILLmanager via SSH with superuser permissions.
Go to the database console:
mysqlCODESelect the billmgr database:
USE billmgr;CODEDetermine the id of the DCImanager 5 processing module:
SELECT id FROM processingmodule WHERE name='<DCI5_processing_module_name>';CODEComments<DCI5_processing_module_name> — DCImanager 5 service processing module name
Determine if the service processing module has the Server type option:
SELECT id FROM processingparam pp WHERE pp.processingmodule=<DCI5_processing_module_id> AND pp.intname='use_configuration' AND pp.value='on';CODEComments<DCI5_processing_module_id> — DCImanager 5 service processing module idIf the reply to the previous command contains the service id, disable the option:
UPDATE processingparam pp SET pp.value='off' WHERE pp.processingmodule=<DCI5_processing_module_id> AND pp.intname='use_configuration' AND pp.value='on';CODEComments<DCI5_processing_module_id> — DCImanager 5 service processing module id
Address space transfer
DCImanager 5 and DCImanager 6 use different software to manage the address space:
- DCImanager 5 uses the IPmanager 5 control panel;
- DCImanager 6 uses the built-in IPmanager 6 module.
To perform the migration, you need to import an address space from IPmanager 5 into IPmanager 6.
IPmanager 6 supports IPmanager 5 API emulation mode. If you are using other software products that require integration with IPmanager 5 (for example, BILLmanager, VMmanager 5, ISPmanager), you can configure them to work with IPmanager 6.
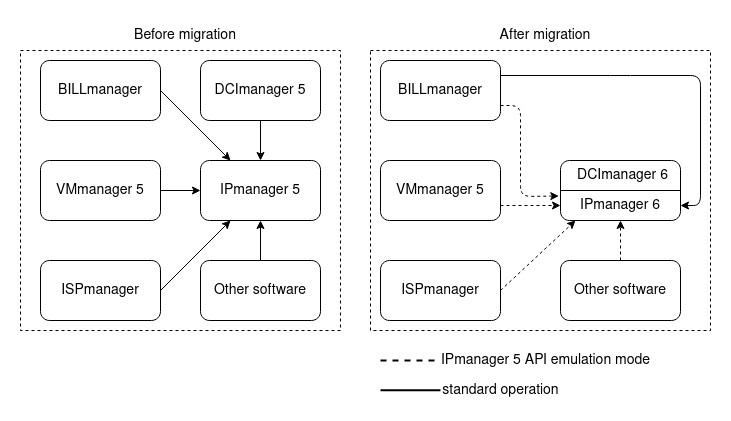
Example of address space management
If DCImanager 6 has integration with external IPmanager 6, the data must be imported into the platform that acts as the master. Read more in the article Integration with IPmanager 6 module.
If you are using VMmanager 6 as the master, import the data according to the instructions in the VMmanager 6 documentation. If VMmanager 6 uses the Integration with DNSmanager 6 module, you do not need to install the same module in DCImanager 6.
Data import
To import address space data:
- Create a user on the server with IPmanager 5 for integration. All types of addresses to be migrated must be available to the user. Read more about address types in Manage the groups of IP addresses.
Connect to the server with DCImanager 6 via SSH with superuser permissions.
Run the command:
docker exec -it dci_ipmgr_1 /opt/ispsystem/ipmgr/bin/mgr5import --dbhost <db_ip> --dbname <db_name> --dbuser <db_user> --dbpassword <db_pass> --user <ipmgr_user>CODEComments to the command<db_ip> — IPmanager database IP address.
<db_name> — IPmanager database name. The default value is ipmgr
<db_user> — IPmanager database username. The default value is root
<db_pass> — IPmanager database user password
<ipmgr_user> — name of the IPmanager user created for integration
Note
You do not have to use the --user parameter. In this case, IPmanager 6 will import the entire database of IPmanager 5 and create pools of IP addresses like USERNAME_GROUPNAME, where USERNAME is the name of the IPmanager user, GROUPNAME is the name of the group of IPmanager 5 addresses.
Optional command parameters--noip — do not convert IP addresses
--nohistory — do not convert the history of IP addresses
--debug — command log output to stdout
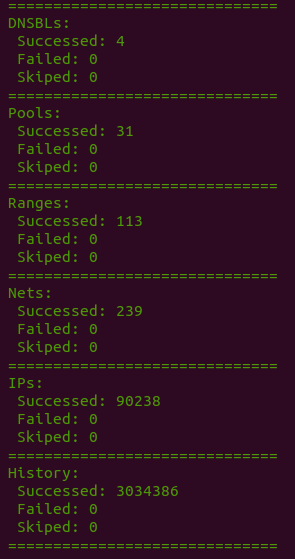
Example of command output

Container names may differ depending on the used version of Docker Compose. A hyphen may be used instead of the underscore character in container names.
The command logs are written to the /var/log/ipmgr5_import.log file in the dci_ipmgr_1 container on the server with DCImanager 6.
Integration of control panels with IPmanager 6
To switch control panels that were integrated with IPmanager 5 to IPmanager 6:
Create an administrator account in DCImanager 6 named ipmgr5@example.com.
Note
ipmgr5@example.com is not an example, but the exact name you need to specify when creating an account.
- If the control panel to be connected should only have access to a certain pool of IP addresses, create a pool in DCImanager 6 with the public suffix. For example, DCI5_public.
- In the control panel to be connected:
- Enter Integration → IPmanager.
- Specify the settings for integration:
IPmanager URL — https://domain.com/api/ipmgr5/v3/ipmgr.
Comments to the URLdomain.com — domain name or IP address of the server with DCImanager 6
Username:
to allow the control panel to access only a certain pool of IP addresses, specify pool_XXX;
CommentsXXX — pool prefix in DCImanager 6. For example, for pool DCI5_public, specify the username pool_DCI5
- to allow the control panel to access the entire address space, specify an arbitrary username.
- Password — password of the ipmgr5@example.com user.
- Press Ok.
Synchronization of PTR records
If DCImanager 6 has integration with DNSmanager 6, you need to synchronize PTR records with the DNS server after the address space is created. To do this:
- Delete the DNSmanager 6 integration module: Settings → Modules → Integration with DNSmanager 6 → Delete module → Delete module.
- Reinstall and configure the integration module. Read more in Integration with DNSmanager 6 module.
The synchronization logs are written to the /var/log/dns_proxy_integration.log file in the dci_dns_proxy_1 container on the server with DCImanager 6.
Container names may differ depending on the used version of Docker Compose. A hyphen may be used instead of the underscore character in container names.
Migration of DCImanager 5 objects
The migration consists of two steps:
- Exporting data from DCImanager 5 to a json file.
- Importing data from a file into the DCImanager 6 platform.
You can migrate all DCImanager 5 objects together or each type individually. A separate file is created for each type of object during migration. For example, a server.json file is created for servers. This allows, in case of any problems, to correct the data in the file manually and repeat the migration.
Note
Before each run of the migration script, you must recreate the authorization key in DCImanager 5.
If you are migrating each type of object separately, perform the migration in the following order:
- Users.
- Equipment:
- Racks and platforms.
- Switches, PDUs, UPS.
- Chassis.
- Servers.
- User VLANs.
- Warehouses:
- Suppliers and supplies.
- Switches, PDUs, UPS, types of equipment, servers.
- Components.
Usernames
Usernames will be changed during migration:
- if DCImanager 5 has integration with BILLmanager, the username will be replaced with the server owner's email;
- If integration with BILLmanager is not configured, @dci5.imported suffix will be added to the username. This change is due to limitations of the DCImanager 6 platform. The format of an email address is mandatory as a user ID.
Hard disk models
Based on the hard disk model from DCImanager 5, a model of drives with the same name in the DCImanager 6 directory will be created. Based on the "Type" field, the "Alias for configuration" and "Size, GB" fields will be generated. If the model name is not specified in DCImanager 5, the value from the "Type" field will be used as the name.
RAM models
Based on the RAM model from DCImanager 5, a RAM model with a similar name in the DCImanager 6 directory will be created. Based on the "Type" field, the "RAM size" and "Frequency" fields will be generated. The memory capacity unit will be changed from mebibyte to gigabyte. If the model name is not specified in DCImanager 5, the value from the "Type" field will be used as the name.
Migration of id
To migrate equipment id from DCImanager 5, add a custom parameter named old_id to the required equipment types in DCImanager 6. During migration, the equipment id will be written to the created parameter. Read more about creating a parameter in the article Custom equipment parameters.
Starting the migration
To start the migration:
- Connect to the server with DCImanager 6 via SSH with superuser permissions.
Enter the migrator container:
docker exec -it migrator bashCODEGo to the service directory:
cd /opt/ispsystem/migrateCODECreate configuration files for migration based on the export_settings.example.yaml and import_settings.example.yaml templates.
Example of file for export
action: export platform: dci5 data: - user - rack - platform - switch - server transport: - type: dci5_http address: https://10.1.1.1:1500 key: my_secret_key - type: dci5_db host: 10.1.1.1 port: 3306 user: migrator password: migrator_password db: dcimgr location: 1 format: json debug: false log_file: /var/log/migrate.log report_file: export_report_{datetime}.txt report_view: plainYMLExample of file for import
action: import platform: dci6 data: - all transport: - type: dci6_http - type: dci6_auth_http location: 1 format: json debug: false log_file: /var/log/migrate.log report_file: import_report_{datetime}.txt report_view: plainYMLCommentsaction — configuration file type. Possible values:
export — DCImanager 5 data export file;
import — DCImanager 5 data import file;
platform — DCImanager version. Possible values:
dci5 — DCImanager 5. Used for the export file;
dci6 — DCImanager 6. Used for the import file;
data — list of objects to be migrated. Possible values:
object groups:
all — all objects;
only_warehouse — all warehouse objects;
except_warehouse — all objects except warehouse objects;
platform objects:
user — users;
rack — racks;
platform — platforms;
pdu — PDUs;
switch — switches;
ups — UPS;
chassis — chassis;
server — servers;
- server_ip — relation of IP addresses to server;
ipmi — server connections to BMC;
pdu_connection — server connections to PDU;
switch_connection — server connections to switches;
intel_amt— server connections to Intel AMT;
user_vlan — VLAN list;
- warehouse — warehouses;
warehouse objects:
provider — suppliers;
delivery — supplies;
- delivery_image — supply images;
- warehouse_switch — switches;
- warehouse_server — servers;
warehouse_cpu — CPUs;
warehouse_ram — RAM;
warehouse_pci — PCI devices;
warehouse_storage — data storage devices;
warehouse_other — other devices;
transport — DCImanager connection details:
to export from DCImanager 5, specify the settings:
HTTPS connections:
type — dci5_http;
address — control panel URL in the format https://192.0.2.1:1500;
key — one-time key for authorization in DCImanager 5;
database connections:
type — dci5_db;
host — control panel IP address;
port — 3306;
user — name of the temporary database user created for integration;
password — password of the temporary database user;
db — dcimgr;
to import into DCImanager 6, specify the settings:
type — dci6_http;
type — dci6_auth_http;
location — location id. The parameter may not be specified in the export file if the export is performed from the default DCImanager 5 location. In other cases, this parameter is mandatory;
format — format of files for migration. Only the json format is available in the current version;
true — display;
- false — do not display;
- debug — displaying debugging information when running the script. Possible values:
- true — display;
- false — do not display;
- log_file — path to migration log file. Default value — /var/log/migrate.log;
- report_file — report file name. If the parameter is not set, the report data will be displayed only in the terminal. To add the migration date and time to the file name, use the {datetime} macro;
- report_view — report format. Default value — plain. Possible values:
- plain — plain text;
- json — json with indentation and line breaks;
- compact_json — json without indentation or line breaks
Run the script to export data:
python3 migrator.py -p export_settings.yamlBASHCommentsexport_settings.yaml — name of the configuration file to export
If the data was exported successfully, run the script to import the data:
python3 migrator.py -p import_settings.yamlBASHCommentsimport_settings.yaml — name of the configuration file to import
Migration logs are written to the /var/log/migrate.log file in the migrator container on the server with DCImanager 6. The migration report is saved to the file specified in the report_file parameter of the migration configuration file.
Repeat migration
If migration failed or if DCImanager 5 configuration changed during the migration, you can perform the migration again:
- Restore DCImanager 6 from a backup.
- Create a one-time key for authorization in DCImanager 5.
- Correct the export and import configuration files.
- Run the migration script.
What to do after migration
- Examine the report and make sure the migration was successful.
- Open the platform interface and check if the following are correct:
- Migration of all platform objects.
- Allocation of IP addresses to servers.
- interaction with switches and PDUs.
- Settings of connections to switches and PDUs.
Changing BILLmanager settings
If DCImanager 5 has integration with BILLmanager, you can transfer services to the DCImanager 6 processing module. During migration:
- For all tariffs that run on the selected DCImanager 5 processing module, the DCImanager 6 processing module will be enabled and the internal configuration for the order will be changed.
An account in DCImanager 6 will be created for each DCImanager 5 user:
username — the email specified in BILLmanager;
password — the password specified in the dedicated server service.
Note
If the user changes the password in DCImanager 5 after ordering the server, the password will be restored to the original password. The user will still be able to enter DCImanager 6 via the BILLmanager interface. In the future, the user will be able to restore the password via email.
- The following will be changed in all open and stopped dedicated server services:
- username — to the user's email from DCImanager 6;
- server id — to the id from DCImanager 6;
- service processing module — to DCImanager 6.
If BILLmanager has a server colocation service, the following will be performed during the migration:
- The DCImanager 6 processing module will be connected to the colocation tariffs.
- The below parameters will be changed in all open and stopped colocation services:
- username — to the user's email in BILLmanager;
server and rack id — to the id in DCImanager 6;
Server search in DCImanager 6 will be performed by its name in the BILLmanager service, not by its id.
- service processing module — to DCImanager 6.
- The user who has the same email address as the user in BILLmanager will become the owner of the server in DCImanager 6. If this user does not exist, it will be created automatically with a random password.
- The DCImanager 5 processing module will be disabled for the colocation tariffs.
Starting the migration
To start the migration:
- Connect to the server with DCImanager 6 via SSH with superuser permissions.
Enter the migrator container:
docker exec -it migrator bashCODEGo to the service directory:
cd /opt/ispsystem/migrateCODECreate a configuration file for the migration based on the template bill_migrate.example.yaml.
Example of configuration file
from_modules: - dci5_processing_module_1 - dci5_processing_module_2 to_module: dci6_processing_module admin_name: temp_admin transport: - type: dci6_http - type: dci6_auth_http - type: bill_http address: https://10.1.1.2:1500 key: my_secret_key debug: false log_file: /var/log/bill_migrate.log report_file: bill_migrate_report_{datetime}.txt report_view: plainYMLComments- from_modules — names of DCImanager 5 service processing modules from which the migration is performed;
- to_module — name of DCImanager 6 service processing module to which the migration is performed;
- admin_name — temporary user to configure the integration;
- transport — DCImanager 6 and BILLmanager connection details. Specify the following:
- type — dci6_http;
- type — dci6_auth_http;
- type — bill_http;
- address — BILLmanager URL in the format https://192.0.2.1:1500;
- key — one-time key for authorization in BILLmanager;
- debug — displaying debugging information when running the script. Possible values:
- true — display;
- false — do not display;
- log_file — path to migration log file. Default value — /var/log/bill_migrate.log;
- report_file — report file name. If the parameter is not set, the report data will be displayed only in the terminal. To add the migration date and time to the file name, use the {datetime} macro;
- report_view — report format. Default value — plain. Possible values:
- plain — plain text;
- json — json with indentation and line breaks;
- compact_json — json without indentation or line breaks
To check if the migration is possible, run the script in "read-only" mode:
python3 bill_migrator.py -p bill_migrate.yaml -rCODECommentsbill_migrate.yaml — configuration file name
In this mode, the script does not perform real actions, but only checks the possibility of migration.
If the report has no errors, re-generate a one-time key in BILLmanager and run the actual migration:
python3 bill_migrator.py -p bill_migrate.yamlCODECommentsbill_migrate.yaml — configuration file name
Migration logs are written to the /var/log/bill_migrate.log file in the migrator container on the server with DCImanager 6. The migration report is saved to the file specified in the report_file parameter of the migration configuration file.
Repeat migration
If the migration failed or if the BILLmanager configuration changed during the migration, you can perform the migration again:
- Create a one-time key for authorization in BILLmanager.
- Correct the configuration file.
- Run the migration script.
What to do after migration
- Examine the report and make sure the migration was successful.
- Check if the tariffs are configured correctly. For example, perform a test server order.
- Check if DCImanager 6 has OS templates used in the tariffs.
- Remove all temporary users with the @dci5.imported suffix from DCImanager 6. Before deleting, make sure that these users do not own the servers.
- Remove the DCImanager 5 processing module:
- Connect to the server with BILLmanager via SSH with superuser permissions.
Go to the database console:
mysqlCODESelect the billmgr database:
USE billmgr;CODEDetermine the id of the DCImanager 5 processing module:
SELECT id FROM processingmodule WHERE name='<DCI5_processing_module_name>';CODEComments<DCI5_processing_module_name> — DCImanager 5 service processing module name
Remove the binding of IP addresses to IPmanager and the DCImanager 5 processing module:
UPDATE ip SET ipmgr=NULL, processingmodule=NULL WHERE processingmodule=<DCI5_processing_module_id>;CODEComments<DCI5_processing_module_id> — DCImanager 5 service processing module id- Delete the processing module in the BILLmanager interface.