Creating a cluster
A cluster is a group of servers in a single location. The key feature of such servers (cluster nodes) is their location and high data transfer speed between them.
Perform the following steps to create a cluster:
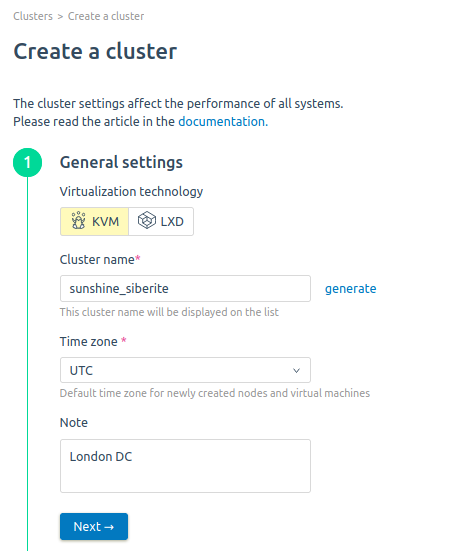
- Go to Clusters → Create a cluster.
Select the cluster Technology type — KVM or LXD.
- Enter a cluster Name or press generate.
- Set the Time zone that will be used for cluster nodes and virtual machines (VMs) by default.
- For cluster nodes to use proxy settings, enable the Use proxy to access the Internet option. Read more in the article Using a proxy.
- If required, specify the DNS servers for VM. VMs in the cluster will use these servers to resolve domain names.
- Enter optional Notes.
- Click Next.
- Select the OS that can be installed on virtual machines in the cluster.
- Activate the Enable SPICE connections option to allow SPICE connections to the VMs in the cluster. Read more it the article SPICE.
- Enable the Users can upload their ISO-images option to allow VM owners to connect their own ISO images to the VM. Read more in the article Mounting an ISO image.
- Enable the Users can connect/disconnect their VM disks option to allow users to manage virtual disks. Read more in the article Managing VM disks.
- Select the Domains Template for VMs in this cluster. For example, if you specify the template .example.com, when you create a VM in this cluster, it will have a domain of the form vm_name.example.com.
- Enable the option Users can change a domain name to allow VM owners to change domain names.
- Enter the CPU overselling rate. Read more in the article Overselling.
- Enter the RAM overselling rate in the node. Read more in the article Overselling.
- Specify the VM limit on nodes — the maximum number of VMs that will be created on cluster nodes.
- Select the type of Distribution of VM on nodes:
- homogeneous — VMs will be created on the most vacant node of the cluster;
- successive — VMs will be created on the node of the cluster that is filled up the most. Read more about node selection in Selecting a cluster node for the virtual machine.
- Click Next.
- Specify the Storage settings rules on nodes. Read more in the article Storage types:
- Images and backups directory. Default value is /image.
- OS directory. Default value is /share.
- Images and backups directory. Default value is /image.
To edit the default storage settings, press
 .To add a storage, click
  and specify its settings :File storage settings
- Click Add a local storage.
- Enter a storage Name.
- Select a type — File storage.
- Select the Storage tags. To add a new tag:
- Press Create a new tag and view all tags.
- Enter the tag Name.
- Add a discretionary Note.
- Press Create.
- Specify the Path for VM directory. Default value is /vm.
- Click Save.
LVM settings- Click Add a local storage.
- Enter a storage Name.
- Select a type — LVM.
- Select the Storage tags. To add a new tag:
- Press Create a new tag and view all tags.
- Enter the tag Name.
- Add a discretionary Note.
- Press Create.
- Specify the Volume group name. Default value is lvm0.
- Click Save.
Ceph settingsRead more about Ceph settings in the article Pre-configuring Ceph.
To connect a new storage- Click Add a network storage.
- Select the Ceph storage type.
- Specify the Connection settings:
- Name.
- Select the Storage tags. To add a new tag:
- Press Create a new tag and view all tags.
- Enter the tag Name.
- Add a discretionary Note.
- Press Create.
- Monitor’s Server IP address in Ceph cluster.
- Port for incoming ssh connections.
- Root password to connect to the server or press I want to use a public ssh key to create an ssh key.
- Click Connect.
- Specify the Storage settings. Read more in the article Creating an RBD storage:
Select the RBD pool for VM storage or create a new pool.
Select the User to manage the pool or create a new user.
Quantity of PG/PGP.
To select from connected storages- Click Connect the existing CEPH storage.
- Specify the Storage settings. Read more in the article Creating an RBD storage:
Select the RBD pool for VM storage or create a new pool.
Select the User to manage the pool or create a new user.
Quantity of PG/PGP.
ZFS settings
There can be only one storage in an LXD cluster.
- Enter a storage Name.
- Specify the ZFS pool name. Default value is zfs0.
- Click Save.
Network LVM- Click Add a network storage.
- Select the SAN storage type.
- Specify the storage settings:
- Name.
- Select the Storage tags. To add a new tag:
- Press Create a new tag and view all tags.
- Enter the tag Name.
- Add a discretionary Note.
- Press Create.
- Path to block device. For example, /dev/sdb.
Click main to use the added storage as primary.
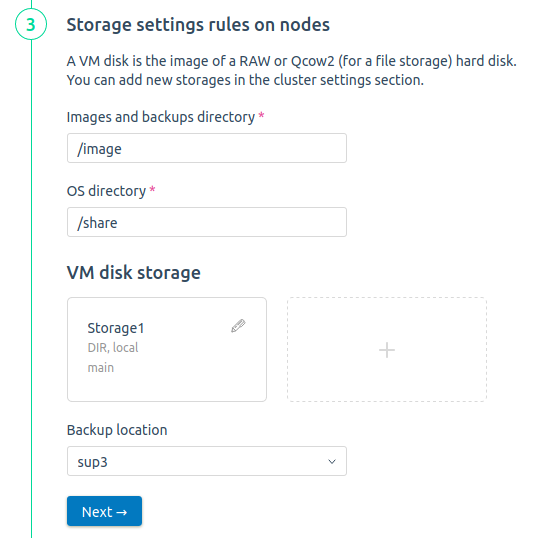
Storage configuration interface
- If a storage for backups is connected to the platform, select it in the Backup location field. For more information about connecting storage, see the article Backup storage.
- Click Next.
Select a Network configuration type:
SwitchingSwitching — a pool is allocated for the cluster, combining blocks of IP addresses from physical networks.
- Enable the Second network interface option to create a cluster with the main and additional network interface. This will allow you to create several network cards in the VM. Read more in Main and additional network .
Select IP pools for the virtual machine. If you have enabled the Second network interface option, specify the Pool for the main network and the Pool for the additional network separately.

If you plan to use one network for allocating public IP addresses and another for private ones, we recommend using the main network for public IP addresses, and an additional one for private ones.
Set the Network checking parameters:
Check IP for node. VMmanager will check the connection to this node after changing the settings.
- Timeout. If there is no connection to the test IP address during this time, VMmanager will revert to the previous settings.
RoutingRouting — a cluster node is assigned subnet of IP addresses. Virtual machines on this node are allocated only the IP addresses from the specified subnet. This subnet routing type does not allow migrating virtual machines to other cluster nodes. Choose this type, if your cluster is located in the data center Hetzner or OVH.
If you create a cluster in the data center OVH when preparing the server perform the steps described in the article Server requirements for the cluster.
IP-fabricIP-fabric — a pool is allocated for the cluster, combining blocks of IP addresses from physical networks. Routing between the nodes of the cluster is carried out via the iBGP protocol.
Before creating an "IP-fabric" cluster, add the cluster settings to the Route Reflector equipment configuration: IP addresses of nodes and numbers of BGP autonomous systems.
- Select IP Pools for VMs in the cluster.
- Select Internal Traffic Networks. Use this option if you want to exclude internal traffic counting. The traffic of the selected networks will not be taken into account in the connected billing systems.
Specify Gateway for IPv4 sessions.
VMmanager will assign IP addresses of the gateway to all virtual interfaces on the cluster node and use this data only to route the VM inside the node. You can specify any address that will not conflict with those used in the cluster node.
- To configure the IPv4 network, enable the Enable BGP-sessions for IPv4 option and specify the session settings:
- Autonomous system BGP number.
- BGP community for IPv4.
- Neighbor IPv4 address and Autonomous System number for Route Reflector equipment.
- Specify an arbitrary Note.
- To specify settings for more equipment, click Add more sessions for IPv4.
- To configure the IPv6 network, enable the Enable BGP-sessions for IPv6 option and specify the session settings:
- Autonomous system BGP number.
- BGP community for IPv6.
- Neighbor IPv6 address and Autonomous System number for Route Reflector equipment.
- Specify an arbitrary Note.
To specify settings for more equipment, click Add more sessions for IPv6.
For an IPv4 network to work in a cluster, add at least one neighbor with an IPv4 address; for an IPv6 network, add at least one neighbor with an IPv6 address.
Set the Network checking parameters:
Check IP for node. VMmanager will check the connection to this node after changing the settings.
- Timeout. If there is no connection to the test IP address during this time, VMmanager will revert to the previous settings.
- To enable the use of virtual networks in a cluster, activate the Enable virtual networks option. Read more in Virtual networks (VxLAN).
Select one of the configuration types:
- Full Mesh. No more than 10 nodes can be added to the cluster. Virtual networks will only be available within that cluster.
- Route Reflector. If you selected the IP-fabric network configuration type, all virtual network settings are copied from the IP-fabric network settings. If you selected the Switching network configuration type, you must specify the settings for virtual networks:
- To configure the IPv4 network, activate the Enable BGP sessions for IPv4 option and specify session settings:
- The BGP Autonomous system number.
- BGP community for IPv4.
Neighbor IPv4 and the number of the Autonomous system for the Route Reflector.
- Add a discretionary Comment.
To specify settings for more equipment, press Add more sessions for IPv4.
- To configure the IPv6 network, activate the Enable BGP sessions for IPv6 option and specify session settings:
- The BGP Autonomous system number.
- BGP community for IPv6.
Neighbor IPv6 and the number of the Autonomous system for the Route Reflector.
- Add a discretionary Comment.
To specify settings for more equipment, press Add more sessions for IPv6.
Add at least one neighbor with an IPv4 address to operate an IPv4 network in the cluster, or add at least one neighbor with an IPv6 address to operate an IPv6 network.
- To configure the IPv4 network, activate the Enable BGP sessions for IPv4 option and specify session settings:
- Click on Create.
Interface of creating a cluster
Connect the nodes to the cluster. For more information please refer to the article Managing servers in the cluster.