"VPU (Vlan Per User)"
This article describes how to install and configure the "the VPU (VLAN Per User)" module. The module allows placing every server (a group of servers) into a separate broadcast domain. More information can be found under VLAN.
Installing and configuring the module
Navigate to Integration→ Modules → the VPU (Vlan Per User) → Install.
After you have installed the module, the Install button will be changed into Settings.
You need to add a router and configure the IRB-interface, as well as groups of IP addresses in IPmanager. For more information please refer to Add a router and Integration with IPmanager.
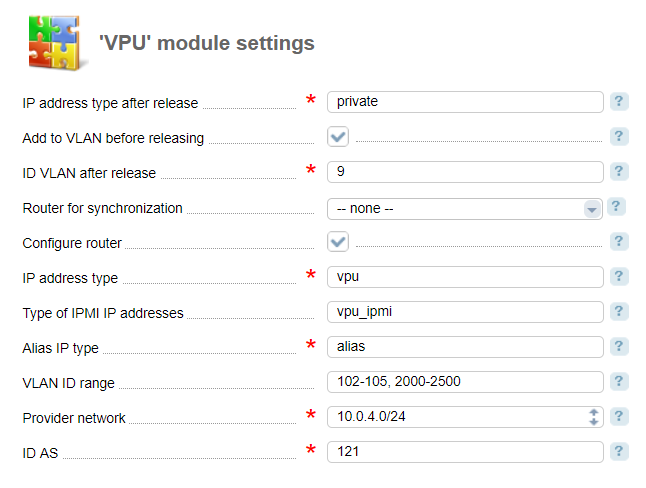
- IP address type after release — when the server status changes into "without owner", its IP addresses will be deleted from the VLAN-network and it will be assigned a new IP address according to the type selected in this field. Enter the name of IP group in IPmanager;
- Add to VLAN during diagnostics — select the checkbox o to add a server into the VLAN after release. If the IPMI address must be configured, the IPMI will be connected to the required VLAN after diagnostics. Otherwise, the server port will be connected to the selected VLAN, followed by diagnostics;
- ID VLAN after release — enter the VLAN identifier;
- Router for synchronization — select the router where the IRB interface will be configured;
- IP address type — select a type of IP addresses that will be allocated to servers in the VPU-network;
- Type of IPMI IP addresses— select a type of IP addresses that will be allocated to IPMI servers in the VPU-network. You need to enter the type for automatic setup of IPMI when adding servers into the VPU;
- Alias IP type — select a type of IP addresses that aliases for servers with the VPU-network will be allocated from;
- VLAN ID range - VLAN identifiers that can be used to create a the VPU. The start and the end identifier of the range must be separated by the hyphen, ranges must be separated by the space. Eg. "1-15 29 50 333-400";
- Provider networks— enter the networks that must include alias IP addresses in the format <network IP>/<mask>. Otherwise, the aliases will be excluded from the switch announcement. The value from this field is used for Bird configuration;
- ID AS— autonomous system ID. It is used for Bird configuration;
- Delete VPU network automatically — this option deletes VPU networks automatically when deleting its last IP address. The option is enabled by default.
After you have configured the module "VPU (Vlan Per User)" in Main menu → VLAN → Networks.
Management options
To enable the VPU mode for the server, complete the following steps:
- create a network in the VLAN;
- configure the IPMI server;
- set up the server.
The server will switch into the VPU mode after an operation is started on the server or the IPMI is configured (from version 5.155).
Creating network in VLAN
Navigate to Main menu → VLAN → Networks to see a list of the VPU-networks connected to the selected VLAN.
Click on Add to create a the VPU in the VLAN:
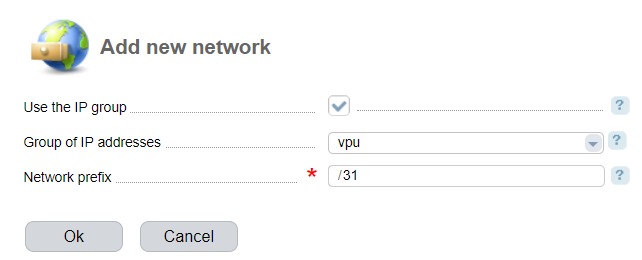
- Use the IP group
- Group of IP addresses — IP for the VPU will be allocated from the selected group;
- Network prefix — defines the number of IP addresses that will be allocated for the VPU.
The VPU-network will be added to the list of networks. In the "Status" column you will see the icons:
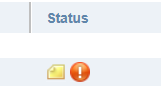
The "exclamation mark" means that you need to run a number of commands on the router. To view a command, move the mouse cursor on the "Envelope" icon.
Example of the router configuration:
set interface irb unit 2001 family inet address 11.0.0.4/31 set vlans vlan2001 vlan-id 2001 l3-interface irb.20012001 — target VLAN.
11.0.0.4/31 — the first IP from the VPU network.
After you have executed the command on the router, request information from the control panel. Navigate to Equipment→ Routers → Refresh.
Once completed, the icon "Exclamation mark " in the Status column will be removed.
Configuring the server IPMI
If your server is connected only to the switch where the IPMI is located, connection with the IPMI will be lost when adding this server into the VLAN. To avoid this, in version 5.155 we launched automatic configuration of IPMI when you add a server into the VPU.
Automatic IPMI configuration:
- In DCImanager:
- Select an IPMI IP address type in the "the VPU (Vlan Per User)" configuration form;
- Enable the Add IPMI automatically option in Settings → Global settings → IPMI.
2. On the server. Make sure that:
a. The server is not included into the VPU (i.e the VPU-addresses are not allocated to the server);
b. No operations are running on the server;
c. Only "Connection to IPMI" is enabled.
Once completed, the Configure IPMI option will be available for that server.
Complete the following steps for automatic configuration of IPMI when the server is available for use again:
- enter the ID VLAN during release in the VPU configuration form;
- enable the "Check before releasing " option in Settings→ Global settings→ Policy;
- select Pool of IP addresses for IPMI in Settings→ Global settings→ IPMI.
Therefore, after deleting the last the VPU address, the system will start a new operation to change the IPMI IP address. During the diagnostics, the system will change the IPMI settings. The VLAN on the switch port will be changed into the one specified in the module settings.
Configuring the existing server
To configure the server, you need to allocate an IP address to connect the server to the VPU. To do so, navigate to Main → Servers → select a server → click IP-addresses → Add:
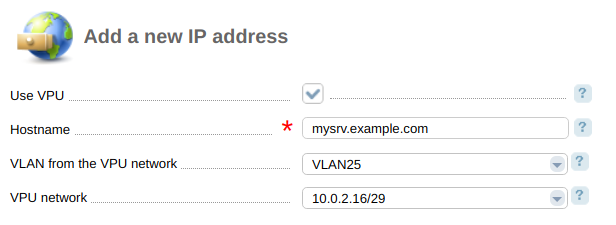
- Use the VPU network — select the checkbox to create a the VPU-network for the server;
- Configure IPMI — IPMI automatic configuration;
- Hostname — enter the domain name associated with the IP address;
- the VPU network — select a the VPU-network that the IP address will be allocated from.
Note.
To add an IP-address from the VPU-network, the server owner must have the VPU-network. He cannot add an address if it belongs to another VPU-network.
VPU-networks without an owner can be used on any server.
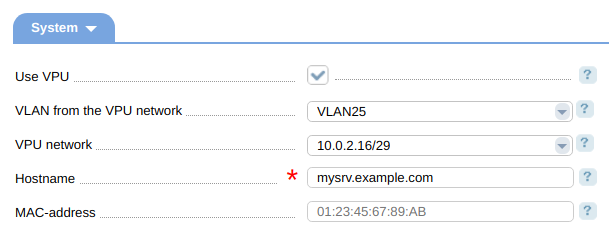
Configuring a new server
To configure a new server, you need to allocate an IP address to that server when adding it into the VPU-network. Navigate to Main → Servers → Add. In the "System" section check the Use the VPU network box and enter the VPU network to select the VLAN that the new server will be added to.
Disabling the VPU on the server
To disable the VPU on the server, you need to delete all server's IP addresses from the VPU-networks.
Note.
Deleting the IP addresses from the VPU-network will release them in the IP pool or in IPmanager. But you can assign them to other servers. The IP addresses from the VPU-network are released only after you delete them.How it works
Automatic configuration of the IPMI server
Automatic configuration of IPMI when adding the IP address from the VPU includes the following steps:
- The system creates /31 the VPU-network for the IPMI according to the type selected in the module configuration form (the IP address type after release parameter);
- The server is allocated a temporary IP with the domain "temp.ipmi.ip.address" from the newly created the VPU-network;
- The server runs the operation to change IPMI settings;
- During the operation the server is allocated an IP address for the IPMI from the network with the same VLAN, as specified in the network for the server;
- After the operation is completed, the temporary IP address will be deleted, and the server connection will be changed from the VPU into VLAN.
Automatic configuration of IPMI when deleting the last IP address from the VPU includes the following steps:
- The server is allocated a temporary IP address with the domain "temp.ipmi.ip.address" from the VLAN network where the server is located;
- The server runs the operation to change IPMI settings;
- During the operation the server is allocated an IP address for the IPMI according to the type specified in Settings→ Global settings→ IPMI- the Pool of IP addresses for IPMI field;
- Next, the temporary IP address will be deleted, and the server connection will be changed into the VLAN specified in the module configuration form (the ID VLAN after release parameter).
Technical details
DHCP-relay configuration
set forwarding-options dhcp-relay forward-snooped-clients all-interfaces
set forwarding-options dhcp-relay server-group dci-dhcp-relay 10.10.10.1
set forwarding-options dhcp-relay active-server-group dci-dhcp-relay
set forwarding-options dhcp-relay group dci-dhcp-relay interface irb.200110.10.10.1 — the primary IP address of DCImanager where the DHCP-server is set up.
irb.2001 — IRB-interface.
Alias IP addresses
Alias IP addresses can be allocated from any network. After you have added them, the following information will be added into the filter ibgp_policy section of the Bird(bird.conf) configuration file:
filter ibgp_policy {
	if ( dest = RTD_UNREACHABLE && pref_from_isp() && net =10.0.0.2/32 ) then {
		bgp_next_hop = 11.0.0.15;
		print "Alias accepted: ",net;
		bgp_origin = 0; bgp_community = -empty-;
		bgp_community.add((1111,1));
		accept;
	}
	reject;
}10.0.0.2 — alias IP address.
11.0.0.15 — IP address from the VPU-network.
Reconfiguring the Bird configuration file
Run the following command to synchronize the Bird configuration file with the settings from DCImanager::
/usr/local/mgr5/sbin/mgrctl -m dcimgr bird.rebuildThe Bird configuration file will be cleaned and all the information for servers with the VPU will be added. You can find the old configuration file in /etc/bird.conf.reset.bak.
Parameters and options of the DCImanager configuration file
Options:
- Option Allow the VPU — enable"the VPU";
- Option AllowVlanOnFree — specify a default VLAN after that switch connections will be included to;
- Option CreateNetOnRouter — enable automatic interface configuration for the VPU on Juniper routers (from version 5.147).
Parameters:
- DefaultIpType — IP-address type that is allocated to the server when the server with VPU is released;
- VPUFreeIpPool — when releasing a server with the VPU, an IP address will be allocated from this pool (for an internal user with PmanagementV2);
- DefaultVlan — default VLAN which is specified when releasing a server provided that the "AllowVlanOnFree" option is set;
- RouterSync — router id for synchronization of VLAN list on that router with the router"_vlan table";
- VPUNetIpPoolIpmi — - (for internal use with IPManagementV2) specifies a pool of IP addresses that will be allocated to IPMI in the VPU-network;
- VPUNetIpType — specifies a type of IP addresses that will be allocated to servers in the VPU;
- VPUNetIpPool — (for internal use with IPManagementV2) specifies a pool of IP ranges that will be allocated to servers in the VPU-network;
- VPUNetIpTypeIpmi — specifies a type of IP addresses that will be allocated to IPMI in the VPU-network;
- AliasIpType — specifies a type of the range of alias IP addresses that will be allocated to servers in the VPU-network;
- VPUAliasIpPool — a pool of IP addresses that will be allocated to servers in the VPU as alias IP. (for an internal user with PmanagementV2);
- AllowVlanRange — specifies VLAN ranges for the VPU (note the correct format: 102-105, 2000-2500);
- AutonomSystem — ID of the autonomous system (AutonomousSystem) for the VPU BGP.