Installation process
The billing system can be installed on a virtual or dedicated server that meets the system requirements. In this article, you can read about the installation process.
Note:
We don't recommend that you install BILLmanager on the same server with ISPmanager. After ISPmanager is installed, Nginx uses port 443 to work with websites. BILLmanager also uses port 443 for correct operation of payment modules. If you configure Nginx-poxy you will face issues related to the shell-client and the installation of APS scripts in ISPmanager.
License activation
License types are described in "Software licensing policy".
A trial license is activated automatically after you have installed BILLmanager on the server. You don't need to order a license.
If you want to use a commercial version you first need to purchase the license. Specify the public IP address of the server where the control panel will be installed.
If the server runs behind the NAT and IP address is assigned to its network interface, the BILLmanager license will be activated during the installation. Read more about the IP-address for the license.
Note:
If the server is located behind NAT or the license doesn't have IP-address or the IP-address is not on the server interface, then you must activate the license using the activation key.
Installation
The installation script will install BILLmanager and additional software applications the billing panel needs:
- the database server — MariaDB;
- the web-server — ihttpd;
- the platform for JavaScript — Node.js.
SELinux will be disabled to allow for the correct installation of the billing system.
Note:
Before you start, check that wget is installed on the server.
Installation steps:
- Connect to the server via SSH with the superuser permissions (root).
Download the installation script:
wget https://download.ispsystem.com/install.eu.sh -O install.eu.shBASHStart the script:
Execute the following command to install the latest version of the control panel:
sh install.eu.sh --billmgrBASHTo install a specific version, execute install.sh with the parameter --release, e.g.:
sh install.eu.sh --release <version> BILLmanager --billmgr5BASH
Note:
If you use a lifetime license please pay attention to its updates period. After the updates period is expired, you won't be able to activate the latest version of the control panel. Install the panel with the parameter --release 5.100, where 5.100 is the last available version for the lifetime license.
We no longer sell lifetime licenses.
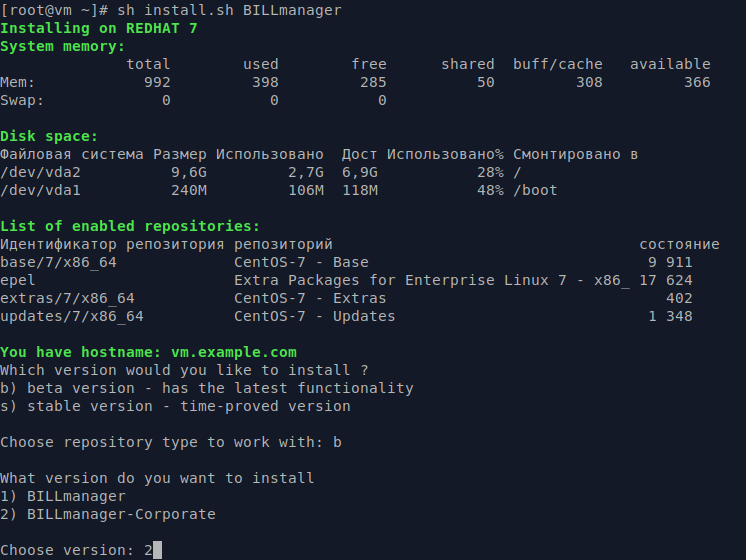
- Select a version:
- stable — a stable version which used to be in the beta-testing phase and now is successfully released.
- beta — a version with the latest updates, however still in the beta-testing phase.
The installation script will connect two ISPsystem repositories: ispsystem-base.repo is used for installing additional software, ispsystem.repo is used for installing ISPsystem control panels.
5. Select a BILLmanager version. Enter the number of the version in your console:
- BILLmanager — this version is for small and medium business companies having one project (one brand).
BILLmanager Corporate — this version is for holding companies and enterprise companies having several independent projects.
Note.
Select from the list of BILLmanager versions, Startup, Advanced or Corporate, that corresponds to your pricing plan.
To configure BILLmanager please log in to the web interface.