"IPMI proxy via auxiliary server"
This article describes the operation principles and installation algorithm of the module “IPMI proxy via auxiliary server".
The module “IPMI proxy via auxiliary server” allows you to access IPMI web-interfaces for IPMI-modules with internal IP. Access is provided through the VNC to the selected server that runs CentOS 7. An environment with a limited version of the browser and IPMI web-interface page will be created on the server.
The module is tested on the following IPMI types:
- SuperMicro (FW: 01.11);
- HP iLO 4 ProLiant (FW: 2.50);
- HP iLO 3 ProLiant (FW: 1.88);
- HP LO 100 (FW: 4.23);
- Huawei iBMC (FW: U25 2.30);
- Intel BMC (FW: 01.21.6038);
- Dell IDRAC 8 Power Edge R430 (FW: 2.41.40.40, Date:14.05.2017);
- SuperMicro (FW: 03.45, Date: 09/19/2016).
More information can be found in the article IPMI.
Preparing a proxy-server
To use this module, you will need a server that runs CentOS 7 and has access to the internal network where IPMI is located. We recommend that you install the proxy software on a separate (virtual or dedicated) server. The server can be assigned either a public or private IP address, but it must be accessible from the server with DCImanager.
We do not recommend setting up proxy on the server with DCImanager. While using proxy, third-party software is also used, and the risk of gaining unauthorized access to the target server increases. Please note that proxy increases server load, therefore, slowing down DCImanager.
Installing and configuring the module
Navigate to Integration → Modules → Install.
After you have installed the module, the Install button will be changed into Settings.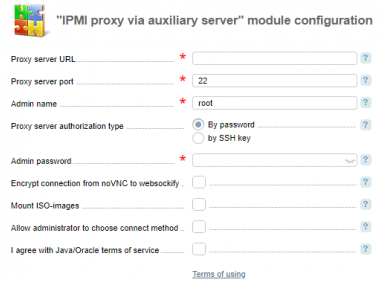
- Proxy server URL — the URL to access the IPMI proxy server via SSH;
- Proxy server port — the SSH port to access IPMI proxy server;
- Admin name — the Admin username to connect to the IPMI proxy server;
- Proxy server authorization type — IPMI proxy server authorization type;
- Admin password / Open SSH-key — connection data depending on the selected connection method:
- By password — use a password for authorization;
- By SSH-key — use an SSH-key for authorization.
Encrypt connection from noVNC to websockify — this option enables encryption of transmitted data (SSL) when connecting noVNC to websockify. We recommend that you enable this option if you work with the control panel using SSL;

Note
VNC-viewer will not be available if this option is disabled.
- Mount ISO-images — this option enables to mount all available ISO images on the proxy server into the user directory. This option allows you to mount ISO images on the target server via the IPMI web-interface or the Java console. The administrator can use all images. The owner of the server can access public images, and the images that he or his administrator uploaded;
- DCImanager server IP address — the IP address of the server where the control panel is installed;
- Allow administrator to choose a connect method — select the checkbox to allow the administrator to select a connection method to the IPMI interface;
- I agree with Java/Oracle terms of service (c) — accept the Java/Oracle(c) terms of service.
Management options
IPMI proxy via auxiliary server is activated when you connect a new IPMI to the server or edit the existing one. For more information please refer to the article IPMI.
Note
The Interface URL field must not contain the URL with a domain name. You can enter only IP addresses. e.g.:
http://1.1.1.1/login.asp
https://1.1.2.2/ipmi/login
http://1.1.2.3/
https://1.1.2.4
After you have installed and configured the module, if proxy via an auxiliary server is set up for the IPMI, clicking the icon ![]() in the Status column on the list of servers will connect to the proxy server and open the image with the IPMI web-interface.
in the Status column on the list of servers will connect to the proxy server and open the image with the IPMI web-interface.
Learn more in the section IPMI web-interface management.
How it works
Proxy server
The VNC server and the software, which is required for displaying the IPMI web-interface and the remote console will be installed on the server.
The websockify server which redirects traffic to the VNC server and back will start on the server with DCImanager.
noVNC, which refers to websockify locally and gets the picture with the IPMI web-interface in the browser through the VNC-server will start on the server with DCImanager.
To enter the password and exchange some textual information with the IPMI web interface easily, use buttons to transfer the clipboard and the text field in the noVNC interface. The Ctrl button is enabled for use inside the Java console.
Activating Proxy
On the server with DCImanager, allow incoming traffic for a range of ports specified in the configuration file (for noVNC).
On the remote proxy server, the system performs the following steps:
- Configures a user template (named dci_vnc_template and dci_vnc_users group) to start the VNC server;
- Installs the software (outdated chromium with java-plugin support, java, tigervnc-server, chromium current version);
- Creates an exception file for java;
- Installs the java-plugin for the browser. It is necessary to open a Java applet for some IPMI, for example for HP iLo 4);
- Configures the correct opening of jnlp-files through javaws;
- Opens incoming traffic to the port range for VNC in the firewall;
- Sets the public key from <control_panel_directory> /etc/.ssh/master_id.pub in ~/.ssh/authorized_keys of the selected administrator;
- If all the steps were completed successfully, creates the empty file /var/lock/ipmiproxyv2_installed. If this file exists, when configuring the module next time, the installation won’t start on that server.
Connecting to the IPMI
On the server running DCImanager:
- The system will check that noVNC port does not match one of the ports banned by browsers: 6000, 6665–6669, 6697;
- Next, it will check the firewall rules and correct them if necessary. If the ports for noVNC were changed in the settings configuration form, the incoming traffic will be allowed to the range of ports from the configuration file;
- The availability of the IPMI web-interface URL will be checked every 10 seconds. If it is unavailable, the corresponding error message will be displayed;
- If the "Mount ISO images" option is enabled:
- The system will generate a list of ISO images available for the user who called the function;
- Each image from the list will be mounted as an NFS-directory (if it wasn’t mounted earlier). The NFS directory is available only for the proxy server
On the remote proxy server:
- A temporary user will be created from the user template. The IPMI link will be specified in its start script;
- Links to IPMI will be added to the list of exceptions for Java (the original one and the link with https);
- The firewall rules will be checked and corrected if necessary. If the ports for noVNC were changed in the settings configuration form, the incoming traffic will be allowed to the range of ports specified in the configuration file;
- If the "Mount ISO images" option is enabled, every available image will be mounted into the ISO subdirectory inside the temporary user home directory;
- The IPMI type will be checked:
- If the Support old IPMI types option is enabled, the browser will support the java plug-in (required for HP iLo 100/160 devices);
- Otherwise, the current version of the browser will start. It is compatible with most IPMI.
- VNC server will start from the user side, where the browser with limited capabilities will start. The IPMI web-interface will open in the browser;
- On the server, with DCImanager the websockify proxy will start. It will wait for a connection on the first free port from the range and redirects them to the VNC server;
- noVNC connected to websockify will open in a new tab.
Closing a tab (or opening a new one with the same IPMI)
- websockify will be stopped;
- Processes of the temporary user will be terminated;
- if the "Mount ISO images" option is enabled:
- the directories with ISO images will be unmounted;
- If the directory usage count is reduced to zero, the NFS directory on the server with DCImanager will be unmounted;
- The user lock files will be deleted if needed;
- The temporary user and his home directory will be deleted.
Changing proxy server address
- The system will try to connect to the old proxy server via SSH;
- The system will try to restore the firewall rules to their original state on the old server;
- The system will try to delete the public key <control_panel_directory> /etc/.ssh/master_id.pub from~/.ssh/authorized_keys of the old server;
- Proxy on the new server will be enabled.
How the module works in locations
If the module is configured on locations, the system will try to connect to IPMI servers on the locations through the proxy server. Make sure the proxy server is accessible both from DCImanager and the servers on the locations. Learn more under Locations.