Ticketing system
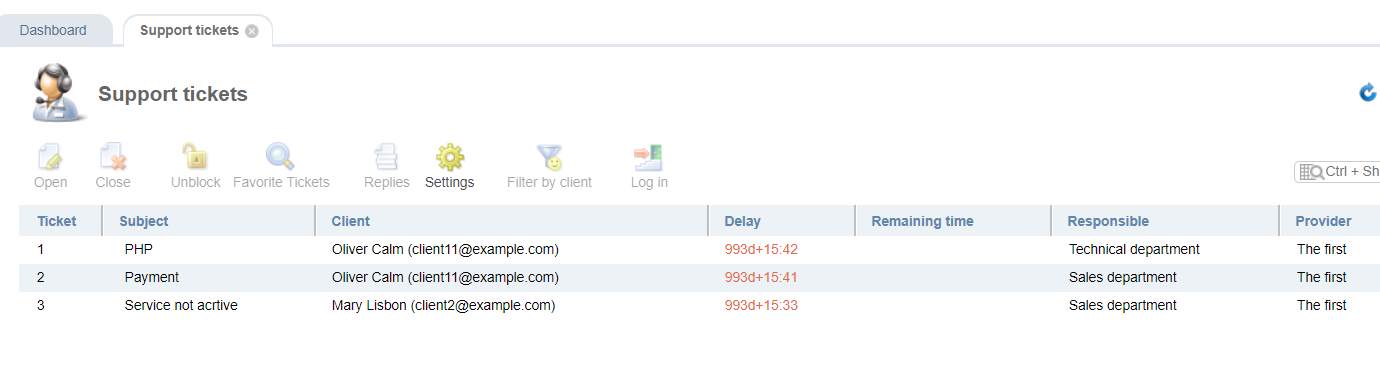
Tickets from clients are displayed in Support → Support tickets. A staff member can view and manager only the tickets sent to the department(s) he is assigned to.
Ticket form
The ticket form contains several areas:
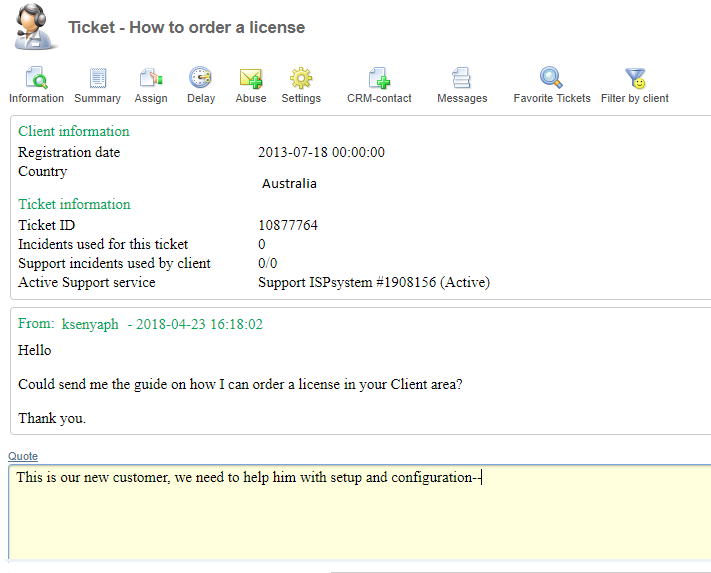
The toolbar:
![]() Information. Brief information about the client: its email, registration date, internal comment, and information on his services.
Information. Brief information about the client: its email, registration date, internal comment, and information on his services.
![]() Forward. Opens a new form where you can redirect the ticket to another department or a staff member. After the ticket is redirected, you will see the automatically generated message: "The ticket has been assigned to "<Department name>". In the upper section of the ticket form, you will see the following information: "Ticket information: The ticket is assigned to <Department name>. The ticket will remain open for the staff who run this task. He can continue sending replies to the client on this ticket.
Forward. Opens a new form where you can redirect the ticket to another department or a staff member. After the ticket is redirected, you will see the automatically generated message: "The ticket has been assigned to "<Department name>". In the upper section of the ticket form, you will see the following information: "Ticket information: The ticket is assigned to <Department name>. The ticket will remain open for the staff who run this task. He can continue sending replies to the client on this ticket.
![]() Settings. Here you can change the font and font size. The changes will be applied only to the ticket form for this staff member.
Settings. Here you can change the font and font size. The changes will be applied only to the ticket form for this staff member.
![]() Messages. In the window that will open you can see all of the replies within the ticket and edit them if needed. Also, you can split the ticket into several starting from the selected reply.
Messages. In the window that will open you can see all of the replies within the ticket and edit them if needed. Also, you can split the ticket into several starting from the selected reply.
![]() Filter by clients. Filter all of the BILLmanager sections by the selected client.
Filter by clients. Filter all of the BILLmanager sections by the selected client.
Depending on the selected service, the toolbar may contain additional buttons for diagnostics: "Whois" and "Dig".
Above the toolbar, you can see the ticket subject and the service associated with this ticket. The staff can edit these fields.
Replies
When a staff member opens the ticket, he can view the information, but cannot send a reply. Clicking the Assign ticket to me button will assign the ticket to the staff and show the icon ![]() in the list of tickets. The ticket is blocked, and other staff cannot send replies within the ticket.
in the list of tickets. The ticket is blocked, and other staff cannot send replies within the ticket.
After the staff member assigned the ticket to himself, he will see additional fields:
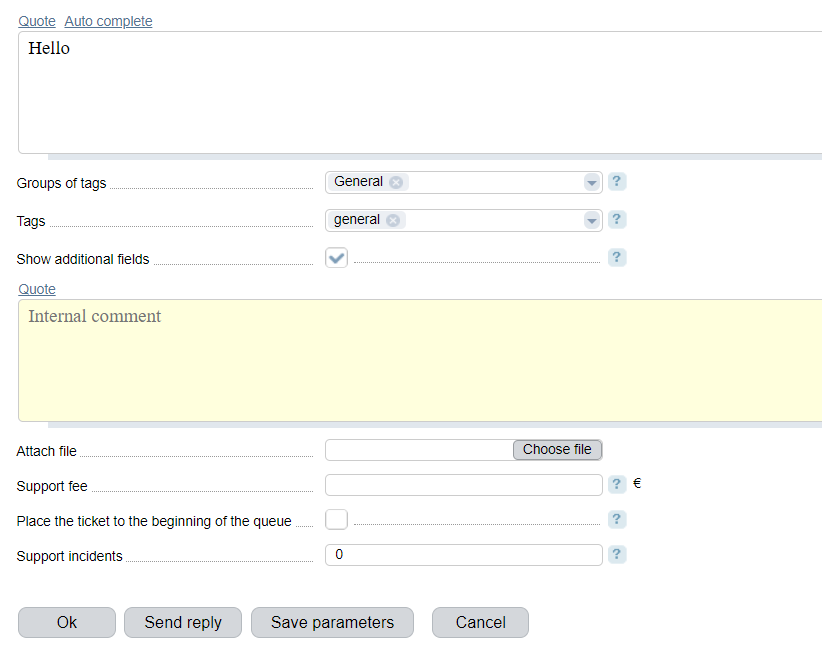
- Priority. Clients can set a ticket priority, and a staff member can change it. By default this function is disabled. To enable the function go to Provider → Global settings → Technical support settings and enable the option Use priority in tickets. Enable the option Provider staff sets the priority, to forbid clients setting the ticket priority.
- Quote. Include a copy of a selected reply.
- Autocomplete. Allows choosing a pre-defined reply.
- Show additional fields. Opens hidden fields allowing to enter your comment or attach files to the ticket:
- Internal comment — here you can enter any information related to this ticket. Only the staff will see this information. The internal comment field and the text are shown in yellow.
- Attach file allows to attach a file that the client can open.
- Charge client — you can charge your client for provided technical support.
- Place at the beginning of the queue — allows setting the highest priority for the ticket. The function is supported only in BILLmanager Corporate.
- Support incidents define how many support incidents were charged for the selected ticket (provided that the per-incident support is set up). The default value is 1. The staff can change this value.
Buttons:
- Clicking Ok will send the reply to the client and close the ticket in the admin area. If the staff member entered the internal comment, it will be sent as well.
- Send reply will send a reply to the client. If the staff member entered the internal comment, it will be sent as well. The ticket will remain open and blocked allowing to chat with the client.
- The Save parameters button is displayed, if the staff member modified some parameters of the ticket, e.g. its subject or service. Clicking Save parameters will apply the changes. Ticket replies and internal comments won't be sent.
- Cancel — close the ticket form. The reply and comment won't be sent. The ticket is considered open in the admin area and blocked by the staff.
Tickets archive
The client can send the resolved ticket to the archive. To do this, he or she needs to go to Support → Support tickets → select a ticket → To Archive button. Tickets sent to the archive can be viewed by the client in the Support → Archived tickets section.
Note
In order for the client to be able to send a ticket to the archive for which an abuse was recorded, it must be resolved. To do this, go to Support → Abuse list → select the abuse → Solved button. The client will then be able to archive the ticket.
Ticket statuses
In the Client area
A client can see open tickets in Support → Support tickets. Active tickets are those tickets which are not moved to the Archive. Status is displayed next to every ticket.
A ticket may have one of the following statuses:
- In progress — a client has sent a response to his service provider, and the provider is working with it. The ticket with this status cannot be moved to the Archive.
- New messages — the ticket contains unread responses.
- Reviewed — the service provider read the information in the ticket and closed it.
In the Admin area
In Support → All tickets staff members can see a list of active and archived tickets. Status is displayed next to every ticket.
A ticket may have one of the following statuses:
- Awaiting response from client — the ticket is closed in the admin area, but is considered open for the client.
- In progress — the provider is working with the selected ticket.
- In archive — the provider resolved the issue, and the client moved the ticket into the Archive.