Import of virtual machines
There are 4 variants of VM import:
- Import from a server with VMmanager;
- Import from a server with libvirt;
- Import from a server with VDSmanager-KVM.
- Import from another hypervisor (not KVM)
Import of virtual machines from a server with VMmanager or libvirt
Navigate to Import → VM import → Add.
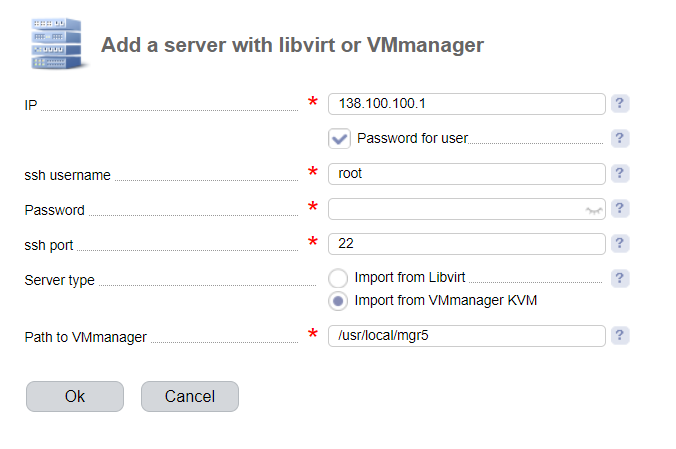
- Public IP-address of the server;
- Access details to the server;
- Server type:
- Import from libvirt;
- Import from VMmanager KVM (enter the directory where the control panel is installed).
After you successfully connect to the server and get information about virtual machines from the control panel or libvirt, the server will be added to the import list. Click the "VM list' button to get a list of virtual machines located on this server. The list shows all the virtual machines on the selected server that can be imported. Virtual machines will be suspended during import.
Select the virtual machines and click Start import.
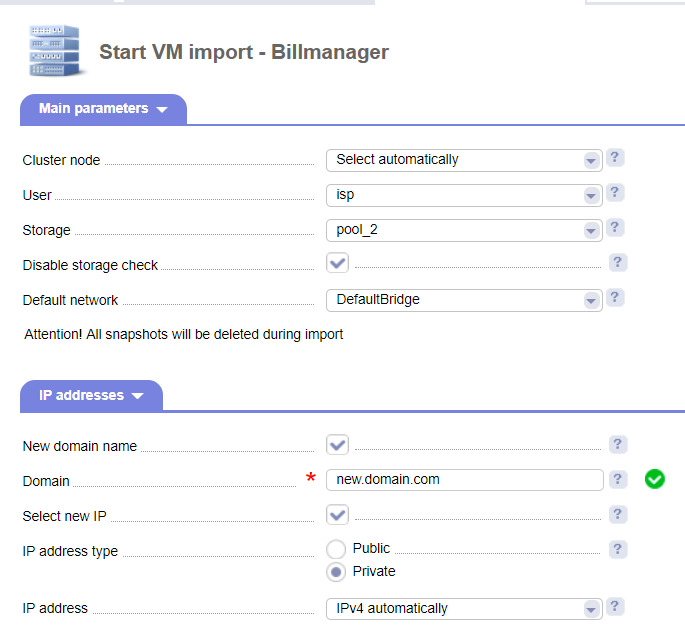
- Cluster node the virtual machines will be imported to:
- Automatically - a cluster node is selected the same way as when creating a new virtual machine. More information can be found under Distribution of virtual machines between cluster nodes;
- From the list.
- User — select the check box if you want to import the owner of this virtual machine;
- Storage — during the import process the virtual disk will be moved from the storage of the source server to the storage of the target server. During the import process, the system will search for a storage on the target server which name matches the name of the source storage where the VM disk is located. If the storage is not found, the virtual disk will be imported into the storage specified in the "Storage" field.
- Disable storage check — move the virtual disk into the storage selected in the "Storage' field;If you need to import virtual machines with a virtual disk located on a network storage:When importing from another VMmanager KVM a virtual machine with the disk located on a network storage, the network storages (both the source and the target) must not have the same names, because disk check will fail. Therefore, when importing you need to enable the "Disable disk check" option and in the "Storage" field enter the target storage with the names that differ from the name of the source storage. The virtual disk will be moved to the storage specified in the "Storage" field. You cannot import the virtual machine if its disk is located in the network storage connected to both clusters (the source and the target), since the disk already exists in the storage.
- Storage— during the import process the virtual disk will be moved from the storage of the source server to the storage of the target server. The system checks that there is a storage with the same name as on the source-storage. If there are now storages with that name in VMmanager, the VM virtual disk will be copied to the storage from this field. If you import a virtual machine from the network storage, the name of the target storage must be different. You cannot import the virtual machine if its disk is located on the network storage connected to both the source and target servers;
- Disable storage check — the virtual disk will be copied into the storage specified in the "Storage" field. You must check this box if you copy the virtual disk from a network storage;
- Default network - after importing the virtual machine the system will try to connect it to the network with the same name as on the source server. If it is not possible the virtual machine will be connected to the default network.
- New domain name - enter a new domain name for the virtual machine;
- Select a new IP - enter the type of a new IP address and how it should be allocated.
- IP-adders type:
- Public — with access from the Internet;
- Private — without access from the Internet;
- NAT — to use with NAT networks.
- IP-adders type:
- IP-address — enter a new IP address.
Import requirements:
1. Enough resources on the cluster nodes;
2. If the source VMmanager is integrated with IPmanager, make sure that the target VMmanager is integrated with the same IPmanager.
Note
The tab IP-addresses is not available if you are importing several virtual machines at the same time.
A virtual machine is suspended during import, all its snapshots are deleted.
After the import is completed, the virtual machine is suspended on the source-server, but not deleted. Deleting the machine will not release its IP address in IPmanager.
Import from a server with VDSmanager-KVM
Navigate to Import→ VDS import → Add.
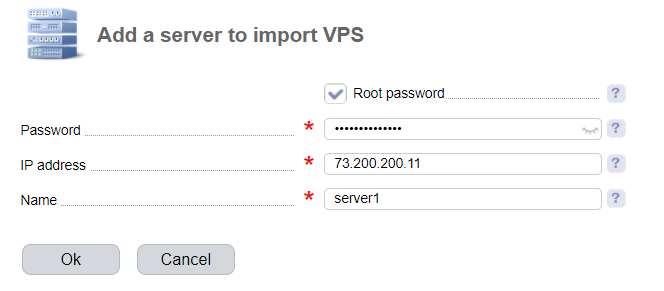
Root password — authorization with the root password;
Password— root user password;
- IP — server IP address;
- Name.
After you have successfully connected to the server and have received information about the virtual machines, the server is added to Import→ VPS import.
Click on Import→ VPS import → VPS list to view a list of virtual machines that you can import. Select the virtual machines and click Import.
Note
The virtual machine is suspended on the source-server, its snapshots are deleted.
After import, the VPS gets suspended on the source-server, but not deleted.
Import requirements:
- Enough resources on the cluster nodes.
- If VDSmanager is integrated with IPmanager, make sure that VMmanager is integrated with the same IPmanager.
- VDSmanager must work with KVM virtualization.
Import of virtual machines created with another hypervisor (not KVM)
Import of virtual machines into VMmanager KVM cluster includes the creation of the same virtual machine and connection of VM disk.
Import of a virtual machine created with a non-KVM hypervisor includes the following steps:
- The virtual disk of the imported virtual machine is converted into the format supported by VMmanager;
- The system defines the configuration of the imported virtual machine;
- A virtual machine with the same configuration as the imported VM is created in VMmanager;
- The created virtual machine is suspended in VMmanager;
- The virtual disk of the newly created virtual machine is changed into the disk of the imported one;
- The virtual machine is activated and checked in VMmanager.
Converting the virtual disk of the imported virtual machine into the format that VMmanager supports
VMmanager supports RAW and Qcow2 formats. Learn more under Virtual disk storage.
We recommend that you use the virt-v2v utility. Learn more under Convert virtual disks into the format that VMmanager supports.
Defining configuration of the imported virtual machine
The following information about the imported virtual machine is required:
- VM resources (vCPU, RAN, disk space);
- Location of the virtual disk.
VMmanager uses libvirt for virtualization management. In libvirt virtual machines are kept in the form of XML-descriptions. You can get any information about a virtual machine from such description.
For more information about XML-description of virtual machines, please refer to the article Virtualization management using libvirt.
The way how you can get information about the imported virtual machine depends on how that machine was created.
Creating a virtual machine in VMmanager with the same configuration as the imported VM has
In the control panel, you need to add a virtual machine similar to the one being imported. You need to specify its settings manually.
Suspending a virtual machine created in VMmanager
In the control panel change the VM status from "Running" into "Suspended".
Changing disk of the newly created virtual machine into the disk of the imported machine
Note
The virtual disk of the machine created in the control panel and the converted virtual disk of the imported virtual machine must have the same format - RAW or Qcow2.
You need to copy the converted virtual disk of the imported virtual machine and use it instead of the virtual disk of the VM created in the control panel. The disk storage of the VM created in the control panel was specified on the VM creation form. The virtual disk has the same name as the virtual machine.
Enabling the virtual machine and checking its performance
In the control panel, you need to change the VM status from "Suspended" into "Running".
Possible issues:
1. You may get an error something like the following:
qemu-kvm: -drive file=/vm/vm2,if=none,id=drive-virtio-disk0,format=qcow2: could not open disk image /vm/vm2: Invalid argumentUsually, this error means that the format of VM disks does not match. You need to re-create a virtual machine in the control panel and specify the correct format of the virtual disk. Or convert the virtual disk of the imported virtual machine into an appropriate format.