Recovery mode
Recovery mode allows loading the server if it doesn't start after a reload for any kind of reason. In case there is no physical access to the server, for example via IPMI.
Server recovery preparation
For the server recovery:
Make sure that there are right IP and MAC addresses listed in DCImanager.
Grant the access to the target server from the server with DCImanager installed to allow the recovery.
Make sure that the server is configured to download over the network.
Make sure that the server is connected to the power distributor or IPMI set up. Or provide the ability of manual server load after the start the recovery process.
Install the essential recovery template in Settings → OS templates:
- Sysrescd-x86_64 — is for OS Linux servers recovery, if servers load via the network with the iPXE.
- Sysrescd-x86_64-noipxe — is for OS Linux servers recovery, if servers load via the network with the PXE.
- FreeBSD-rescue-amd64 — is for OS FreeBSD servers recovery.
Make sure that the DHCP-server interfaces are mentioned in Settings → Global settings → field Interfaces.
Server recovery
Go to Main menu → Servers → Operations.
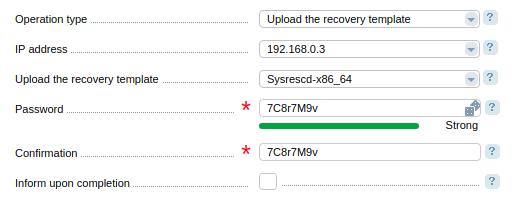
Specify:
Operation type — choose "Upload the recovery template";
IP-address — server address;
Upload the recovery template — template that will be used for the recovery;
Password — for the server connection;
Confirmation;
Inform upon completion — operation completion informing or the SSH server availability option.
DCImanager will reload the server and you would be able to access it via SSH.
Press Main menu → Servers → Cancel to exit the recovery mode. The server will be rebooted in normal mode.
How it works
FreeBSD-rescue-amd64 template
Used for FreeBSD servers recovery.
Example of the superuser password recovery on the server:
Connect to the server loaded with the recovery template FreeBSD-rescue-amd64 via SSH;
Upload the gmirror module to work with drives mirrors:
gmirror loadBASHRun command gmirror status. The output should look like these:
# gmirror status Name Status Components mirror/mir0 COMPLETED ad4 (ACTIVE) ad6 (ACTIVE)BASHRun ls -la /dev/mirror/mir0* to view directories on found device mirror/mir0:
# ls -la /dev/mirror/mir0* crw-r----- 1 root operator 0, 91 Jun 18 13:47 /dev/mirror/mir0 crw-r----- 1 root operator 0, 92 Jun 18 13:47 /dev/mirror/mir0s1 crw-r----- 1 root operator 0, 93 Jun 18 13:47 /dev/mirror/mir0s1a crw-r----- 1 root operator 0, 94 Jun 18 13:47 /dev/mirror/mir0s1bBASHIn this case the root directory is — /dev/mirror/mir0s1a. If there is no root directory, check if it exists on drives /dev/ad*:
# ls -la /dev/ad* crw-r----- 1 root operator 0, 63 Jun 18 13:53 /dev/ad4 crw-r----- 1 root operator 0, 64 Jun 18 13:53 /dev/ad4s1 crw-r----- 1 root operator 0, 66 Jun 18 13:53 /dev/ad4s1a crw-r----- 1 root operator 0, 67 Jun 18 13:53 /dev/ad4s1b crw-r----- 1 root operator 0, 65 Jun 18 13:53 /dev/ad6BASHIn this case the root directory is — /dev/ad4s1a.
Create the directory:
mkdir /true_rootBASHMount a catalog:
mount /dev/ad4s1a /true_rootBASHChange the root directory:
chroot /true_rootBASHTo change the superuser password run:
passwd rootBASHInsert the new password twice and exit from chroot with:
exitBASHUnmount the directory:
umount /true_rootBASH
Sysrescd-x86_64 and Sysrescd-x86_64-noipxe templates
Used for Linux servers recovery. Templates are based on OS Gentoo. Gentoo uses its own portage system. Read more on official Gentoo website. To manage the software the emerge command is used. Read more on opennet.ru. For example, installation performed with the command:
emerge <portage_name>Example of the superuser password recovery on the server:
Connect to the server, loaded with the recovery template via SSH;
Specify the drives connection method. For instance wit the command:
lsblkBASHDefine the root directory;
Create the directory:
mkdir /true_rootBASHMount the root directory:
mount /dev/<device of a root directory> /true_rootBASHChange the root directory:
chroot /true_rootBASHTo change the superuser password, run:
passwd rootBASHInsert the new password twice and exit the chroot with:
exitBASHUnmount the directory:
umount /true_rootBASH