IPMI
This article describes the functions and the options that DCImanager supports to create and manage IPMI.
IPMI is a system for monitoring and managing the functions that are built into server hardware and software. Management functions are available even if the server is powered off.
IPMI functions:
- Powers on, powers off, reboots servers;
- Connects to the IPMI console for the server management;
- Monitors server statuses.
Connecting to IPMI
DCImanager supports the following IPMI connection methods:
- Access the IPMI directly from the web-interface;
- Access the IPMI through the jnlp-console;
- Access to the IP KVM trough the jnlp-console (ihttpd proxy);
- Access the IPMI through ihttpd proxy;
- Access the IPMI through noVNC proxy.
| Comparison of IPMI connection methods | |||||
|---|---|---|---|---|---|
| Access to IPMI from IPMI interface | Access to IPMI through jnlp-console | Access to IP KVM trough jnlp-console (ihttpd proxy) | Access to IP KVM trough IPMI web-interface through ihttpd proxy | Access IPMI through noVNC proxy | |
| Supported IPMI | Servers that allow connecting to the IPMI web-interface | Servers that allow connecting through the jnlp-console | Servers that allow connecting through the jnlp-console and the HTTP protocol | Servers that allow connecting through the HTTP protocol (Supermicro, HP (iLO2)) | Servers that allow connecting to the IPMI web-interface |
| IPMI web-interface IP address | Public | Public | Private | Private | Private |
| https | Supported | Supported | Not supported. You need to disable in the IPMI web-interface | Not supported. You need to disable in the IPMI web-interface | Supported |
| Authentication | login, password per every session | One-time configuration | One-time configuration | One-time configuration | login, password per every session; you can copy them to the clipboard |
Navigate to Main menu → Servers to access the IPMI via the web-interface. You will see the icon ![]() in the "Status" column of every server with the IPMI.
in the "Status" column of every server with the IPMI.
Clicking the icon will open the IPMI web-interface. Install the corresponding modules to use other connection methods.
IPMI modules
- "IPMI console" — allows users to download the IPMI console as a .jnlp file;
- "IPMI proxy via ihttpd" — allows server owners with the IPMI that is assigned the internal IP address to access the IPMI web-interface through the built-in ihttpd web-server.;
- "IPMI via auxiliary server" — allows server owners with the IPMI that is assigned the internal IP address to access the IPMI web-interface through the VNC-client connected to a selected server with CentOS 7. An environment with the limited browser version and IPMI web interface page will be created on the server.
Navigate to Integration → Modules to install and configure the module.
You can activate and use several modules at the same time.
Adding an IPMI connection
Navigate to Main → Servers → select a server → click Connections → Add.
Complete the following 2 steps:
Step 1. Choose a device.
Step 2. Connect.
Choose a device
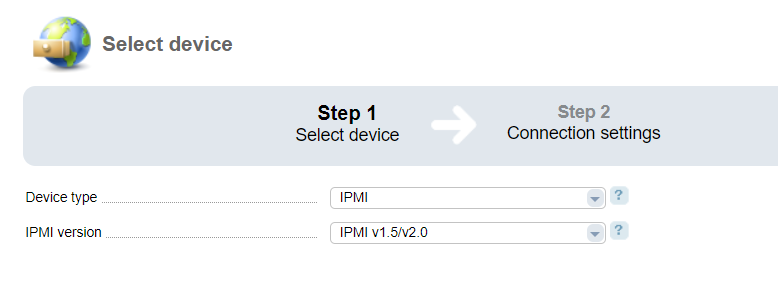
- Device type - select IPMI;
- IPMI version — select the protocol to work with the IPMI:
- IPMI v1.5/v2.0;
- IPMI v2.0 (lanplus).
Connect
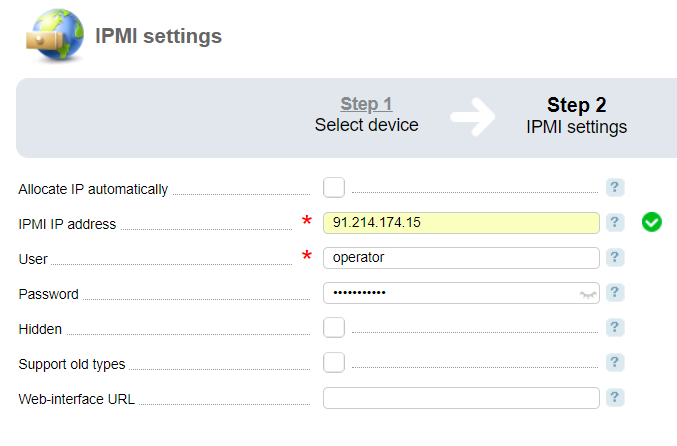
- Use IP address group — select how to allocate IP addresses. With this option disabled, you will need to enter an IP address for the IPMI. When selecting the checkbox, select a group of IP addresses from which an IP address will be allocated to the IPMI;
- IP address — enter the IP address that will be allocated to the IPMI. This field is available if you selected the "Use IP address group" checkbox;
- IP address group — select a group from which the IP address will be allocated to the IPMI. This field is available if you selected the "Use IP address group" checkbox;
- User — enter the username to access IPMI;
- Password - enter a user password to access IPMI;
- Hidden — with this checkbox selected, the device will not perform a number of operations such as server reboot, power on/off. Traffic statistics won't be collected;
- Support old types — select the checkbox to use an old browser version for noVNC proxy. It enables the support of Java-plug-in which allows displaying server console (relevant for IPMI HP iLo)
- Enable IPMI proxy via ihttpd — select the checkbox to enable proxy via ihttpd. It can be used if the IPMI server is behind the NAT. The option is available if the module "IPMI proxy via ihttpd" is installed.
- Web-interface URL — enter the URL that a user will be redirected to when trying to access the IPMI. If you leave the field blank, the system will use the IPMI IP address. Activating the option "Enable IPMI proxy via ihttpd " will hide the option "Web-interface URL";
- IPMI connection type:
- Without proxy — do not use the module;
- VNC proxy — use the module "IPMI proxy via auxiliary server";
- ihttpd proxy — use the module "IPMI proxy via ihttpd".