Inventory management module
The Inventory Management module allows you to keep an inventory of equipment and track its movement in the data center.
Functionality of the module:
- keeping inventory in one or more warehouses. For example, each location can have a separate warehouse for its equipment;
- keeping equipment directories;
- manual and automatic addition of equipment to the warehouse;
- inventorying of components, servers, switches, PDUs, UPS and miscellaneous equipment;
- maintaining a database of suppliers;
- tracking of equipment deliveries;
- export equipment data to CSV format.
By default, the module does not support deleting any kind of equipment. This provides complete inventorying of equipment in the warehouse.
You can allow deletion in the module settings: in the right menu click the ![]() icon → Modules tab → module Inventory management → Configure button → enable the option Allow deletion of equipment and components → Save button.
icon → Modules tab → module Inventory management → Configure button → enable the option Allow deletion of equipment and components → Save button.
Purchasing the module
The Inventory management module is purchased separately from the DCImanager 6 platform.
- Go to your client area at eu.ispsystem.com:
- Open your DCImanager 6 license settings.
- Select the required number of equipment pieces in The "Warehouse" module parameter.
- Click Save changes.
- Update your DCImanager 6 license information:
 → System overview → Update license information.
Module installation
To install the module:
- Enter → Modules → Inventory management → Install button.
- Configure warehouse settings:
- If you plan to keep inventory of equipment in two or more warehouses, press Add warehouse and enter its name. To delete the warehouse settings, press
 .
. - Select the Accounting currency — the monetary unit that determines the value of the equipment: ruble, US dollar, or euro.
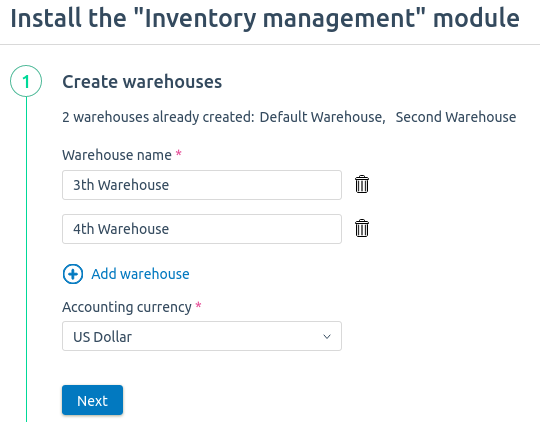
- Press Next.
- Select the warehouses used for each location.
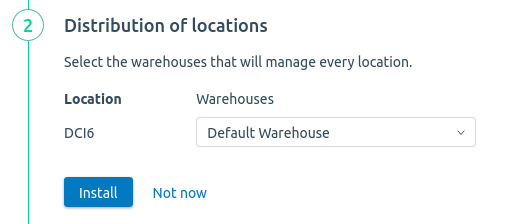
- Press Next.
- Select the warehouse for each location to which you want to add equipment currently in service.
- Press Install.
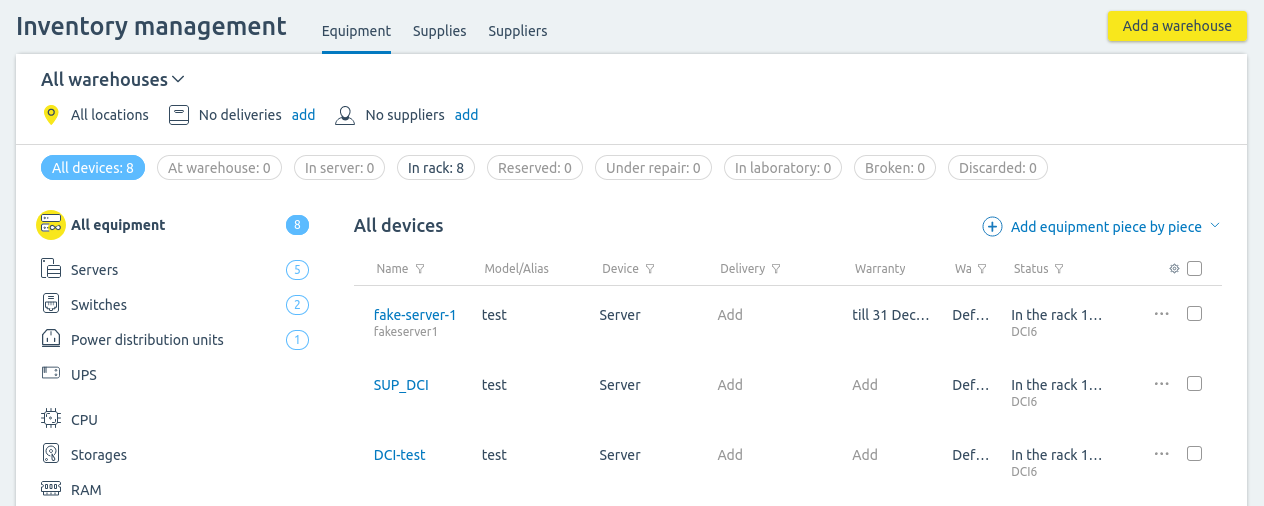
After installing the module, the Inventory management section will appear in the platform. Equipment in service will automatically be added to the warehouses.
To work with the module, enter Inventory management.
To install the module, enter ![]() → Modules → Inventory management → Install button. After installing the module, the Inventory management module will appear in the platform.
→ Modules → Inventory management → Install button. After installing the module, the Inventory management module will appear in the platform.
Section interface
Warehouse management
To switch between warehouses, click on the name of the warehouse in the upper left corner and select the required one. To view the equipment in all warehouses, select All warehouses.
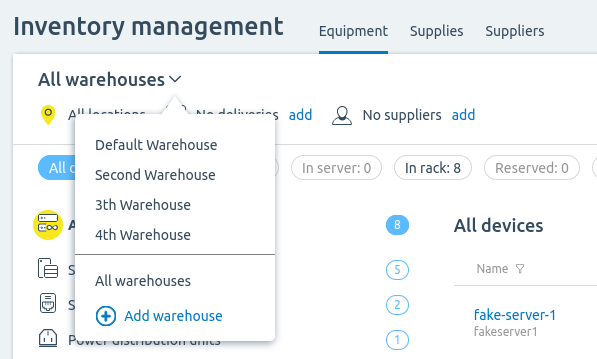
Switching between warehouses
To add a warehouse:
- Click Add warehouse.
- Specify the warehouse settings:
- Enter the Name.
- If necessary, select Locations linked to the warehouse. Equipment from this location will automatically be added to the warehouse.
- Add a discretionary Note.
- Click Add warehouse.
To change the warehouse settings, switch to the required warehouse → ![]() menu → Edit warehouse.
menu → Edit warehouse.
To delete a warehouse:
- Move equipment to other warehouses.
- Enter the
 menu → Delete warehouse.
Configuring equipment directories
Equipment directories contain lists of component models and server platforms. Models are used to differentiate devices of the same kind. For example, for CPUs, you can specify Intel Core i5 and Intel Core i7 models. For several models of accessories you can specify a common alias - a label that will be used to search for equipment.
To configure the directories, enter Equipment → Directories.
Section interface
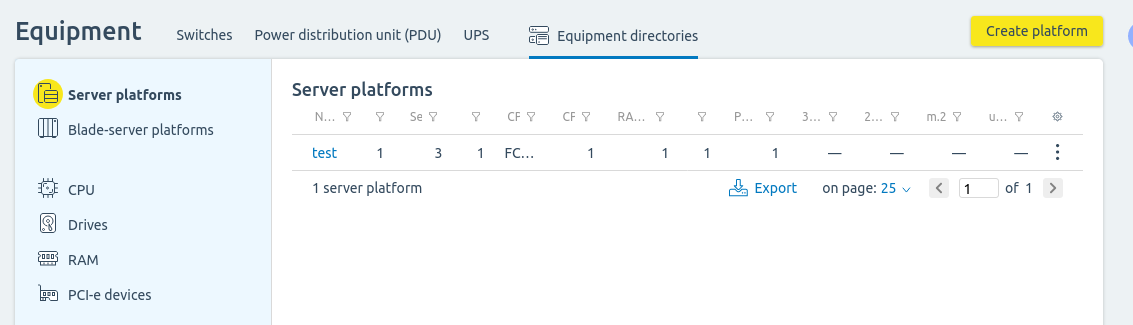
Server platforms
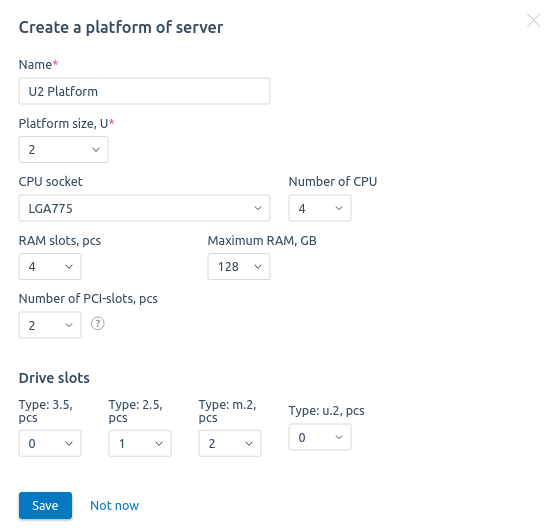
To add a server platform model:
- Enter Server platforms (Blade server platforms) → Create platform.
- Specify the platform parameters:
- Name.
- Platform size in units or chassis slots. The size in units can be a multiple of 0.5.
- CPU socket. E.g. LGA775, FCBGA1440.
- Number of CPU.
- Number of RAM slots.
- Maximum RAM, GB.
- Number of PCI slots.
- Number of drive slots. If any slots are absent, enter 0 or leave the value blank.
- Press Save.
Example of adding
To edit platform settings, enter the ![]() menu → Edit.
menu → Edit.
To delete a platform, enter the ![]() menu → Delete platform.
menu → Delete platform.
Note
You can only delete a platform if there are no servers with that platform type in DCImanager 6.
Component models
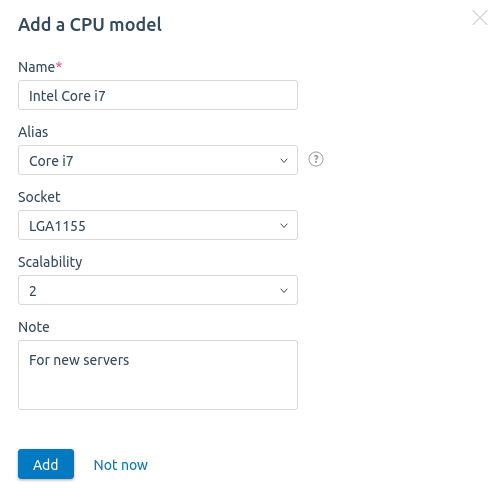
To add a component model:
- Select the type of components: CPU, Drive, RAM or PCI-e device → Add model.
Specify the parameters of the model:
for CPUCPU settings:
- Name.
- Alias.
- Socket.
- Scalability — the number of CPU cores working simultaneously.
- Comment.
for driveDrive settings:
- Name.
- Alias.
- Alias for configuration — will be used in the server configuration name. E.g., Intel-Core-i3-100SATA-2x100SSD:
- SSD;
- SATA;
- SAS;
- SCSI;
- NVME.
- Size, GB.
- Technology:
- HDD;
- SDD;
- Not specified.
- Protocol:
- SATA;
- SCSI;
- NVME;
- Not specified.
- Interface:
- SATA;
- SCSI;
- SAS;
- M.2;
- U.2;
- PCIe;
- Not specified.
- Note.
for RAMRAM settings:
- Name.
- Alias.
- RAM size, GB.
- Frequency, Mhz.
- Manufacturer.
- Memory type:
- DDR;
- DDR2;
- DDR3;
- DDR4;
- DDR5;
- DDR3L;
- DDR4L.
- The ECC (error-correcting code) option is a memory that automatically detects and corrects spontaneous memory bit errors.
- The Registered Memory option is a memory whose modules contain a register between the memory chips and the system memory controller.
- The LP (low profile) option — memory with low height chips.
- Примечание.
for PCI-e devicesSettings of PCI-e devices:
- Name.
- Alias.
- Device group:
- RAID controller;
- Network card;
- Video card;
- Adapter;
- Other.
- Note.
- Press Add.
Example of adding
To edit model settings, enter the ![]() menu → Edit.
menu → Edit.
To delete a model , enter the ![]() menu → Delete model.
menu → Delete model.
Note
You can only delete a model if there are no components with that model in DCImanager 6.
Adding equipment delivery
The module allows you to keep track of equipment that came in a particular delivery. Before you add a delivery, you need to specify the supplier's details.
Supplier management
To manage your suppliers, go to the Suppliers tab.
To add a supplier:
- Press Add supplier.
- Specify the supplier’s details:
- Name.
- Identification number. E.g., VAT (value added tax identification number).
- Phone. If necessary, press Add the phone number and specify an additional number.
- Website.
- Actual address.
- If the actual and legal addresses are the same, enable the Matches the legal address option. If not, enter the Legal address.
- Discretionary Note.
- Press Add supplier.
To view deliveries from a supplier, press on the name of the supplier in the list.
To edit the supplier settings, enter the ![]() menu → Edit.
menu → Edit.
To delete a supplier, enter the ![]() menu → Delete supplier.
menu → Delete supplier.
Note
You can only delete suppliers from which there were no deliveries.
Delivery management
To manage deliveries, enter the Supplies tab.
To add a delivery:
- Press Add delivery.
- Specify delivery information:
- Delivery note number.
- Suppliers.
- Delivery date.
- Delivery warehouse.
- Delivery amount in the accounting currency.
- Files of the delivery note. In total, you can upload up to 10 files in PNG, JPG, JPEG, or PDF format. The maximum size of each file is 16 MB.
- Discretionary Note.
- Press Next.
- To specify the scope of the equipment, press Add equipment. You can do this later in the delivery card.
- Specify the equipment details:
- Select the Equipment type.
- Select the Platform for server or blade server or Model for other types of equipment.
- Select or enter the Number of ports for the switch or PDU.
- Enter the Nomenclature of the device.
- Enter the Price per unit in the accounting currency.
- For equipment with a valid warranty, enable the Device under warranty option and choose or specify the expiration date in the format "dd.mm.yyyyy".
- Add a discretionary Note.
- Select the Number of devices — up to 100.
- Specify the Name or barcode and Serial number for each device.
Press Add. The equipment will be added to the delivery list. Press Add equipment to add more equipment to the list.
To delete a device from the list, press. To delete multiple devices, select them in the list and press Delete at the bottom of the table.
Note
Once a delivery has been created, you will not be able to delete devices of the delivery from the warehouse.
- Press Add delivery.
To edit the delivery details, enter the ![]() menu → Edit.
menu → Edit.
To add equipment to the delivery, press on its name in the list → Add equipment.
To work with delivery notes, click on the name of the delivery note → Delivery note. In this section you can view, add, download, print and delete delivery note files.
To delete a delivery, enter the ![]() menu → Delete delivery.
menu → Delete delivery.
Note
You can only delete a delivery if it contains no equipment.
Adding components piece by piece
Components
To add components, switch to the required warehouse → Add equipment piece by piece → select the type. You can also add equipment on the tab with the required type of components. For example, Inventory management → CPU → Add CPU.
- Enter the Name or barcode or leave the generated option.
- Select the Model or create a new one.
- To link the device to a delivery, select the Delivery or add a new delivery.
- For equipment with a valid warranty, enable the Part under warranty option and choose or specify the expiration date in the format "dd.mm.yyyyy".
- Enter the Serial number.
- Enter the Price per unit in the accounting currency.
- Enter the Nomenclature of the device.
- Select the equipment Status:
- In warehouse;
- In server:
- select the Location;
- select the Server.
- Discarded;
- Reserved. Choose or specify the Reservation end date in the format "dd.mm.yyyy";
- In laboratory;
- Under repair;
- Broken.
- Add a discretionary Note.
- Press Add.
Servers
All servers added to DCImanager 6 automatically appear in the warehouse. Rack servers get "In rack" status, blade servers get "In chassis" status. To add a server with the "At warehouse" status, enter to the required warehouse → Add equipment → Server or Blade server:
- Enter the Name or barcode or leave the generated option.
- Select the Platform type or create a new one.
- Specify the MAC address of the device.
- To link the device to a delivery, select the Delivery or add a new delivery.
- For equipment with a valid warranty, enable the Server under warranty option and choose or specify the expiration date in the format "dd.mm.yyyyy".
- Enter the Serial number.
- Enter the Price per unit in the accounting currency.
- Enter the Nomenclature of the device.
- Add a discretionary Comment.
- Press Add.
Switches, PDUs, UPS
All switches added to DCImanager 6 automatically appear in the warehouse. To add a switch with the "At warehouse" status, enter Inventory management → Add equipment → Switch (PDU, UPS):
- Enter the Name or barcode or leave the generated option.
- Select the Platform type or create a new one.
- For a switch or a PDU, enter or select the Number of ports.
- To link the device to a delivery, select the Delivery or add a new delivery.
- For equipment with a valid warranty, enable the Server under warranty option and choose or specify the expiration date in the format "dd.mm.yyyyy".
- Enter the Serial number.
- Enter the Price per unit in the accounting currency.
- Enter the Nomenclature of the device.
- Add a discretionary Comment.
- Press Add.
Chassis
To add a chassis, enter Inventory management → Add equipment → Chassis:
- Enter the Name or barcode or leave the generated option.
- Select or enter the equipment Model.
- Select the Slots number.
- To link the device to a delivery, select the Delivery or add a new delivery.
- For equipment with a valid warranty, enable the Server under warranty option and choose or specify the expiration date in the format "dd.mm.yyyyy".
- Enter the Serial number.
- Enter the Price per unit in the accounting currency.
- Enter the Nomenclature of the device.
- Add a discretionary Comment.
- Press Add.
Adding other equipment types
You can keep track of cables, patch panels, rack shelves, socket strips and any other devices. To add such equipment, enter Inventory management → Add equipment → Other:
- Select or enter the kind of Equipment.
- Enter the Name or barcode or leave the generated option.
- Select or enter the equipment Model.
- Select or enter the Equipment parameter.
- To link the device to a delivery, select the Delivery or add a new delivery.
- For equipment with a valid warranty, enable the Server under warranty option and choose or specify the expiration date in the format "dd.mm.yyyyy".
- Enter the Serial number.
- Enter the Price per unit in the accounting currency.
- Enter the Nomenclature of the device.
- Add a discretionary Comment.
- Press Add.
Managing equipment
You can filter the list of equipment by:
- name;
- device type;
- model;
- device parameters;
- serial number;
- delivery;
- delivery note number/date of delivery;
- inventory status.
To filter the list, press ![]() in the required column.
in the required column.
To change equipment settings, enter the  menu → Edit .
To decommission a part, enter the menu → Discard .
To change device (server, switch or PDU) settings, go to its card: select the device type → select the device → menu → Server (Switch, PDU) parameters.
To manage the switch ports, go to Switches → select the device → menu → Ports.
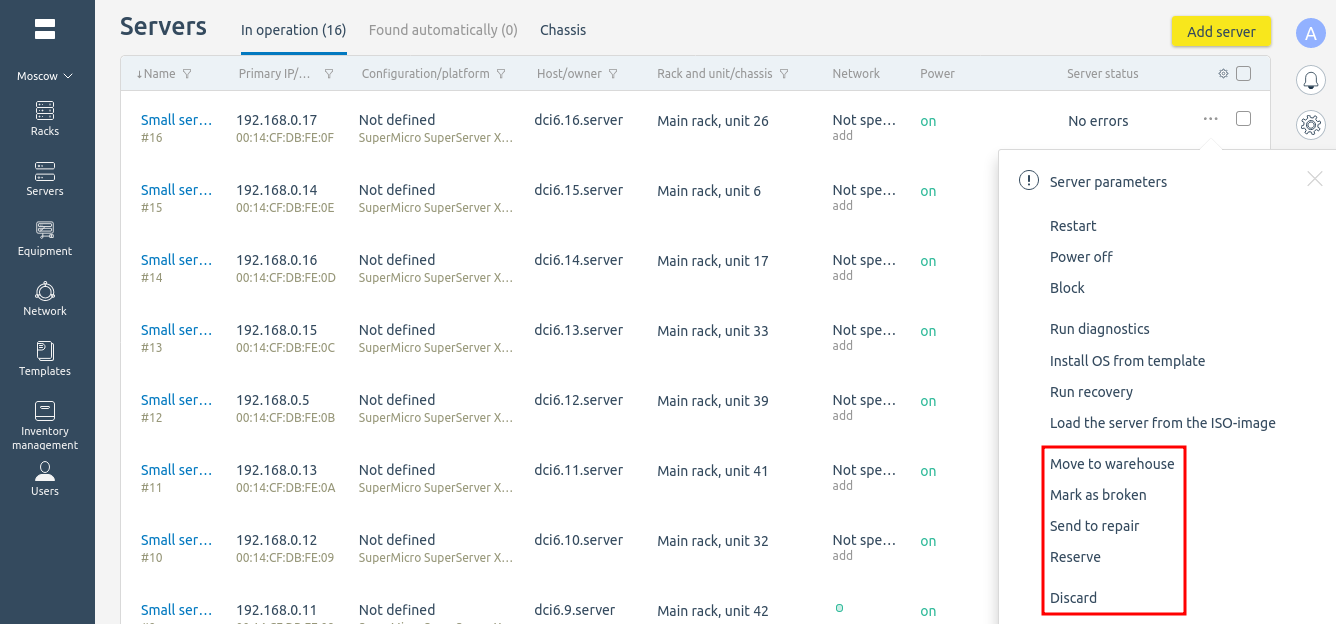
To change the server or switch status, go to Servers or Switches → select the device → menu → select the action:
- Install into rack;
- Mark as broken;
- Send to repair;
- Move to warehouse;
- Reserve;
- Discard;
- Delete.
You can mark the equipment recorded under Other as belonging to a specific server or rack. Go to Other → select the device → menu → Install into server (rack) → select the location and server (rack) → Add to server (Put into operation).
Note
In the current version of the module, information about the installed device is not displayed in the server card.
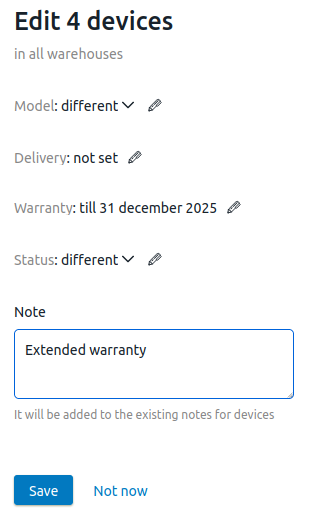
Group change
To change the settings of multiple devices:
- Select the desired devices in the left column.
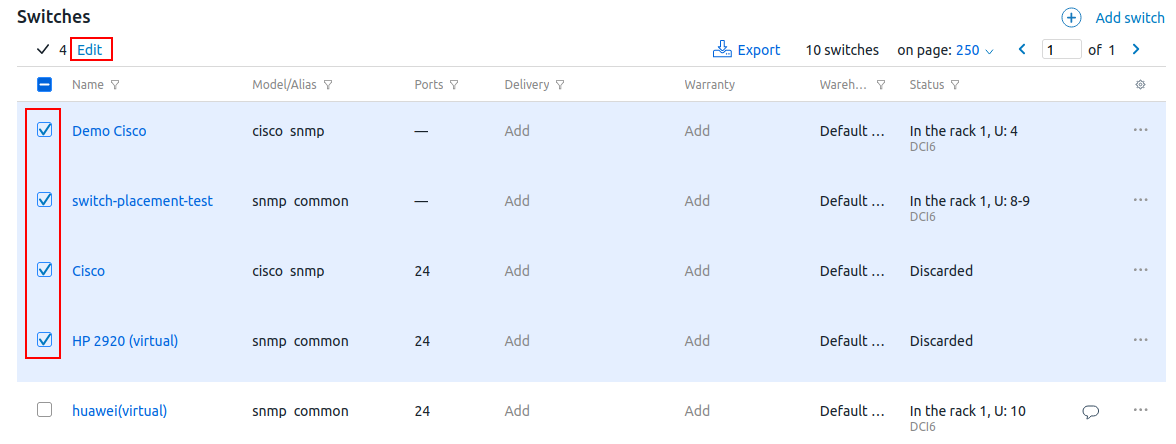
- Click the Edit button.
- Click the
 icon next to the parameter and select or enter the desired value.
 - Enter the Note. It will be added to the existing device notes.
- Click the Save button.
Managing devices in operation
You can change the status of the device in operation. To do this, go to the device section → select the device → menu → select the action:
- Move to warehouse;
- Mark as broken;
- Send to repair;
- Reserve;
- Discard;
- Delete.
Changing the server status
You can change the handler of a switch or a PDU while it remains in service. To do this, you have to move the device to the warehouse, and then install it back in the rack and select the new handler. An example for a switch:
- Move the switch to the warehouse: Switches → select the switch → menu → Move to warehouse.
- Install the switch into the rack: Inventory management → Switches → select the switch → menu → Install into rack.
- Select the Handler and specify the device settings.
- Press Put the switch into operation.
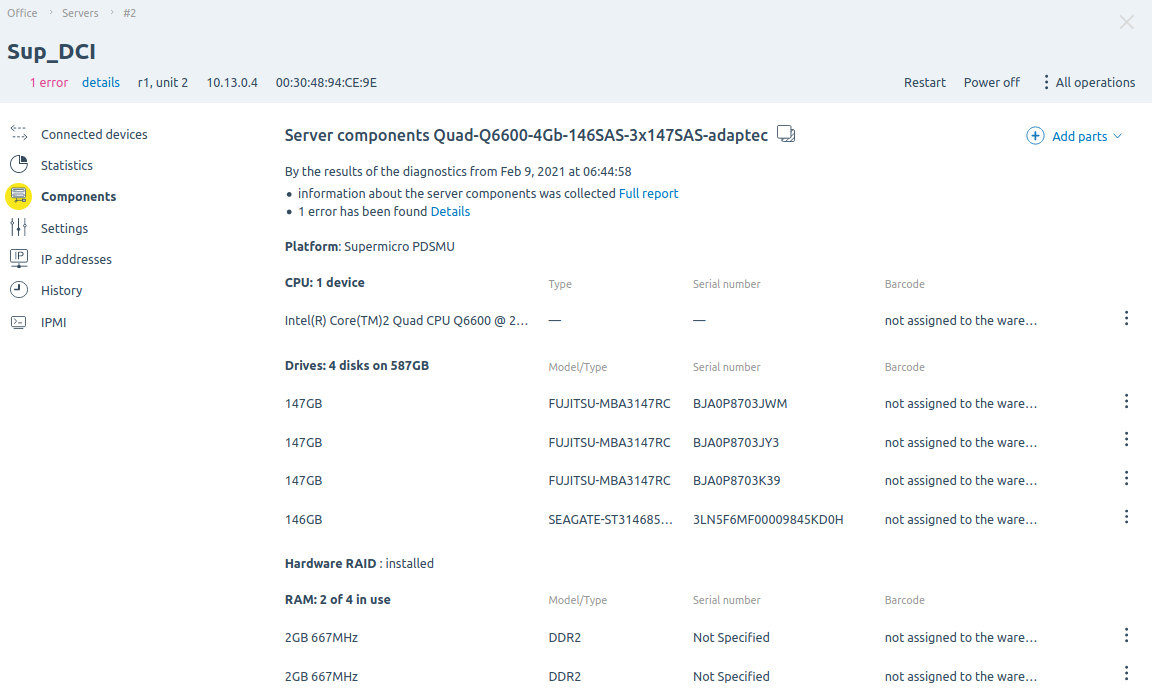
Managing the server components
You can keep inventory of components found on the server during diagnostics. A server part can be associated with the equipment added in the "Inventory management" section or you can change its status. For example, mark as stored in the warehouse or decommissioned.
To automatically link the parts found on the server during diagnostics to the equipment in the warehouse, in the right menu click the ![]() icon → Modules tab → Inventory management module → Configure button → enable the Automatically link and move server components to the warehouse option → Save button. Enabling the option will also link the previously found parts to the equipment in the warehouse if the serial numbers match.
icon → Modules tab → Inventory management module → Configure button → enable the Automatically link and move server components to the warehouse option → Save button. Enabling the option will also link the previously found parts to the equipment in the warehouse if the serial numbers match.
To manage server components, go to Servers → select the server → Components.
To link a part to the added equipment, enter the menu → Link with the part at the warehouse → select the added part → Link.
To change the status of a server part, enter the menu → Extract from server → select the status of the part → Extrace and send to the warehouse.
To add equipment from the warehouse to the list of server components, press Add parts → select the type → select the required part → Add. After adding equipment, run diagnostics on the server. DCImanager 6 will link the records of the part found in the diagnostics and the part added from the warehouse if the parts have the same characteristics:
- Discs — size and serial number;
- CPUs — name;
- RAM — size and serial number;
- RAID controllers — name.
If the Automatically link and move server components to the warehouse option is enabled in the module settings, the records will be linked automatically if the serial numbers match.
Managing server components
Server assembly and disassembly
You can add or remove several components from the server at the same time. To do this, click Inventory management → Assemble/disassemble server in the left menu.
Section interface
Server assembly
To add components:
- Open the Assemble tab.
- Enter the Server name or serial number. In the right part of the window, a list of its components will be displayed.
Enter Serial number of barcodes of components. You can use a comma, space, or line break as a value separator.

Components with the Discard status cannot be added to the server.
- Click the Assemble button.
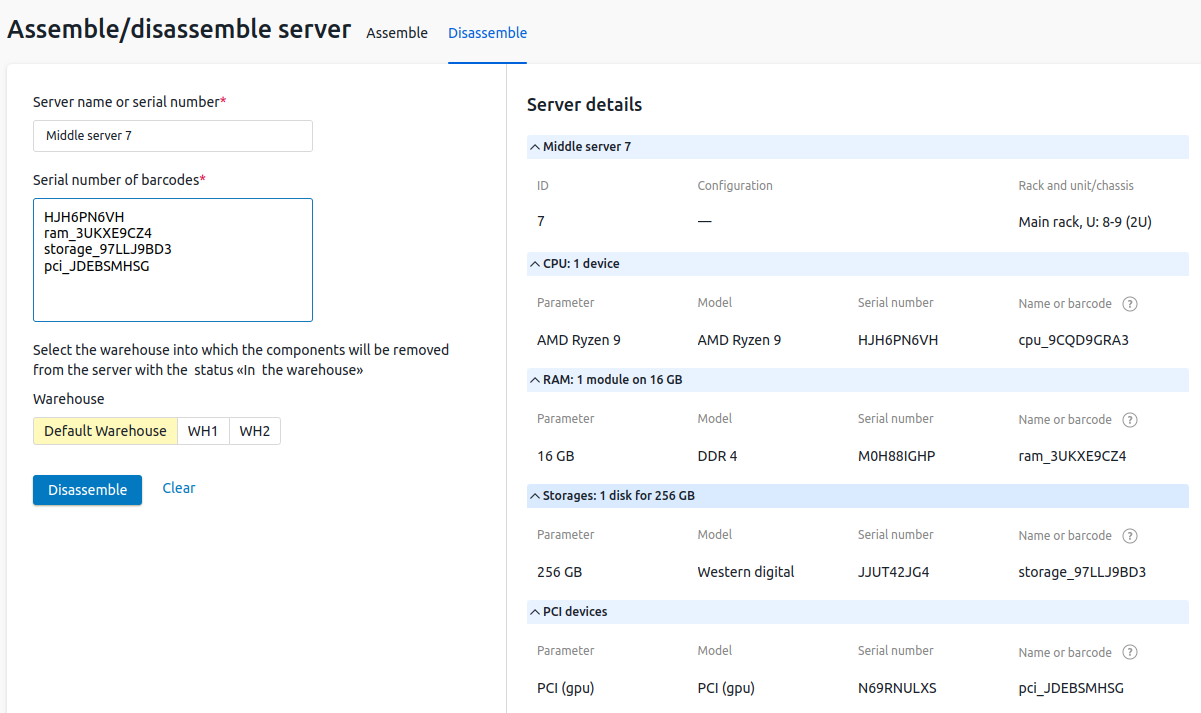
Server disassembly
To remove components:
- Open the Disassemble tab.
- Enter the Server name or serial number. In the right part of the window, a list of its components will be displayed.
- Enter Serial number of barcodes of the components. You can use a comma, space, or line break as a value separator.
- Select the Warehouse where the components will be placed.
- Click the Disssemble button.
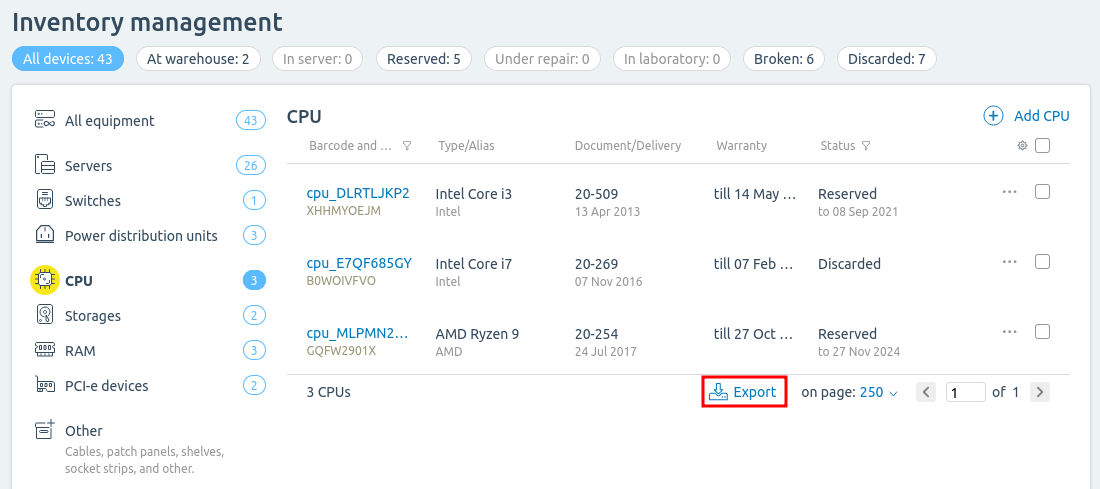
Exporting equipment data
To export equipment data, navigate to the required section and press Export at the bottom of the list. The information will be saved in CSV format.
Exporting