Integration with IPmanager. VMmanager
When adding the processing module, the billing platform will ask you to integrate the panel with IPmanager for centralized management of IP addresses.
BILLmanager controls the selection of IP addresses when activating a VPS: it requests a free IP from IPmanager and sends a new request to VMmanager to create a virtual machine with the selected address.
IPmanager can be installed on the same server with BILLmanager or on a separate one. After you install IPmanager, you will need to integrate it with BILLmanager.
IPmanager configuration
First, you need to add a user and IP network in IPmanager.
Log in to IPmanager "Main" → "Networks" add the networks that will allocate IP addresses for virtual machines.
Navigate to "Main" → "Users " and create a new account (do not use the existing one) with the "User" role. We will use it for our integration.
Navigate to "User " → "Rights" and grant access to use IP addresses for every user. It can be a single IP address, a range or a network.
Example: a service provider has only 185.60.134.110/24. The range 133.31.223.110-133.31.223.126 should be used for virtual servers. So, in IPmanager you create the network 185.60.134.110/24, but allow the user to use only 133.31.223.110-133.31.223.126.
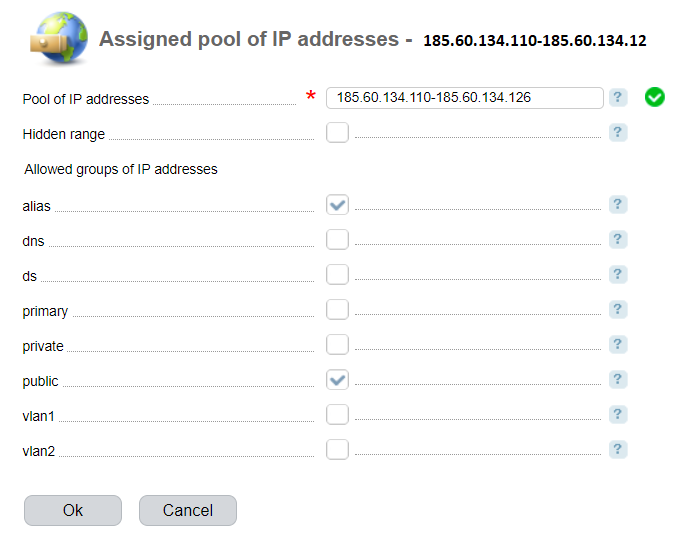
In the list of "Allowed groups of IP addresses" select public. BILLmanager uses only "public" IP-address for VPS services.
BILLmanager configuration
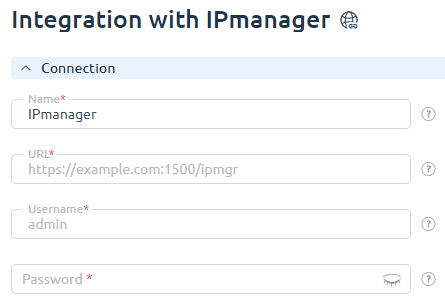
Navigate to "Integration" → "IPmanager". The integration form consists of two sections - "Connection" and "Synchronization of IP addresses".
Connection
- Name - enter any name for this integration.
- URL - IPmanager address. Make sure that it is accessible from the server with BILLmanager.
- Username - enter the name of the IPmanager account with "User" permissions. Using this username BILLmanager will get/return IP addresses from IPmanager.
- Password - enter the user password.
Synchronization of IP addresses
During synchronization, statuses of IP addresses in IPmanager will be compared with information in BILLmanager:
- If the IP address is already used in IPmanager, but does not exist in BILLmanager, BILLmanager will send a request to IPmanager to release that IP.
- If the IP address is free in IPmanager, but is assigned to a service in BILLmanager, the billing platform will mark it as "allocated" in IPmanager.
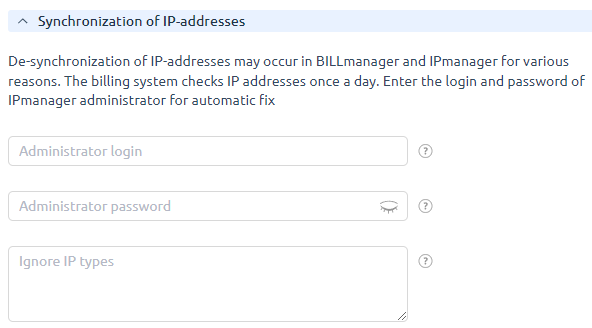
Since the synchronization is performed with the username that we specified during the integration, BILLmanager can release and use in IPmanager only those IP addresses that belong to this user. That's why there may be insufficient permission to change the IP status. On the synchronization form, you can enter the login and password of the IPmanager administrator to change IP statuses regardless of user privileges.
If you don't want all IP addresses to be synchronized, select the "Ignore IP types" checkbox. "IP types" are groups of IP addresses created in IPmanager → "IP groups". Only public IP addresses are used for VPS services in BILLmanager.
Note
For synchronization of IP addresses we don't recommend that you specify credentials of IPmanager administrator, especially if some IP addresses in IPmanager were allocated manually (not by BILLmanager) and they are not bound to services in the billing platform.
Otherwise, IP addresses will be released by BILLmanager automatically.
Every day at 03:15 a.m. the fix.moduleip cron job starts the synchronization of IP addresses.
Integration with IPmanager 6
VMmanager 6 and DCImanager 6 platforms have a built-in module for address space management — IPmanager 6. To configure integration with this module:
- To allow VMmanager 5 to access only a certain pool of IP addresses, create a pool in VMmanager 6 (DCImanager 6) with the suffix public. For example, VM5_public.
Create an administrator account named ipmgr5@example.com in VMmanager 6 (DCImanager 6).

ipmgr5@example.com is not an example, but the exact name that you need to specify when creating an account.
- In VMmanager 5 and BILLmanager:
- Enter Integration → IPmanager .
- Specify the settings for integration:
URL — https://domain.com/api/ipmgr5/v3/ipmgr
Comments to the URLdomain.com — domain name or IP address of the server with VMmanager 6 (DCImanager 6)
Username:
to allow the control panel to access only a certain pool of IP addresses, specify pool_XXX;
CommentsXXX — pool prefix in VMmanager 6 (DCImanager 6). For example, for the VM5_public pool, specify the username pool_VM5.
- to allow the control panel to access the entire address space, specify an arbitrary user name.
- Password — password of the ipmgr5@example.com user.
- In the Synchronization of IP-addresses section leave the Administrator login and Administrator password fields blank.
- Press Ok button.