Integration with website
BILLmanager has an open API to communicate with third-party services. It allows you to integrate the billing platform with your website.
The API enables to register clients in the billing platform directly from your website. Alternatively, your clients can order services from the website and they will be redirected to BILLmanager for payment. The system can also upload and update the cost of the services from BILLmanager to the website automatically. It improves the level of user-friendliness for clients and increases your website conversion rate.
Use the following API requests to integrate BILLmanager with the website.
Note:
Enabling reCATPCHA for BILLmanager integrated with a website may disturb the normal operation of the billing platform and website. To avoid this, add reCAPTCHA with the same keys as in BILLmanager. Read more in Integration with a website with reCAPTCHA.
General information
All requests to BILLmanager API are made through the standard protocol (HTTP). Responses can be either in the XML or JSON form. To specify the format, add '&out=xml', '&out=json' or '&out=sjson' to your API request.
We use the following definitions in our examples below:
- DOMAIN — BILLmanager server domain name.
- PRICELIST_ID — tariff plan id.
- ADDON_ID — tariff plans add-on id.
- PERIOD_ID — payment period id. Trial: -100, day: -50, lifetime: 0. If the value is more than 0, then the period length is specified in months.
- ITEM_id — service id.
- ACCOUNT_ID — client id.
- PARTNER_ID — partner id.
- COUNTRY_ID — country id in "Countries".
- PROJECT_ID — provider id. In "BILLmanager" version it is 1.
- ITEMTYPE_INTNAME — internal (service) product type name. You can check the values in the section Product types, the Internal name field.
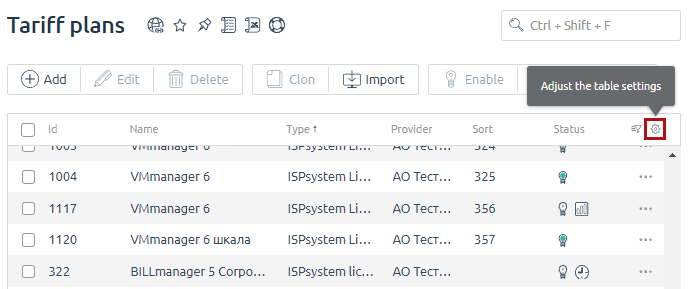
By default, the column id is hidden in most lists. To display this column, click the Adjust the table settings button and activate the id flag:
Client registration
Registration
The system redirects a new client from your website to the registration form:
Registration in BILLmanager
https://DOMAIN/billmgr?func=registerTo register a user on the website without redirecting to BILLmanager, use the register function. A remote call of this function will register a new client in the billing platform. The function has the following parameters:
- sok = ok — save data
- email — login and email of a new client
- passwd — password of a new client
- realname — client name
- phone — phone number
- conditions_agree set to on, if a client has to agree to a service agreement at the registration process
- offer_xxx set to on, if a client has to agree to a formal offer at the registration process
- country — country id according to BILLmanager directory, optional
- state — country id according to BILLmanager directory, optional
- project — provider id. In the version"BILLmanager" it equals 1;
- recovery set to on, if you want to send a password reset notification in the registration email
- _ga — Google Analytics id, optional
- partner — if you use the affiliate program, the website should remember 'PARTNER_ID' in case a client was referred by the referral link. Usually, this parameter is kept in cookies.
- sesid — only if you use the affiliate program. This is the click identifier.
tzoffset — time zone offset off GMT, optional. in BILLmanager it can be set via JavaScirpt:
User time zone offset
function tzoffset() {
        var january_offset = get_date_offset(new Date(2010, 0, 2)),
            june_offset = get_date_offset(new Date(2010, 5, 2)),
            diff = january_offset — june_offset;
        var result = get_date_offset(new Date());
        if (diff < 0 || diff > 0) {
            result = result + ",1";
        } else {
            result = result + ",0";
        }
        return result;
}Client registration
https://DOMAIN/billmgr?func=register&sok=ok&email=user@example.com&passwd=q1w2e3&realname=John Wick&phone=71234567788BILLmanager will return user.id — the id of the newly created client, and account.id — the id of the registered client.
Authorization
To authorize a client in BILLmanager, use the auth function with the following parameters:
- username — login, Username field in the section Clients. Usually, it coincides with the email registered by the client;
- password — password of the user;
- lang — a language of BILLmanager interface;
- project — provider id. In "BILLmanager" version = 1.
Client authorization
https://DOMAIN/billmgr?username=user@example.com&password=q1w2e3&lang=ru&project=PROJECT_ID&func=authAuthorization check
In order to understand what account was used for the client authorization, use the whoami function. The function returns the code of an authorized client and his name and surname.
Authorization confirmation
https://DOMAIN/billmgr?func=whoamiTariff plans
To automatically upload tariffs prices from BILLmanager to the website, use the pricelist.export function with the following parameters:
- elid=PROJECT_ID — Provider id in BILLmanager.
onlyavailable — Show only tariff plans that are available for order.
DetailsFor example, there are two tariff plans in BILLmanager: "VPS for all" and "VPS for partner". VPS for all is available to all customers of the service provider. "VPS for partner" is available only to the customers from the group"Partners". The API-request without authorization in BILLmanager and with the parameter
onlyavailable="yes"will not show the tariff "VPS for partner". The API-request without authorization and with the parameter onlyavailable="off" will show the tariff "VPS for all" and "VPS for Partner".- pricelist — Tariffs plan ids separated by commas. They are to be specified only if you need to get data from a certain tariff plan.
- addonitemtype — Id of product type add-ons to tariff plans. They are specified only if you need to get data only from certain add-ons.
- itemtype — Product type id. They are specified only if you need data on tariff plans of a certain type.
- exclude_pricelist — Tariff ids which are excluded from the function output, separated by commas.
- othercurrency — ISO code of the currency in which you would like to bill clients for tariffs and add-ons if you need the additional output in another currency different from the provider's currency. It is converted according to the current exchange rate in BILLmanager.
- out — data output format. Possible values: "json" and "xml".
This function returns the cost of tariffs and add-ons in the selected format.
Tariff plans information
https://DOMAIN/billmgr?func=pricelist.export&out=<data_output_format>How to retrieve information about all tariff plans
To retrieve information about all tariff plans including disabled ones, use the function pricelist.export with the parameter pricelist.
Note:
To perform this operation you must log in to BILLmanager with administrator permissions.
Receive the ID of all tariff plans. Eg., you can use the function pricelist:
https://domain.com?func=pricelist&out=printDIFFUse the function pricelist.export with the parameter pricelist:
https://domain.com?func=pricelist.export&out=print&onlyavailable=off&pricelist=id_listDIFFWheredomain.com — the domain or public IP address of the server with BILLmanager.
id_list — all ID of tariff plans created in BILLmanager, separated by commas.
Service order
Usually, a client chooses the service and its configuration directly on the provider's website. Clicking on Order or Pay for the service buttons on the website will redirect him to the billing platform to complete the order. If the client is not authorized in the system, BILLmanager will suggest registering or logging in under the existing account. After log in/sign up the client will be automatically redirected to the billing platform order page.
Client registration link
You can redirect clients to different ordering pages:
- tariff plan page, payment period, tariff plan parameters and payment processing page;
- tariff plan page with a specific payment period. The client has to select tariff parameters and then make a payment;
- tariff plan page with a specific payment period and selected parameters. The client only has to make a payment.
Tariff plan order link
The link to the page where your client can select a tariff plan:
Redirect to tariff plan order page
https://DOMAIN/billmgr?func=register&redirect=startpage%3DITEMTYPE_INTNAME%26startform%3DITEMTYPE_INTNAME%252Eorder%26pricelist%3DPRICELIST_ID%26project%3DPROJECT_IDRequest parameters:
- startpage — page/list that will open after registration/login
- startform — service order form that will open after registration/login
- pricelist — tariff plan id
- project — provider id
Note:
The URL standard adds some limits to the symbols you can use. In this regard, you need to encode all links to the URL format; otherwise, the links might be displayed incorrectly.
In the section "Service order" only coded links are used. We can only recommend to use them in such a format.
The example of a link to the shared hosting tariff plan (startform=vhost.order):
Redirect to shared hosting specific tariff plan order page
https://DOMAIN/billmgr?func=register&redirect=startpage%3Dvhost%26startform%3Dvhost%252Eorder%26project%3D1Link to the order page with specific tariff plan and selected payment period
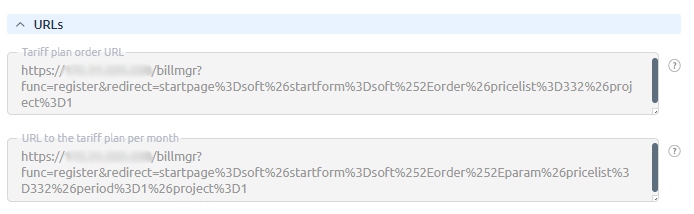
BILLmanager automatically generates tariff plan order links. You can find them if the section Tariff plans → Edit →section URLs.
You can also pass add-ons addon_N=xxx, where N is add-on id, xxx is resource value:
- integer add-ons — integer value of the resource that a client orders
- add-on specified by enumeration — id of the enumeration element
- "client can choose" add-on — id of the add-on added to the main addon. The value of the resource that a client orders shall be passed in the parameter addon_N
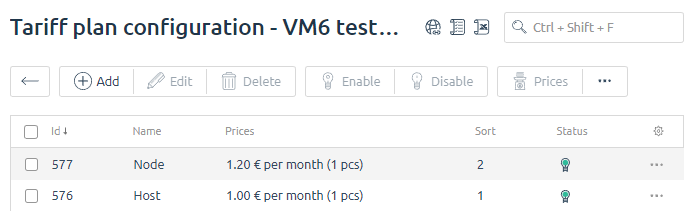
You can find the add-on id in Tariff plans → Options → "Id" field.
Tariff plan order page with selected parameters:
Redirect to shared hosting order page with specific parameters
https://DOMAIN/billmgr?func=register&redirect=startpage%3Dvhost%26startform%3DITEMTYPE_INTNAME%252Eorder%252Eparam%26pricelist%3DPRICELIST_ID%26period%3DPERIOD_ID%26project%3DPROJECT_ID%26addon_N=xxx%26addon_N=xxxThe example of shared hosting (startform=vhost.order.param) with id 2 (pricelist=2). Set add-on value "Web domain limit" to 15 (addon_5=15) and add-on value "Disk space" to 2048 (addon_3=2048).
Redirect to shared hosting order page with specific parameters
https://DOMAIN/billmgr?func=register&redirect=startpage%3Dvhost%26startform%3Dvhost%252Eorder%252Eparam%26pricelist%3D2%26period%3D3%26project%3D1%26addon_3=2048%26addon_5=15Service payment link
If you need to redirect your client directly to the cart or to the payment page, you need to edit the following parameters: the starform parameter value shall be changed to quickforder, parameter redirect parameter with cart (redirect to cart) value or payment (redirect to service payment) is added.
You can redirect your client to the cart by using this link:
Redirect to the cart
https://DOMAIN/billmgr?func=register&redirect=startpage%3DITEMTYPE_INTNAME%26startform%3Dquickorder%26pricelist%3DPRICELIST_ID%26period%3DPERIOD_ID%26project%3D1%26addon_N%3Dxxx%26addon_N%3Dxxx%26redirect%3DcartAlternatively, you can redirect a client to the page where he/she can select a payment method:
Redirect to payment method page
https://DOMAIN/billmgr?func=register&redirect=startpage%3DITEMTYPE_INTNAME%26startform%3Dquickorder%26pricelist%3DPRICELIST_ID%26period%3DPERIOD_ID%26project%3D1%26addon_N%3Dxxx%26addon_N%3Dxxx%26redirect%3DpaymentDomain order link
Domain order link requires parameters in the 'redirect' parameter:
- checked_domain — a list of the checked domains with additional parameters. The format:
- The '-' symbols in a domain name are changed into '_', '.', is changed into '____________'
- A domain status separated with ':' will be added to the resulting value:
- 0 — not checked,
- 1 — available,
- 2 — in use,
- 3 — error defining status,
- 4 — domain is registered in BILLmanager.
- For domain registration use value — 1 as its status, 2 — for transfer.
- A tariff id separated with ':' will be added to the resulting value.
Domain name selection identifier (0 — not selected, 1 — selected) separated with ':' will be added to the resulting value.
Example of 'checked_domain' parameter
name_domain____________ru:1:PRICELIST_ID:1CODE
- startform=domain.order.contact — redirect a client to BILLmanager to fill out the information
- domain_action — 'register' for registration of a new domain name, 'transfer' for domain transfer
- domain_name — registered domain name
- selected_domain — domain name encoded as described above
- selected_pricelist — id of the selected tariff plan
- PRICELIST_ID — tariff plan id
When passing several values to 'checked_domain', 'selected_domain' and 'selected_pricelist', values are separated with ','.
Example of the link using "redirect" parameter:
Link example
https://DOMAIN/billmgr?func=register&redirect=startpage%3Ddomain%26startform%3Ddomain.order.contact%26checked_domain%3Dname_domain____________ru%253A1%253APRICELIST_ID%253A1%252C%26domain_action%3Dregister%26domain_name%3Dname_domain.ru%26period%3D12%26selected_domain%3name_domain____________ru%26selected_pricelist%3DPRICELIST_IDCalculating order price
Function pricelist.calculate allows to show the price for a certain service and certain add-ons:
Calculation order price
https://DOMAIN/billmgr?func=pricelist.calculate&pricelist=PRICELIST_ID&period=PERIOD_ID&addon_XXX=VALUEClient user data specified via su or authinfo may be required to call the function.
To add the cost of the add-on to the total amount of the order, you need to add the addon parameter to the query:
addon_XXX=VALUE — additional resources where:
- XXX — Id of the tariff add-on, ADDON_ID.
- VALUE — the amount of the allocated resource.
Checking promo code
You can place a promo code field (to get a discount) on your website. To check the availability of such code in the billing platform, you can use promotion.promocode.check command:
Checking promo code
https://DOMAIN/billmgr?func=promotion.promocode.check&pricelist=PRICELIST_ID&period=PERIOD_ID&promocode=PROMOCODE
Additional information
You can use callback for json to send requests to BILLmanager API:
callback example
https://DOMAIN/billmgr?callback=JSON_CALLBACK&username=" + user.login + "&password=" + user.password + "&lang=ru&project=2&func=auth&out=json"