Creating platform backups
You can create a backup copy of VMmanager that contains all the settings of the platform. The backup copy is saved in .tar archive format and contains the following files:
- config.json — platform configuration file;
- docker-compose.yaml — Docker configuration file;
- vm_dump.sql — platform database dump file.
Copy names have the format YYYY_MM_DD__HH_MM.tar.gz.
YYYY_MM_DD — creation date
HH_MM — creation time
Note
The backup copy does not contain virtual machine or cluster node statistics.
You configure scheduled creation of platform backups and exporting them to an external storage. A physical or virtual server with access via SSH or FTP can be used as a storage. In addition, the five latest backups of the platform are saved on the server with VMmanager in the /opt/ispsystem/vm/backup/ directory.
Backup creation and restoring from backup are performed by the vm platform installation service. If VMmanager is not installed or damaged on the server to be recovered, the service will install the platform and then restore data from the backup.
After restoring from a backup, activate the platform license. For Infrastructure version, activation has to be performed within seven days after the restore. After this period expires, the platform will be blocked.
Creating backups
In the console
Connect to VMmanager server via SSH and enter the command:
vm backupCODE- Enter the password for the backup archive or press Enter to create an archive without a password.
The copy will be saved to /opt/ispsystem/vm/backup/.
In the platform interface
Configure the platform backup creation schedule to create copies automatically. Enter ![]() → Database backup → Add schedule:
→ Database backup → Add schedule:
- Select when to Make copies:
- Daily;
- Weekly → select the day;
- Monthly → enter the date from 1 to 28 → Apply;
- enter the time in the cron scheduler format. For example, 15 10 * * 0 — create backups on Sundays at 10:15 UTC or 00 12 1,16 * * — create backups on the 1st and 16th of the month at 12:00 UTC.
- Enter the UTC time at which platform will start backup creation.
- Specify the schedule Name. By default, platform creates a schedule with the name corresponding to the schedule settings. For example, "Daily at 0:00 through SSH".
- Specify the discretionary Note to the schedule.
- Select the storage for backups:
- external storage with connection through SSH;
external storage with connection through FTP;

Note
Platform will not be able to save a backup if the FTP server has an invalid SSL certificate.
Locally — the backup will be created at the server with platform.
Note
We recommend saving backups to an external storage, because in case of problems with the platform server, the backup files may be damaged.
If you use an external storage, specify its settings:
- IP address or domain name;
- Port;
- Login;
- Password or press I want to use public SSH-key to configure an SSH key connection;
- Storage path — the directory on the server to which platform will save backups.
- Press Add.
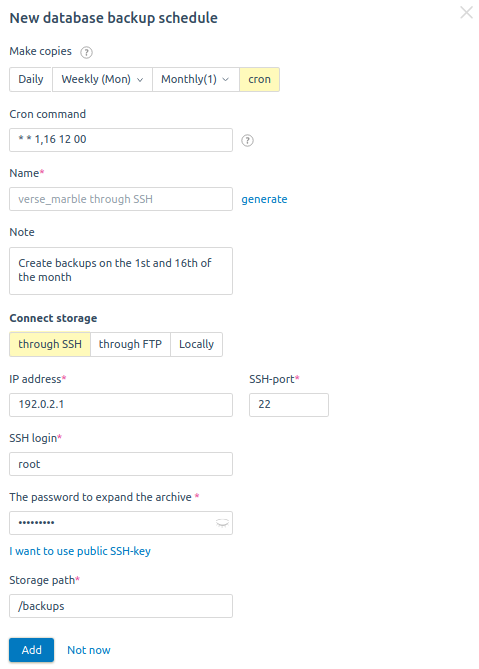
Example of schedule settings
You can manage the created schedules through the ![]() menu in Settings → Database backup. Possible actions with schedule:
menu in Settings → Database backup. Possible actions with schedule:
- Run the schedule — start backup creation process immediately;
- Edit;
- Enable/Disable;
- Note — add note;
- Delete.
Also in this section you can download the last five backups.
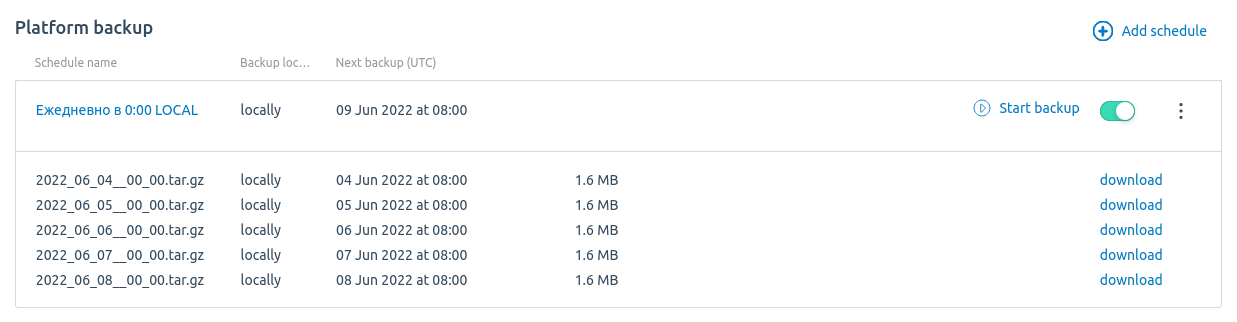
Database backup section
Recovery from a backup
If VMmanager is not installed on the server
- Generate a new token in your client area eu.ispsystem.com.
- Connect to the server via SSH.
- Update the operating system to the latest stable version.
- If tar archiver or curl utility are not installed on the system, install them.
Download the installer:
curl -O https://download.ispsystem.com/6/installer/vm/vmCODEMake the installer file executable:
chmod +x vmCODECreate the directory /opt/ispsystem/license/:
mkdir -p /opt/ispsystem/licenseBASHStart the recovery:
./vm restore -b=<backup_file>CODEComments to the command<backup_file> — absolute path to the backup file. For example, /opt/ispsystem/vm/backup/2022_03_30__00_00.tar.gz
- If necessary, enter the backup archive password.
Activate the license:
In VMmanager interface, go to
 → System information.
- In the License key field enter the value of the license token.
- Click the Activate button.
If VMmanager is installed on the server
- Generate a new token in your client area eu.ispsystem.com.
- Connect to the server via SSH.
- Update the operating system to the latest stable version.
- If the tar archiver is not installed on the system, install it.
Start the recovery:
vm restore -b=<backup_file>CODEComments to the command<backup_file> — absolute path to the backup file. For example, /opt/ispsystem/vm/backup/2022_03_30__00_00.tar.gz
- If necessary, enter the backup archive password.
Go to the directory with the license files:
cd /opt/ispsystem/licenseBASHDelete all files from the directory except machine_id:
rm -v !("machine_id")BASHActivate the license:
In VMmanager interface, go to
→ System information.- In the License key field enter the value of the license token.
- Click the Activate button.