VM management
Virtual machines are created on cluster nodes based on pre-defined templates of virtual machines (VM templates). For more information about VM templates refer to the article Create a virtual machine template.
Creating a virtual machine
To create and manage a virtual machine, navigate to Management → Virtual machines.
Main
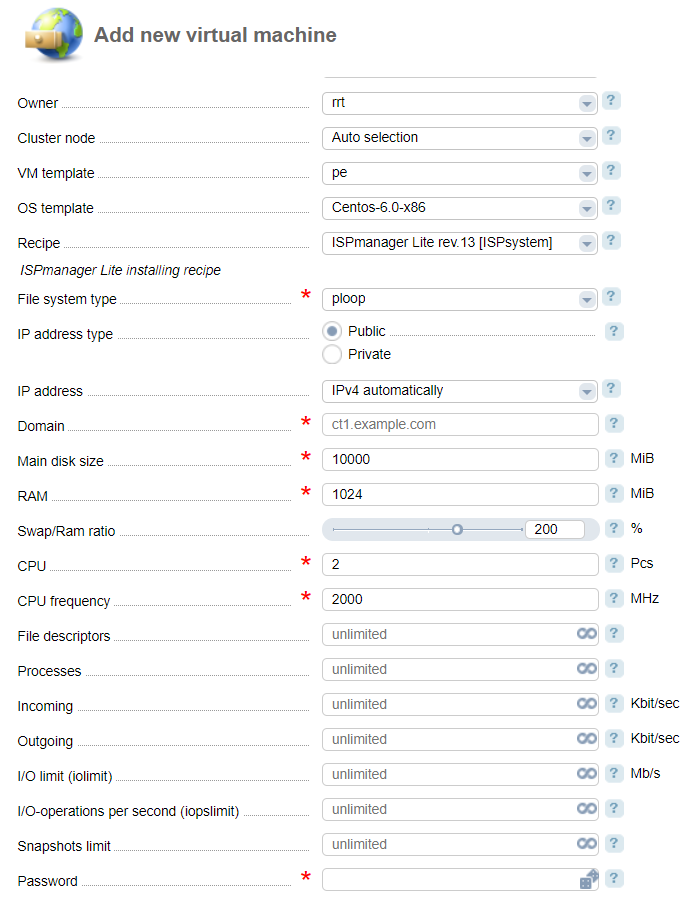
- Name;
- Owner;
- Cluster node — select a cluster node where the virtual machine will be created. By default a cluster node is selected automatically (for more details refer to the article Distribution of virtual machines between cluster nodes);
- VM template — select a template that a virtual machine will be based on;
- OS template - select a template of the operating system.
- Recipe — selected a recipe (script) that will be executed on the virtual machine after OS deployment. More information can be found under Recipes;
- File system:
- ploop — container file system is a part of the cluster node file system;
simfs — a disk image is created for locating the container file system.
- IP— address type:
- Public — can be accessed from the Internet;
- Private — cannot be accessed from the Internet;
- IP— address — allocation type: manually or automatically allocate one or several IP addresses;
- Domain — enter the domain name for the virtual machine;
- Main disk size - in MiB;
- RAM —in MiB;
- Swap/Ram ratio - specify the ratio between Swap and RAM in %. The recommended value is 200%;
- CPU - the number of CPU you want to allocate to the container (in MHz). The more the weight, the more CPU time is allocated to a container. Possible values: 8–500000;
- CPU frequency - processor frequency - CPU weight for the container;
- File descriptors - provide the maximum number of open file descriptors;
- Processes - provide the maximum number of processes that can run simultaneously;
- Incoming traffic- the limit on incoming traffic in Kbit/sec;
- Outgoing traffic - the limit on outgoing traffic in Kbit/sec;
- Snapshots — the maximum number of snapshots that a user can create for this virtual machine.
- Password - enter the superuser password.
- Confirmation - re-type the password to ensure it has been entered correctly.
- Enable TUN/TAP — select the checkbox to enable TUN/TAP in the virtual machine;
- Blocked - select the check box to protect the server from destructive actions. With this option selected, you cannot suspend, start, delete, reinstall, and delete IP addresses.
SSH keys
- Public SSH keys — enter public SSH keys that will be added to the operating system you are going to install.
Notes
- Notes — enter any information related to this virtual machine
After you have added the parameters, the OS deployment procedure will start (depending on the OS template or ISO-image you have selected before). Once completed, the virtual machine is ready to use.
VM management
Navigate to Management → Virtual machines.
Click on Convert to convert the VM file system from simfs into ploop.
Click on Compress to decrease the container size containing the VM file system;
Click on Migration to migrate the virtual machine to another cluster node. Learn more Migration of virtual machines;.
Click on Password to change the password of the virtual machine. This function is available only for Linux virtual machines which disks are located in any storage except for RBD. The method mount.linux is used for password change. The method uses the package guestfish.
How it works:
VMmanager stops the virtual machine and mounts the virtual disk:
guestmount -a <disk_image> -i <the path to the mount point>BASHVMmanager executes chroot:
mount -t proc proc <the path to the mount point>/proc mount -o bind /dev <the path to the mount point>/dev mount -o bind /sys <the path to the mount point>/sys chroot <the path to the mount point>BASHVMmanager changes the password:
usermod -p 'new-password' rootBASH- VMmanager executes unmount.
Click on IP addresses to manage the IP addresses of the virtual machine.
Click on Snapshots to create and manage VM snapshots. Learn more in Backup configuration;