This article describes how to install and configure the "User VLAN" module. The module allows users to place their servers in the VLANs that the administrator allowed for them. More information can be found under VLAN.
Installing and configuring the module
Navigate to Integration → Modules→ User VLAN → Install
After you have installed the module, the Install button will be changed into Settings.
- VID range for users — enter a range of identifiers (VLAN ID) that will be assigned to user VLAN. The start and the end range identifier must be entered with a hyphen, the ranges must be entered space separated. Eg. "1-15 29 50 333-400".
To allow a user to create VLAN, make sure the following requirements are met:
- The user must have permissions to create a VLAN. Navigate to Main→ Users→ Permissions→ Virtual networks (VLAN)→ On;
- Provide the number of VLANs that a user can create. Navigate to Main → Users→ Edit→ Number of VLAN.
Management options
Drill down to the user area and go to Main→ Virtual networks (VLAN)→ Add.
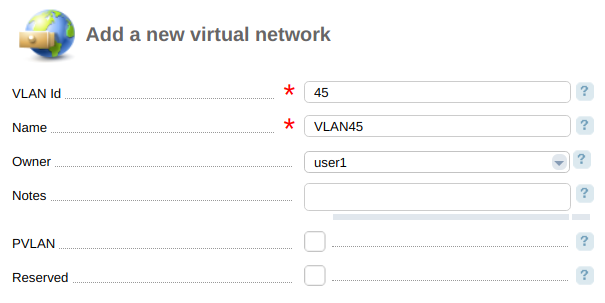
- VLAN id — virtual network numerical identifier. It must be included in the range specified in the module settings;
- Name;
- Owner — user who can use the VLAN on his servers. You can add the IP address to the server from the VLAN with the same owner or without an owner;
- Notes — additional information;
- PVLAN — mark this VLAN as a Private VLAN;
- Service — mark this VLAN as a service one. Such networks cannot be created on switches, add or delete from members of the trunk port.