This article describes how to install and use the "IPMI console" module. It allows users to download the IPMI console as the .jnlp file.
More information can be found under IPMI.
Installing and configuring the "IPMI console" module
Navigate to Integration → Modules → select IPMI console → Install.
After you have installed the module, the Install button will be changed into Settings.
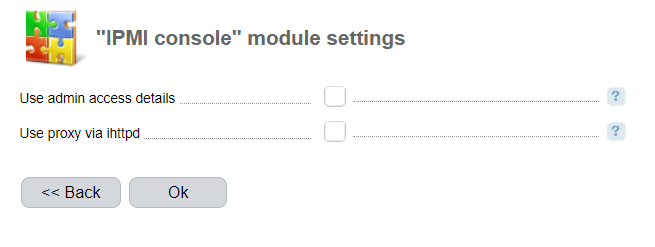
- Use admin access details — select the checkbox to allow server owners to use the admin's access data to upload the IPMI console. A new IPMI user won't be created for the server owner. The option is available starting from version 5.146;
- Use proxy via ihttpd — select the checkbox to upload the IPMI console that runs through ihttpd. The option is available starting from version 5.146.
Management options
Navigate to Main → Servers → IPMI console. Clicking the IPMI console button will send a request to establish the IPMI connection. If the administrator sent the request, the session will use the parameters specified in the connection configuration form. Otherwise, enable the Use admin access details option in the module configuration form.
Navigate to Integration → Modules → IPMI console → Install

- IPMI username;
- User level - define the user access permissions to the IPMI. They depend on the IPMI settings:
- Administrator — full permissions by default;
- Operator — read permissions in IP-KVM by default;
- User — server state view permissions by default;
- Allow the server owner to access IPMI - this option allows a server owner to gain the login and password of a new user. To see the login and password, move the mouse cursor over the icon
 in the Status column of the server list;
 - Password - user password.
When the session is established, the .jnlp file is downloaded. The files are kept in the /usr/local/mgr5/skins/common/ipmi_console/ directory. A random name is generated for the files. To open the file, double-click it or use the javaws utility.