YooKassa (New protocol)
To add YooKassa, you need to configure the settings on the payment gateway side and add the module in BILLmanager.
This module uses the new protocol, and we recommend that all new users configure it to accept payments from customers.
| Payment methods support | ||||
|---|---|---|---|---|
| Bank cards | Cash | E-wallets | Mobile payments | Online banking |
|
|
|
|
|
| Visa, Mastercard, Maestro, Mir, JCB. | Terminals, ATMs, bank cash desks. | QIWI Wallet, WebMoney, YooMoney. | Beeline, Megafon, MTS, Tele2. | Alpha-Click, Sberbank Online Fast money transfer system. |
| Supported features | ||||
| Payments return |
| |||
| Recurring payments |
| |||
| Subscriptions* |
| |||

* — to enable your clients to create subscriptions, when configuring integration with this payment method, choose Bank Card and/or YooMoney as the payment method. Subscriptions will not work for other payment methods.
Configuring the payment method
To configure YooKassa:
- Enter the client area or register at YooKassa website. Read more about how to register in YooKassa documentation.
In the client area, enter the section Integration → Ready-made solutions.
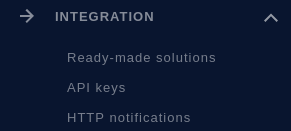
"Integration" section in YooKassa client area

Note:
To be able to select integration with BILLmanager in this section, specify the address of BILLmanager in the section Contract → Payments acceptance.
Select BILLmanager from "Your system" list and press Save.

Selection of BILLmanager payment module on the YooKassa side
The parameters required for integration with BILLmanager will appear in your client area:
- in the section Settings → Store — shopId;
- in the section Integration → API keys — secret key.
ShopId — the unique store ID in YooKassa system used to configure integration on BILLmanager side.
Secret key — the secret key of the store used to configure integration on BILLmanager side.
Configuring recurring payments on the Yookassa side
Note:
Recurring payments in BILLmanager will not work if they are not configured on the Yookassa side.
To set up recurring payments in Yookassa, you need to:
- Write a message to the Yookassa manager from your Client area. To do this, click on the operator icon in the upper right corner.
- In the Problem solving section, write a message. For example: "I want to connect recurring payments. How do I do it?"
- The answer from the Yookassa manager with instructions for further action will be sent to your email.
As a rule, you will be asked to send a screenshot of your website showing how the client can unlink their card. To create such a screenshot:
- Create a test client in your BILLmanager.
- Log in to BILLmanager with that user's permissions.
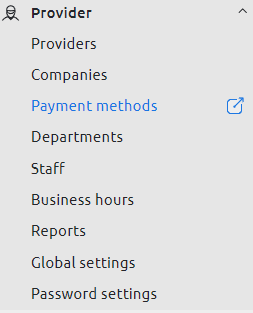
Enter the client area settings → Payment methods.
- Save the test bank card. Read more about how to save and delete a bank card in BILLmanager, in Payment methods1.
- Create a screenshot that will show:
the possibility to unlink the payment method;
the browser address line.
Configuring BILLmanager
Navigate to Provider → Payment method and complete the following fields:
Step 1 — Select a payment method — choose "YooKassa".
Step 2 — Integration settings. Enter the integration details.
Step 3 — Payment method settings. Enter the payment method parameters.
Integration
- Shop id — enter your ShopId.
- Secret key — enter your Secret Key.
- Payment method — select one or more payment methods available for this payment module;
- Recurring payments — select the check box to enable recurring payments. Recurring payments are used in BILLmanager for Account automatic replenishment or to create Subscriptions. If the flag is active, specify the following:
- Return page for a successful auto payment — a link to return from your YooKassa client area after a successful configuration of auto payment. Use the BILLmanager page https://domain.com/billmgr?func=payment.recurring.success or an arbitrary page;
- Return page for an unsuccessful auto payment — a link to return from your YooKassa client area after an unsuccessful configuration of auto payment. Use the BILLmanager page https://domain.com/billmgr?func=payment.recurring.fail or a discretionary page;
Return page for an auto payment configuration in progress — a link to return from your YooKassa client area the configuration of the auto payment is in progress. Use the BILLmanager page https://domain.com/billmgr?func=payment.pending or a discretionary page.
Commentsdomain.com — domain name or public IP address of the server with BILLmanager.
Note:
Sending receipts is mandatory for payment. Enter Provider → Payment methods → Edit → Online receipt sending settings block and select the Receipt sending method — "Receipts are sent by the payment system".
On the edit form of the newly created payment gateway you can check the Allow refund box to enable refunds.
Redirecting after payment
This payment method supports the function for redirecting the customer after payment to a discretionary page. Use different pages depending on the success of the payment. For example, BILLmanager pages:
- for a successful payment: https://domain.com/billmgr?func=payment.success;
- for an unsuccessful payment: https://domain.com/billmgr?func=payment.fail;
for payments in progress: https://domain.com/billmgr?func=payment.pending.
Commentsdomain.com — domain name or public IP address of the server with BILLmanager.
To specify return pages when creating a payment method, go to step three and fill in the fields Successful payment return page , Failed payment return page and . You can also specify them after creating the payment method in Provider → Payment methods → Edit → Settings block.
Payments refunds
To permit refund of payments:
- Complete the creation of the payment method.
- Enter Provider → Payment methods → Edit → Refunds block.
- Enable the Allow payment refunds option and press Ok to save your settings.
Logging
YooKassa has the following log files:
- /usr/local/mgr5/var/pmyandexcheckout.log — configuration details of the payment method;
- /usr/local/mgr5/var/ycpayment.log — payment log;
- /usr/local/mgr5/var/ycrecurring.log — recurring payments;
- /usr/local/mgr5/var/ycresult.log — responses from the payment gateway.